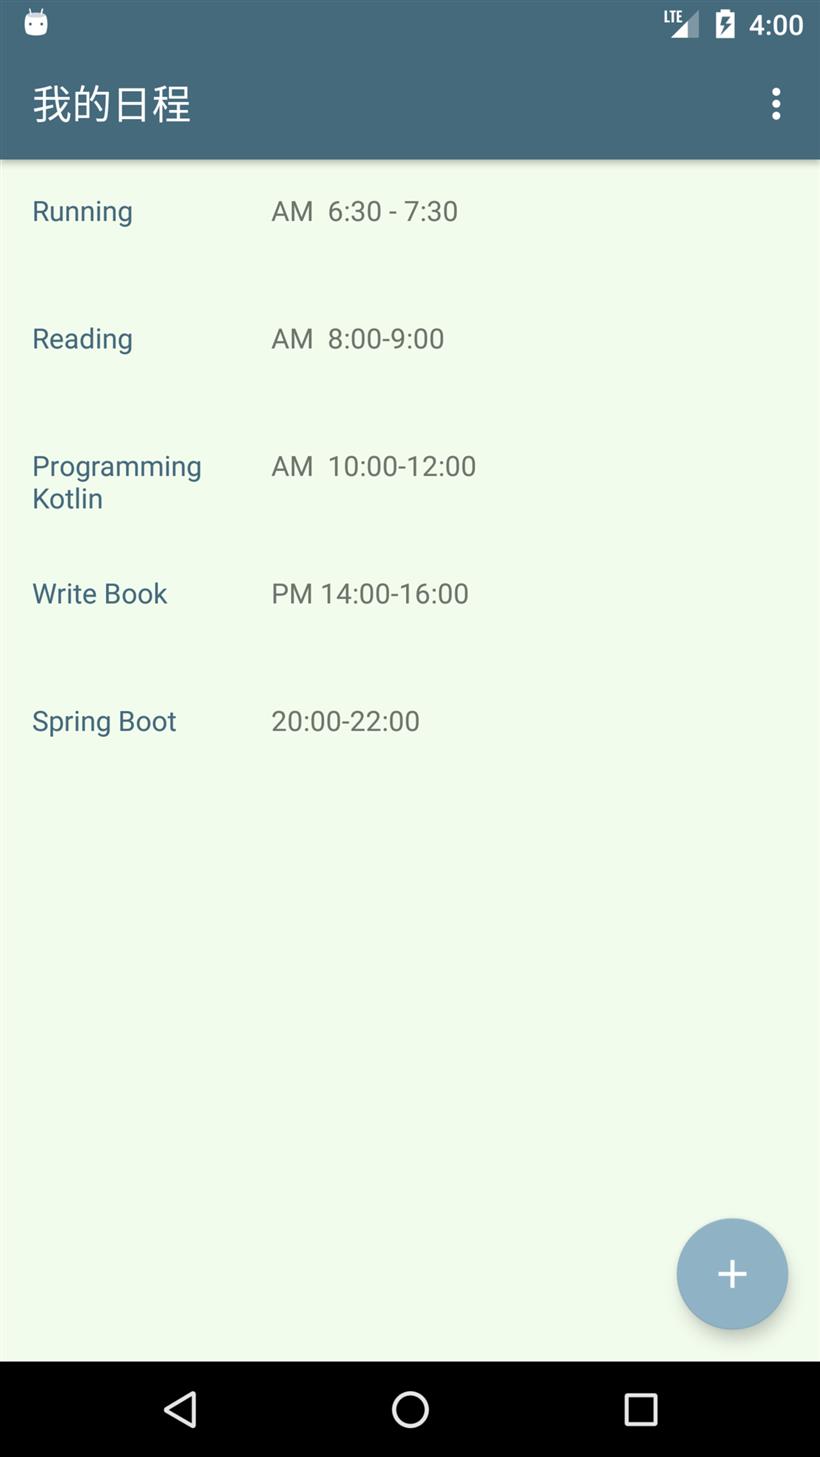
下面我们来实现这个页面。

首先,这个是主页面,对应 activity_main.xml 视图, 文件内容如下:
<?xml version="1.0" encoding="utf-8"?>
<android.support.design.widget.CoordinatorLayout
    xmlns:android="http://schemas.android.com/apk/res/android"
    xmlns:app="http://schemas.android.com/apk/res-auto"
    xmlns:tools="http://schemas.android.com/tools"
    android:layout_width="match_parent"
    android:layout_height="match_parent"
    android:fitsSystemWindows="true"
    tools:context="com.easy.kotlin.mytodoapplication.MainActivity">
    <android.support.design.widget.AppBarLayout
        android:layout_width="match_parent"
        android:layout_height="wrap_content"
        android:theme="@style/AppTheme.AppBarOverlay">
        <android.support.v7.widget.Toolbar
            android:id="@+id/toolbar"
            android:layout_width="match_parent"
            android:layout_height="?attr/actionBarSize"
            android:background="?attr/colorPrimaryDark"
            app:popupTheme="@style/AppTheme.PopupOverlay" />
    </android.support.design.widget.AppBarLayout>
    <include layout="@layout/content_main" />
    <android.support.design.widget.FloatingActionButton
        android:id="@+id/fab"
        android:layout_width="wrap_content"
        android:layout_height="wrap_content"
        android:layout_gravity="bottom|end"
        android:layout_margin="@dimen/fab_margin"
        app:srcCompat="@drawable/ic_content_add" />
</android.support.design.widget.CoordinatorLayout>
我们的待办事项列表视图是fragment_todos.xml, 文件内容如下:
<RelativeLayout xmlns:android="http://schemas.android.com/apk/res/android"
    xmlns:app="http://schemas.android.com/apk/res-auto"
    xmlns:tools="http://schemas.android.com/tools"
    android:layout_width="match_parent"
    android:layout_height="match_parent"
    android:paddingBottom="@dimen/activity_vertical_margin"
    android:paddingLeft="@dimen/activity_horizontal_margin"
    android:paddingRight="@dimen/activity_horizontal_margin"
    android:paddingTop="@dimen/activity_vertical_margin"
    tools:context=".TodosFragment"
    tools:showIn="@layout/activity_main">
    <co.moonmonkeylabs.realmrecyclerview.RealmRecyclerView
        android:id="@+id/todos_recycler_view"
        android:layout_width="match_parent"
        android:layout_height="match_parent"
        app:rrvEmptyLayoutId="@layout/empty_view"
        app:rrvIsRefreshable="false"
        app:rrvLayoutType="LinearLayout" />
</RelativeLayout>
我们看下RealmRecyclerView的配置:
|
配置项
|
功能说明
|
|
app:rrvEmptyLayoutId
|
当列表为空的时候的显示页面
|
|
app:rrvIsRefreshable
|
是否支持下拉刷新,通过setOnRefreshListener 或 setRefreshing来进行事件处理
|
|
app:rrvLayoutType
|
配置LayoutManager,可选项是:LinearLayout,Grid,LinearLayoutWithHeaders等
|
下面我们来实现这个TodosFragment 。
首先新建TodosFragment类,继承如下面代码所示:
class TodosFragment : Fragment(), TodoAdapter.TodoItemClickListener {
    @BindView(R.id.todos_recycler_view)
    lateinit var realmRecyclerView: RealmRecyclerView
    private var realm: Realm? = null
    ...
}
其中,TodoAdapter是继承了RealmBasedRecyclerViewAdapter的适配器类。我们在 TodoAdapter 里面定义了一个视图持有类:
inner class ViewHolder(view: View, private val clickListener: TodoItemClickListener?) :
        RealmViewHolder(view), View.OnClickListener {
    // Bind a field to the view for the specified ID. The view will automatically be cast to the field type
    @BindView(R.id.todo_item_todo_title)
    lateinit var todoTitle: TextView
    // val todoTitle: TextView by bindView(R.id.todo_item_todo_title)
    @BindView(R.id.todo_item_todo_content)
    lateinit var todoContent: TextView
    // val todoContent: TextView by bindView(R.id.todo_item_todo_content)
    init {
        // Bind annotated fields and methods
        ButterKnife.bind(this, view)
        view.setOnClickListener(this)
    }
    override fun onClick(v: View) {
        clickListener?.onClick(v, realmResults[adapterPosition])
    }
}
在ViewHolder初始化 View 的时候,我们使用ButterKnife进行了绑定
init {
    // Bind annotated fields and methods
    ButterKnife.bind(this, view)
    view.setOnClickListener(this)
}
待办事项监听器类:
interface TodoItemClickListener {
    fun onClick(caller: View, todo: Todo)
}
我们在TodosFragment中实现这个方法:
override fun onClick(caller: View, todo: Todo) {
    (activity as MainActivity).hideFab()
    val todoEditFragment = TodoEditFragment.newInstance(todo.id)
    activity.supportFragmentManager
            .beginTransaction()
            .replace(R.id.content_main, todoEditFragment, todoEditFragment.javaClass.getSimpleName())
            .addToBackStack(todoEditFragment.javaClass.getSimpleName())
            .commit()
}
点击待办事项,把当前的content_main切换成编辑事项 EditFragment的视图。
然后我们在TodoAdapter中重写RealmBasedRecyclerViewAdapter的onCreateRealmViewHolder和onBindRealmViewHolder方法。
override fun onCreateRealmViewHolder(viewGroup: ViewGroup, viewType: Int): ViewHolder {
    val v = inflater.inflate(R.layout.todo_item, viewGroup, false)
    return ViewHolder(v, clickListener)
}
override fun onBindRealmViewHolder(viewHolder: ViewHolder, position: Int) {
    val todo = realmResults[position]
    viewHolder.todoTitle.setText(todo.title)
    viewHolder.todoTitle.fontFeatureSettings = "font-size:12px"
    viewHolder.todoTitle.setTextColor(Color.argb(255, 69, 106, 124))
    viewHolder.todoContent.setText(todo.content)
}
我们在添加(保存)完事项的时候,回到之前的列表页面:
private fun createTodoFrom(title: EditText, todoContent: EditText) {
    realm.beginTransaction()
    // Either update the edited object or create a new one.
    var t = todo ?: realm.createObject(Todo::class.java)
    t.id = todo?.id ?: UUID.randomUUID().toString()
    t.title = title.text.toString()
    t.content = todoContent.text.toString()
    realm.commitTransaction()
    activity.supportFragmentManager.popBackStack()
}
当回退到待办事项列表的时候,我们在TodosFragment中的 onResume() 函数中来实现数据的更新展示:
override fun onResume() {
    super.onResume()
    val todos = realm!!.where(Todo::class.java).findAll()
    Log.i(MY_TAG, "onResume: ${todos}")
    Log.i(MY_TAG, "onResume: realmRecyclerView = ${realmRecyclerView} ")
    val adapter = TodoAdapter(activity, todos, true, true, this)
    realmRecyclerView.setAdapter(adapter)
}
其中,val todos = realm!!.where(Todo::class.java).findAll() 是去 Realm 数据库中查询出所有Todo对应的实体记录。
然后,通过适配器val adapter = TodoAdapter(activity, todos, true, true, this)把数据装配到RecyclerView中 realmRecyclerView.setAdapter(adapter) 。


