- 联系我们
- duidaima.com 版权声明
- 闽ICP备2020021581号
-
 闽公网安备 35020302035485号
闽公网安备 35020302035485号


// 堆代码 duidaima.com
using System.Diagnostics;
var app = WebApplication.Create(args);
app.Run(context => context.Response.WriteAsync(
    Process.GetCurrentProcess().ProcessName));
app.Run();
然后我们在Visual Studio的解决方案视图右键选择该项目,在弹出的菜单中选择“发布(Publish)”选项,创建一个指向“C:\App”的Publish Profile,然后执行这个Profile完成发布工作。应用发布也可以执行命令行“dotnet publish”来完成。应用部署好之后,我们利用浏览器采用地址“http://localhost/webapp”访问部署好的应用,从图2所示的输出结果可以看出ASP.NET CORE应用实际上就运行在IIS的工作进程中。
<?xml version="1.0" encoding="utf-8"?>
<configuration>
  <location
    path="."
    inheritInChildApplications="false">
    <system.webServer>
      <handlers>
        <add
          name="aspNetCore"
          path="*"
          verb="*"
          modules="AspNetCoreModuleV2"
          resourceType="Unspecified" />
      </handlers>
      <aspNetCore
          processPath="dotnet"
          arguments=".\App.dll"
          stdoutLogEnabled="false"
          stdoutLogFile=".\logs\stdout"
          hostingModel="inprocess" />
    </system.webServer>
  </location>
</configuration>
<!--ProjectGuid: 243DF55D-2E11-481F-AA7A-141C2A75792D-->
In-Process模式会注册如下这个IISHttpServer,对应的配置选项定义在IISServerOptions中。如果具有同步读写请求和响应主体内容的需要,我们需要将AllowSynchronousIO属性(默认为False)设置为True。如果将AutomaticAuthentication属性返回True(默认值),认证用户将自动赋值给HttpContext上下文的User属性。我们可以利用MaxRequestBodyBufferSize(默认为1,048,576)和MaxRequestBodySize属性(默认为30,000,000)设置接收请求主体的缓冲区的容量,和最大请求主体的字节数。internal class IISHttpServer
: IServer, IDisposable
{
public IFeatureCollection Features { get; }
public IISHttpServer(
IISNativeApplication nativeApplication,
IHostApplicationLifetime applicationLifetime,
IAuthenticationSchemeProvider authentication,
IOptions<IISServerOptions> options,
ILogger<IISHttpServer> logger);
public unsafe Task StartAsync<TContext>(
IHttpApplication<TContext> application,
CancellationToken cancellationToken);
public Task StopAsync(
CancellationToken cancellationToken);
}
public class IISServerOptions
{
public bool AllowSynchronousIO { get; set; }
public bool AutomaticAuthentication { get; set; }
public string? AuthenticationDisplayName { get; set; }
public int MaxRequestBodyBufferSize { get; set; }
public long? MaxRequestBodySize { get; set; }
}
针对IISHttpServer的注册实现在IWebHostBuilder接口如下这个UseIIS扩展方法中。由于这个方法并没有提供一个Action<IISServerOptions>委托参数对IISServerOptions配置选项进行设置,所以我们不得不采用原始的对它进行设置。由于IHostBuider接口ConfigureWebHostDefaults扩展方法内部会调用这个方法, 我们并不需要为此做额外的工作。public static class WebHostBuilderIISExtensions
{
public static IWebHostBuilder UseIIS(
this IWebHostBuilder hostBuilder);
}
三、Out-of-Process部署模式
<?xml version="1.0" encoding="utf-8"?>
<configuration>
  <location
    path="."
    inheritInChildApplications="false">
    <system.webServer>
      <handlers>
        <add
          name="aspNetCore"
          path="*"
          verb="*"
          modules="AspNetCoreModuleV2"
          resourceType="Unspecified" />
      </handlers>
      <aspNetCore
          processPath="dotnet"
          arguments=".\App.dll"
          stdoutLogEnabled="false"
          stdoutLogFile=".\logs\stdout"
          hostingModel="outofprocess" />
    </system.webServer>
  </location>
</configuration>
<!--ProjectGuid: 243DF55D-2E11-481F-AA7A-141C2A75792D-->
我们在上面演示了In-Process的部署方式,现在我们直接修改配置文件web.config,按照上面的方式将<aspNetCore>配置节的hostingModel属性设置为“outofprocess”,部署的应用就自动切换到Out-of-Process。此时再次以相同的方式访问部署的应用,我们会发现浏览器上显示的进程名称变成了“dotnet”。
<Project Sdk="Microsoft.NET.Sdk.Web">
    <PropertyGroup>
        <TargetFramework>net6.0</TargetFramework>
        <Nullable>enable</Nullable>
        <ImplicitUsings>enable</ImplicitUsings>
        <NoDefaultLaunchSettingsFile>true</NoDefaultLaunchSettingsFile>
        <AspNetCoreHostingModel>OutOfProcess</AspNetCoreHostingModel>
   </PropertyGroup>
</Project>
为了进一步验证上述的这一系列环境变量是否存在,如下所示的演示程序会将以“ASPNETCORE_”为前缀的环境变量作为响应内容输出来。除此之外,作为响应输出的还有进程名称、请求的PathBase和“MS-ASPNETCORE-TOKEN”报头。using System.Diagnostics;
using System.Text;
var app = WebApplication.Create(args);
app.Run(HandleAsync);
app.Run();
Task HandleAsync(HttpContext httpContext)
{
var request = httpContext.Request;
var configuration = httpContext.RequestServices
.GetRequiredService<IConfiguration>();
var builder = new StringBuilder();
builder.AppendLine(
$"Process: {Process.GetCurrentProcess().ProcessName}");
builder.AppendLine(
$"MS-ASPNETCORE-TOKEN: {request.Headers["MS-ASPNETCORE-TOKEN"]}");
builder.AppendLine(
$"PathBase: {request.PathBase}");
builder.AppendLine("Environment Variables");
foreach (string key in
Environment.GetEnvironmentVariables().Keys)
{
if (key.StartsWith("ASPNETCORE_"))
{
builder.AppendLine(
$"\t{key}={Environment.GetEnvironmentVariable(key)}");
}
}
return httpContext.Response
.WriteAsync(builder.ToString());
}
应用重新发布之后,再次利用浏览器访问后回得到如图5所示的结果。我们可以从这里找到上述的环境变量,请求携带的“MS-ASPNETCORE-TOKEN”报头正好与对应环境变量的值一致,应用在IIS中的虚拟目录作为了应用路径被写入环境变量并成为请求的PathBase。如果站点提供了HTTPS终结点,其端口还会写入“ASPNETCORE_ANCM_HTTPS_PORT”这个环境变量,这是为了实现针对HTTPS终结点的重定向而设计的。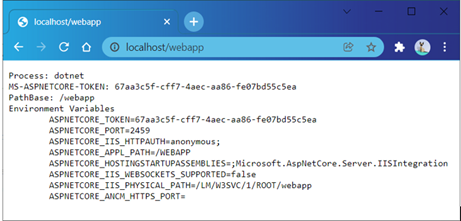
public class IISMiddleware
{
    public IISMiddleware(
        RequestDelegate next,
        ILoggerFactory loggerFactory,
        IOptions<IISOptions> options,
        string pairingToken,
        IAuthenticationSchemeProvider authentication,
        IHostApplicationLifetime applicationLifetime);
    public IISMiddleware(
        RequestDelegate next,
        ILoggerFactory loggerFactory,
        IOptions<IISOptions> options,
        string pairingToken,
        bool isWebsocketsSupported,
        IAuthenticationSchemeProvider authentication,
        IHostApplicationLifetime applicationLifetime);
    public Task Invoke(HttpContext httpContext);
    public Task Invoke(HttpContext httpContext)
}
public class IISOptions
{
    public bool AutomaticAuthentication { get; set; }
    public string? AuthenticationDisplayName { get; set; }
    public bool ForwardClientCertificate { get; set; }
}
IIS利用WAS根据请求激活工作进程w3wp.exe。如果站点长时间未曾访问,它还会自动关闭工作进程。如果工作进程都关闭了,承载ASP.NET CORE应用的dotnet.exe进程自然也应该关闭。为了关闭应用承载进程,ASP.NET CORE Core Module会发送一个特殊的请求,该请求携带一个值为“shutdown”的“MS-ASPNETCORE-EVENT”报头,IISMiddleware中间件在接收到该请求时会利用注入的IHostApplicationLifetime对象关闭当前应用。
如果不支持WebSocket,该中间件还会将代表“可升级到双向通信”的IHttpUpgradeFeature特性删除。将应用路径设置为请求的PathBase也是由这个中间件完成的。由于IISMiddleware中间件所作的实际上是对HttpContext上下文进行初始化的工作,所以它必须优先执行才有意义,为了将此中间件置于管道的前端,如下这个IISSetupFilter被定义出来完成对该中间件的注册。
internal class IISSetupFilter : IStartupFilter
{
    internal IISSetupFilter(
        string pairingToken,
        PathString pathBase,
        bool isWebsocketsSupported);
    public Action<IApplicationBuilder> Configure(
        Action<IApplicationBuilder> next);
}
IISSetupFilter最终是通过IWebHostBuilder接口如下这个UseIISIntegration扩展方法进行注册的。这个方法还负责从当前配置和环境变量提取端口号,并完成监听地址的注册。由于KestrelServer默认会选择注册到服务器上的终结点,所以该方法会利用配置将IServerAddressesFeature特性的PreferHostingUrls属性设置为True,这里设置的监听地址才会生效。这个方法还会根据当前IIS站点的设置对IISOptions作相应设置。由于IHostBuider接口ConfigureWebHostDefaults扩展方法内部也会调用这个方法,我们并不需要为此做额外的工作。public static class WebHostBuilderIISExtensions
{
public static IWebHostBuilder UseIISIntegration(
this IWebHostBuilder hostBuilder);
}
四、<aspnetcore>配置<aspNetCore
processPath = "dotnet"
arguments = ".\App.dll"
stdoutLogEnabled = "false"
stdoutLogFile = ".\logs\stdout"
hostingModel = "outofprocess"
forwardWindowsAuthToken = "true"
processesPerApplication = "10"
rapidFailsPerMinute = "5"
requestTimeout = "00:02:00"
shutdownTimeLimit = "60"
startupRetryCount = "3"
startupTimeLimit = "60">
<environmentVariables>
<environmentVariable name = "ASPNETCORE_ENVIRONMENT" value = "Development"/>
</environmentVariables>
<handlerSettings>
<handlerSetting name = "stackSize" value = "2097152" />
<handlerSetting name = "debugFile" value = ".\logs\aspnetcore-debug.log" />
<handlerSetting name = "debugLevel" value = "FILE,TRACE" />
</handlerSettings>
</aspNetCore>
上面这段XML片段包含了完整的<aspNetCore>配置属性,下表对这些配置进行了简单的说明。设置的文件可以采用绝对路径和相对于部署目录(通过 “.”表示)的相对路径。
|
属性 |
含 义 |
|
processPath |
ASP.NET CORE应用启动命令所在路径,必需。 |
|
arguments |
ASP.NET CORE应用启动传入的参数,可选。 |
|
stdoutLogEnabled |
是否将stdout 和stderr输出到 stdoutLogFile属性指定的文件,默认为False。 |
|
stdoutLogFile |
作为stdout 和stderr输出的日志文件,默认为“ aspnetcore-stdout”。 |
|
hostingModel |
部署模式,“inprocess/InProcess”或者“outofprocess/OutOfProcess”(默认值)。 |
|
forwardWindowsAuthToken |
是否转发Windows认证令牌,默认为True。 |
|
processesPerApplication |
承载ASP.NET CORE应用的进程( processPath)数,默认为1。该配置对In-Process模式无效。 |
|
rapidFailsPerMinute |
ASP.NET CORE应用承载进程( processPath)每分钟允许崩溃的次数,默认为10,超过此数量将不再试图重新启动它。 |
|
requestTimeout |
请求处理超时时间,默认为2分钟。 |
|
startupRetryCount |
ASP.NET CORE应用承载进程启动重试次数,默认为2次。 |
|
startupTimeLimit |
ASP.NET CORE应用承载进程启动超时时间(单位为秒),默认为120秒。 |
|
environmentVariables |
设置环境变量。 |
|
handlerSettings |
为ASP.NET CORE Core Module提供额外的配置。 |