- 联系我们
- duidaima.com 版权声明
- 闽ICP备2020021581号
-
 闽公网安备 35020302035485号
闽公网安备 35020302035485号

Cookie 认证是ASP.NET Core用来实现客户自定义认证逻辑,没有使用ASP.NET Core Identity 。
using Microsoft.AspNetCore.Authentication.Cookies;
var builder = WebApplication.CreateBuilder(args);
// 堆代码 duidaima.com
// Add services to the container.
builder.Services.AddControllersWithViews();
builder.Services.AddAuthentication(CookieAuthenticationDefaults.AuthenticationScheme)
.AddCookie(options =>
{
options.LoginPath = "/Home/Login";
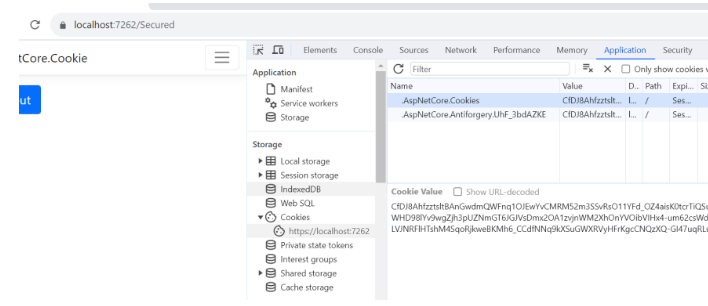
options.Cookie.Name = ".AspNetCore.Cookies";
options.ExpireTimeSpan = TimeSpan.FromMinutes(10);
options.SlidingExpiration = true;
});
var app = builder.Build();
在上面代码我们在AddAuthentication()方法中使用CookieAuthenticationDefaults.AuthenticationScheme参数设置应用程序默认认证方法。这意味着登录成功后将为通过身份验证的用户创建一个cookie,这个cookie名字为.ASPNetCore.Cookies 。options.LoginPath = "/Home/Login";这意味着如果一个未授权的用户尝试访问应用程序安全的URL时将会被自动跳转到/Home/Login, 在登录页面输入用户名和密码进行授权。
app.UseRouting();
app.UseAuthentication();
app.UseAuthorization();
app.MapControllerRoute(
    name: "default",
    pattern: "{controller=Home}/{action=Index}/{id?}");
app.Run();
调用UseAuthentication& UseAuthorization()方法。
现在我们在ASP.NET Core 应用程序中使用Cookie认证,在这个应用程序创建2个Controllers。
在Home控制器我们有Login和Logout特性,使用Login特性,用户能够登录应用程序,使用Logout特性用户能够退出应用程序。
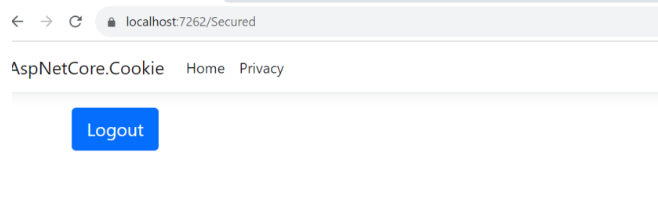
Secured控制器能只允许登录的用户进行访问,这个控制器有[Authorize]特性。创建一个Controller叫SecuredController.cs,添加[Authorize]特性,所有控制器内部的方法都继承了authorize特性,这意味着所有的action方法只允许授权的用户访问。
using Microsoft.AspNetCore.Authorization;
using Microsoft.AspNetCore.Mvc;
namespace AspNetCore.Cookie.Controllers
{
    [Authorize]
    public class SecuredController : Controller
    {
        public IActionResult Index()
        {
            return View();
        }
    }
}
接下来,使用下面代码创建Index试图在Views->Secured文件夹。<form method="post" asp-controller="Home" asp-action="Logout">
<button class="btn btn-lg btn-primary btn-block">Logout</button>
</form>
这个视图表单有一个button按钮,当button点击时,Home控制器Logout方法被调用,当前用户会退出系统。
using AspNetCore.Cookie.Models;
using Microsoft.AspNetCore.Authentication.Cookies;
using Microsoft.AspNetCore.Authentication;
using Microsoft.AspNetCore.Mvc;
using System.Diagnostics;
using System.Security.Claims;
namespace AspNetCore.Cookie.Controllers
{
    public class HomeController : Controller
    {
        private readonly ILogger<HomeController> _logger;

        public HomeController(ILogger<HomeController> logger)
        {
            _logger = logger;
        }
        public IActionResult Index()
        {
            return View();
        }
        public IActionResult Login()
        {
            return View();
        }
        public async Task<IActionResult> Login(string username, string password, string ReturnUrl)
        {
            if ((username == "Admin") && (password == "Admin"))
            {
                var claims = new List<Claim>
                {
                    new Claim(ClaimTypes.Name, username)
                };
                var claimsIdentity = new ClaimsIdentity(claims, "Login");
                await HttpContext.SignInAsync(CookieAuthenticationDefaults.AuthenticationScheme, new ClaimsPrincipal(claimsIdentity));
                return Redirect(ReturnUrl == null ? "/Secured" : ReturnUrl);
            }
            else
                return View();
        }
        public IActionResult Privacy()
        {
            return View();
        }

        [ResponseCache(Duration = 0, Location = ResponseCacheLocation.None, NoStore = true)]
        public IActionResult Error()
        {
            return View(new ErrorViewModel { RequestId = Activity.Current?.Id ?? HttpContext.TraceIdentifier });
        }
    }
}
Login方法使用了string username, string password, string ReturnUrl在参数中,首先进行检查以确定用户的用户名和密码是否都是管理员用户名和密码,在真实环境中,我们将从数据库中获取用户名和密码与用户输入的用户名和密码进行匹配,在这里为了方便我们使用静态的用户名和密码。if ((username == "Admin") && (password == "Admin"))
{
//…
}
接下来,对用户进行授权,使用用户信息创建一个Cookie,构造一个ClaimsPrincipal序列化用户信息并储到Cookie。var claims = new List<Claim>
{
new Claim(ClaimTypes.Name, username)
};
var claimsIdentity = new ClaimsIdentity(claims, "Login");
调用SignInAsync()方法对用户进行登录,它使用2个参数:2.ClaimsPrincipal
await HttpContext.SignInAsync(CookieAuthenticationDefaults.AuthenticationScheme, new ClaimsPrincipal(claimsIdentity));用户登录之后,用户跳转return URL
return Redirect(ReturnUrl == null ? "/Secured" : ReturnUrl);现在,在Home文件夹下创建一个Login视图文件代码如下:
<form class="form-horizontal" action="login" role="form" method="post">
    <div class="mb-3 row">
        <label class="col-sm-1 control-label">用户名</label>
        <div class="col-sm-11">
            <input name="username" class="form-control" />
        </div>
    </div>
    <div class="mb-3 row">
        <label class="col-sm-1 control-label">密码</label>
        <div class="col-sm-11">
            <input name="password" type="password" class="form-control" />
        </div>
    </div>
    <div class="mb-3 row">
        <div class="col-sm-11 offset-sm-1">
            <button type="submit" class="btn btn-primary">登录</button>
        </div>
    </div>
</form>
builder.Services.AddAuthentication(CookieAuthenticationDefaults.AuthenticationScheme)
            .AddCookie(options =>
            {
                options.LoginPath = "/Home/Login";
                options.Cookie.Name = ".AspNetCore.Cookies";
                options.ExpireTimeSpan = TimeSpan.FromMinutes(10);
                options.SlidingExpiration = true;
            });
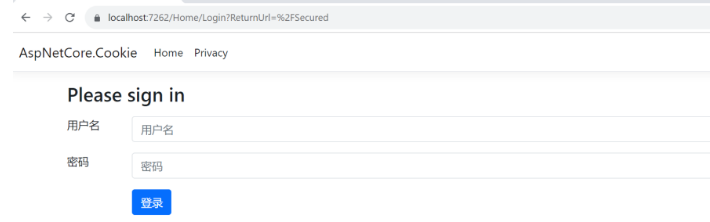
当我们在浏览器中打开secured地址,页面会跳转到https://localhost:7262/Home/Login?ReturnUrl=%2FSecured,注意查询字符串值包含Return url, 当我们登录成功之后,应用程序将跳转到这个url 。
[HttpPost]
public async Task<IActionResult> Logout()
{
    await HttpContext.SignOutAsync();
    return RedirectToAction("Index", "Home");
}
调用SignOutAsync()方法退出当前用户,这个方法从浏览器中移除认证Cookie。