- 联系我们
- duidaima.com 版权声明
- 闽ICP备2020021581号
-
 闽公网安备 35020302035485号
闽公网安备 35020302035485号

今天介绍一款基于.NET的进程间数据交互经典解决方案-管道(Pipes),仅供学习分享使用,如有不足之处,还请指正。
管道概述
在C#中,管道(Pipes)是一种进程间通信(IPC)机制,允许不同进程进行数据传输,位于System.IO.Pipes命名空间。C#提供了两种类型的管道:匿名管道和命名管道,分别适用于不同场景:
1.匿名管道:匿名管道在本地计算机上提供进程间通信。 它们提供的功能比命名管道少,但也需要更少的开销。 可以使用匿名管道来简化本地计算机上的进程间通信。 不能使用匿名管道通过网络进行通信。
2.命名管道:命名管道提供管道服务器与一个或多个管道客户端之间的进程间通信。 它们提供的功能比匿名管道更多,这些管道在本地计算机上提供进程间通信。 命名管道支持通过网络和多个服务器实例、基于消息的通信和客户端模拟进行全双工通信,这样连接进程就可以在远程服务器上使用自己的权限集。
匿名管道
匿名管道功能比较少,具有如下特点:
1.匿名管道只能在单一计算机上进行通信,不能跨服务器进行通信。
2.匿名管道只适于父子进程,不适于两个相关独立无任何关系的进程。
3.匿名管道只支持单向传输,不支持双向传输。
匿名管道通过AnonymousPipeServerStream实现服务端,AnonymousPipeClientStream实现客户端,服务端和客户端可以分别进行接收(PipeDirection.In)或输出数据(PipeDirection.Out),但不是既接收又发送数据(PipeDirection.InOut)。
服务端
在本实例中,服务端是一个WinForm可执行程序【DemoAnonymousPipeServer】,用于接收客户端发送的数据,首先定义一个AnonymousPipeServer类,用于封装匿名管道服务端(AnonymousPipeServerStream)的操作。如下所示:
using System.IO.Pipes;
namespace DemoPipe.Common
{
    /// <summary>
    /// 匿名管道帮助类
    /// </summary>
    public class AnonymousPipeServer:IDisposable
    {
        private AnonymousPipeServerStream pipeServerStream;
        private CancellationTokenSource cts;
        private CancellationToken token;
        public Action<string> Received;
        private string clientHandle;
        public string ClientHandle
        {
            get { return clientHandle; }
            set { clientHandle = value; }
        }

        private Task receiveTask;
        public AnonymousPipeServer()
        {
            pipeServerStream = new AnonymousPipeServerStream(PipeDirection.In, HandleInheritability.Inheritable);
            this.clientHandle = pipeServerStream.GetClientHandleAsString();
            cts = new CancellationTokenSource();
            token = cts.Token;
        }

        public void BeginReceive()
        {
            receiveTask = Task.Run(() =>
            {
                using (StreamReader sr = new StreamReader(pipeServerStream))
                {
                    while (!token.IsCancellationRequested)
                    {
                        try
                        {
                            string? msg = sr.ReadLine();
                            if (!string.IsNullOrEmpty(msg))
                            {
                                Received?.Invoke($"[{ClientHandle}]{msg}");
                            }
                        }
                        catch (Exception ex)
                        {
                            Console.WriteLine(ex.Message);
                            Console.WriteLine(ex.StackTrace);
                        }
                        finally
                        {
                            Task.Delay(500);
                        }
                    }
                }
            });
        }
        /// <summary>
        /// 资源释放
        /// </summary>
        public void Dispose()
        {
            this.cts.Cancel();
            if (pipeServerStream != null)
            {
                pipeServerStream.DisposeLocalCopyOfClientHandle();
                pipeServerStream.Close();
                pipeServerStream.Dispose();
            }
        }
    }
}
在上述代码中,服务端通过StreamReader实现对流的读取,用于不断的接收数据,如接收到数据,则调用输出的Received委托方法。接下来,FrmMain页面实例化AnonymousPipeServer,并订阅Received委托方法,当接收到数据时,触发此方法,并将接收到的数据显示在UI页面上。由于匿名管道只支持父子进程,所以在FrmMain页面打开子进程客户端,并将客户端句柄传递给客户端,用于初始化客户端对象。如下所示:using DemoPipe.Common;
using System.Diagnostics;
namespace DemoAnonymousPipeServer
{
public partial class FrmMain : Form
{
private AnonymousPipeServer server;
private Process client;
public FrmMain()
{
// 堆代码 duidaimia.com
InitializeComponent();
server = new AnonymousPipeServer();
this.lblClientHandle.Text = server.ClientHandle;
server.Received += new Action<string>((string msg) =>
{
this.txtReceiveMsg.Invoke(() =>
{
this.txtReceiveMsg.AppendText($"{DateTime.Now.ToString("yyyy-MM-dd HH:mm:ss.fff")}:{msg}\r\n");
});
});
server.BeginReceive();
}
private void btnOpenClient_Click(object sender, EventArgs e)
{
string clientName = "DemoAnonymousPipeClient.exe";
if (Process.GetProcessesByName(clientName).Length < 1)
{
client = new Process();
client.StartInfo.FileName = clientName;
client.StartInfo.Arguments = server.ClientHandle;
client.StartInfo.UseShellExecute = false;
client.Start();
}
}
}
}
客户端using System;
using System.Collections.Generic;
using System.IO.Pipes;
using System.Linq;
using System.Text;
using System.Threading.Tasks;
namespace DemoPipe.Common
{
public class AnonymousPipeClient:IDisposable
{
private PipeStream pipeClientStream;
private string pipeHandle;
private StreamWriter streamWriter;
public AnonymousPipeClient(string pipeHandle)
{
this.pipeHandle = pipeHandle;
pipeClientStream = new AnonymousPipeClientStream(PipeDirection.Out, this.pipeHandle);
this.streamWriter = new StreamWriter(pipeClientStream);
this.streamWriter.AutoFlush = true;
}
public void Send(string msg)
{
try
{
this.streamWriter.WriteLine(msg);
pipeClientStream.WaitForPipeDrain();
}
catch (IOException ex)
{
Console.WriteLine(ex.Message);
Console.WriteLine(ex.StackTrace);
}
}
public void Dispose()
{
if (this.streamWriter != null)
{
this.streamWriter.Close();
this.streamWriter.Dispose();
}
if (pipeClientStream != null)
{
pipeClientStream.Close();
pipeClientStream.Dispose();
}
}
}
}
在上述代码中,客户端通过StreamWriter实现对流的写入, 用于将UI页面用户输入的信息发送到服务端。接下来在FrmMain页面中创建AnonymousPipeClient实例,并传入父进程传递来的句柄。如下所示:using DemoPipe.Common;
namespace DemoAnonymousPipeClient
{
public partial class FrmMain : Form
{
private AnonymousPipeClient client;
public FrmMain()
{
InitializeComponent();
this.txtClientHandle.Text = PipeInstance.PipeHandle;
}
private void btnSend_Click(object sender, EventArgs e)
{
try
{
string msg = this.txtSendMsg.Text;
if (!string.IsNullOrEmpty(msg))
{
client.Send(msg);
}
}
catch (Exception ex)
{
Console.WriteLine(ex.Message);
Console.WriteLine(ex.StackTrace);
}
}
private void btnInit_Click(object sender, EventArgs e)
{
try
{
string clientHandle = this.txtClientHandle.Text;
client = new AnonymousPipeClient(clientHandle);
MessageBox.Show("Init success.","Info",MessageBoxButtons.OK,MessageBoxIcon.Information);
}
catch (Exception ex)
{
Console.WriteLine(ex.Message);
Console.WriteLine(ex.StackTrace);
}
}
}
}
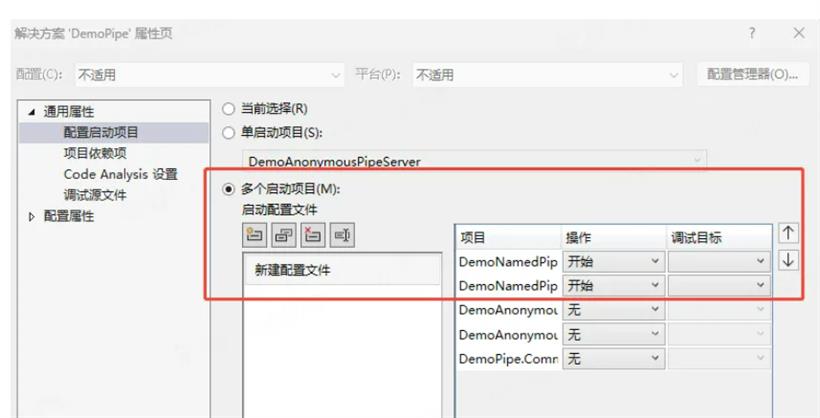
实例演示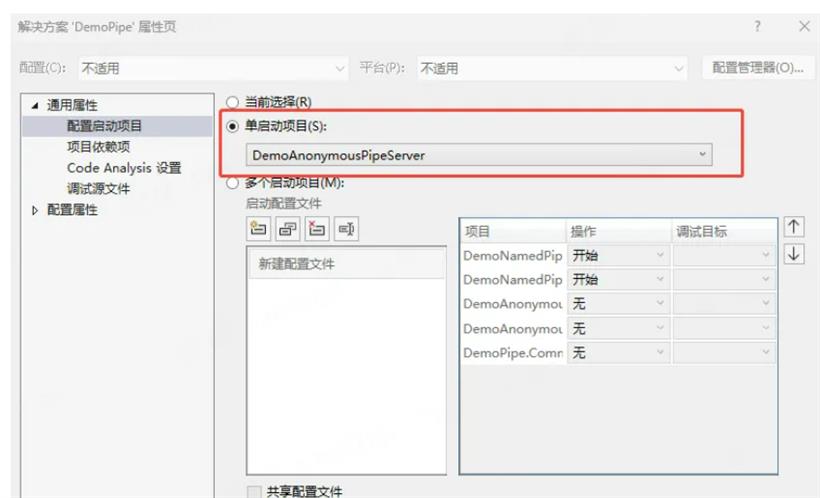

using System;
using System.Collections.Generic;
using System.IO.Pipes;
using System.Linq;
using System.Text;
using System.Threading.Tasks;

namespace DemoPipe.Common
{
    public class NamedPipeServer:IDisposable
    {
        private readonly int NUMOFTHREADS=4;
        // 堆代码 duidaima.com
        private string pipeName;

        private NamedPipeServerStream pipeServerStream;

        private StreamWriter streamWriter;

        public Action<string> Received;

        private StreamReader streamReader;

        public NamedPipeServer(string pipeName)
        {
            this.pipeName = pipeName;
            this.pipeServerStream = new NamedPipeServerStream(this.pipeName, PipeDirection.InOut,NUMOFTHREADS);
        }

        public void Send(string msg)
        {
            Task.Run(() =>
            {
                if (!this.pipeServerStream.IsConnected)
                {
                    return;
                }
                if (this.streamWriter == null)
                {
                    this.streamWriter = new StreamWriter(pipeServerStream);
                    this.streamWriter.AutoFlush = true;
                }
                this.streamWriter.WriteLine(msg);
                this.streamWriter.Flush();
                this.pipeServerStream.WaitForPipeDrain();
            });
        }

        public void Receive()
        {
            Task.Run(() =>
            {
                if (!this.pipeServerStream.IsConnected)
                {
                    this.pipeServerStream.WaitForConnection();
                }
                if (this.streamReader == null)
                {
                    this.streamReader = new StreamReader(pipeServerStream);
                }
                try
                {
                    string? msg = streamReader.ReadLine();
                    if (!string.IsNullOrEmpty(msg))
                    {
                        Received?.Invoke($"[]{msg}");
                    }
                }
                catch (Exception ex)
                {
                    Console.WriteLine(ex.Message);
                    Console.WriteLine(ex.StackTrace);
                }
                finally
                {
                    Task.Delay(500);
                }
            });
        }

        public void Dispose()
        {
            if (pipeServerStream != null)
            {
                pipeServerStream.Close();
                pipeServerStream.Dispose();
            }
        }
    }
}
在上述示例中,有两个方法分别用于实现数据的发送(Send)和和接收(Receive)。接下来在FrmMain 页面中创建NamedPipeServer实例,以及分别用于实现接收和发送的事件,如下所示:using DemoPipe.Common;
namespace DemoNamedPipeServer
{
public partial class FrmMain : Form
{
private NamedPipeServer pipeServer;
public FrmMain()
{
InitializeComponent();
pipeServer = new NamedPipeServer("okcoder");
pipeServer.Received += new Action<string>((string msg) =>
{
this.txtReceiveMsg.Invoke(() =>
{
this.txtReceiveMsg.AppendText($"{DateTime.Now.ToString("yyyy-MM-dd HH:mm:ss.fff")}:{msg}\r\n");
});
});
}
private void btnSend_Click(object sender, EventArgs e)
{
try
{
string msg = this.txtSendMsg.Text;
if (!string.IsNullOrEmpty(msg))
{
pipeServer.Send(msg);
}
}
catch (Exception ex)
{
Console.WriteLine(ex.Message);
Console.WriteLine(ex.StackTrace);
}
}
private void btnReceive_Click(object sender, EventArgs e)
{
this.pipeServer.Receive();
}
}
}
客户端using System;
using System.Collections.Generic;
using System.IO.Pipes;
using System.Linq;
using System.Security.Cryptography;
using System.Text;
using System.Threading.Tasks;
namespace DemoPipe.Common
{
public class NamedPipeClient:IDisposable
{
private readonly int NUMOFTHREADS = 4;
private string pipeName;
private NamedPipeClientStream pipeClientStream;
private StreamWriter streamWriter;
private CancellationTokenSource cts;
private CancellationToken token;
public Action<string> Received;
private StreamReader streamReader;
public NamedPipeClient(string pipeName)
{
this.pipeName = pipeName;
this.pipeClientStream = new NamedPipeClientStream(".", this.pipeName, PipeDirection.InOut);
}
public void Send(string msg)
{
Task.Run(() =>
{
if (!this.pipeClientStream.IsConnected)
{
this.pipeClientStream.Connect(1000);
}
if (this.streamWriter == null)
{
this.streamWriter = new StreamWriter(pipeClientStream);
this.streamWriter.AutoFlush = true;
}
this.streamWriter.WriteLine(msg);
this.streamWriter.Flush();
this.pipeClientStream.WaitForPipeDrain();
});
}
public void Receive()
{
Task.Run(() =>
{
if (!this.pipeClientStream.IsConnected)
{
this.pipeClientStream.Connect(1000);
}
if (this.streamReader == null)
{
this.streamReader = new StreamReader(pipeClientStream);
}
try
{
string? msg = streamReader.ReadLine();
if (!string.IsNullOrEmpty(msg))
{
Received?.Invoke($"[]{msg}");
}
}
catch (Exception ex)
{
Console.WriteLine(ex.Message);
Console.WriteLine(ex.StackTrace);
}
finally
{
Task.Delay(500);
}
});
}
public void Dispose()
{
this.cts.Cancel();
if (pipeClientStream != null)
{
pipeClientStream.Close();
pipeClientStream.Dispose();
}
}
}
}
在上述实例中,接收和发送,都采用后台线程异步操作,避免线程阻塞造成UI主线程卡顿。接下来创建FrmMain中创建NamedPipeClient类的实例,以及UI上发送和接收的事件,如下所示:using DemoPipe.Common;
namespace DemoNamedPipeClient
{
public partial class FrmMain : Form
{
private NamedPipeClient pipeClient;
public FrmMain()
{
InitializeComponent();
this.pipeClient = new NamedPipeClient("okcoder");
pipeClient.Received += new Action<string>((string msg) =>
{
this.txtReceiveMsg.Invoke(() =>
{
this.txtReceiveMsg.AppendText($"{DateTime.Now.ToString("yyyy-MM-dd HH:mm:ss.fff")}:{msg}\r\n");
});
});
}
private void btnSend_Click(object sender, EventArgs e)
{
try
{
string msg = this.txtSendMsg.Text;
if (!string.IsNullOrEmpty(msg))
{
pipeClient.Send(msg);
}
}
catch (Exception ex)
{
Console.WriteLine(ex.Message);
Console.WriteLine(ex.StackTrace);
}
}
private void btnReceive_Click(object sender, EventArgs e)
{
pipeClient.Receive();
}
}
}
在上述实例中,客户端和服务端采用同一个管道名称,这样才能进行通信。