今天我们就来看看如何在 gRPC 中进行 Http Basic 认证。
1. 什么是 Basic 认证
HTTP Basic authentication 中文译作 HTTP 基本认证,在这种认证方式中,将用户的登录用户名/密码经过 Base64 编码之后,放在请求头的 Authorization 字段中,从而完成用户身份的 认证。
这是一种在 RFC7235(https://tools.ietf.org/html/rfc7235) 规范中定义的认证方式,当客户端发起一个请求之后,服务端可以针对该请求返回一个质询信息,然后客户端再供用户的凭 证信息。具体的质询与应答流程如图所示:
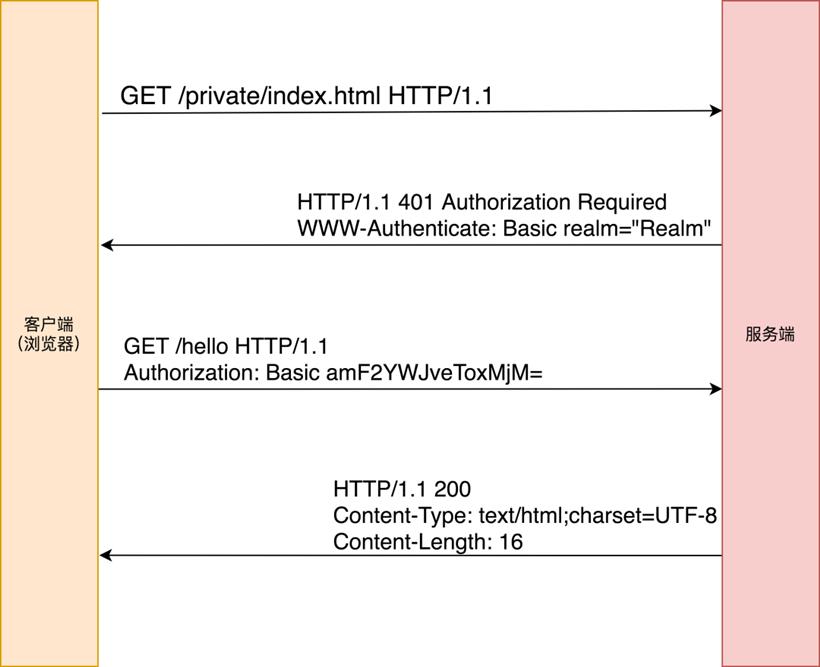
由上图可以看出,客户端的用户名和密码只是简单做了一个 Base64 转码,然后放到请求头中就传输到服务端了。
我们在日常的开发中,其实也很少见到这种认证方式,有的读者可能在一些老旧路由器中见过这种认证方式;另外,在一些非公开访问的 Web 应用中,可能也会见到这种认证方式。为什么很少见到这种认证方式的应用场景呢?主要还是安全问题。
HTTP 基本认证没有对传输的凭证信息进行加密,仅仅只是进行了 Base64 编码,这就造成了很大的安全隐患,所以如果用到了 HTTP 基本认证,一般都是结合 HTTPS 一起使用;同 时,一旦使用 HTTP 基本认证成功后,由于令牌缺乏有效期,除非用户重启浏览器或者修改密码,否则没有办法退出登录。
2. gRPC 中的基本认证
gRPC 并没有为 Http Basic 认证提供专门的 API,如果我们需要在 gRPC 中进行 Http Basic 认证,需要自己手工处理。不过相信小伙伴们看了上面的流程图之后,对于手工处理 gRPC+Http Basic 也没啥压力。
首先我们先来看客户端的代码:
//堆代码 duidaima.com
public class HttpBasicCredential extends CallCredentials {
    private String username;
    private String password;

    public HttpBasicCredential(String username, String password) {
        this.username = username;
        this.password = password;
    }

    @Override
    public void applyRequestMetadata(RequestInfo requestInfo, Executor executor, MetadataApplier metadataApplier) {
        executor.execute(() -> {
            try {
                String token = new String(Base64.getEncoder().encode((username + ":" + password).getBytes()));
                Metadata headers = new Metadata();
                headers.put(Metadata.Key.of(AuthConstant.AUTH_HEADER, Metadata.ASCII_STRING_MARSHALLER),
                        String.format("%s %s", AuthConstant.AUTH_TOKEN_TYPE, token));
                metadataApplier.apply(headers);
            } catch (Throwable e) {
                metadataApplier.fail(Status.UNAUTHENTICATED.withCause(e));
            }
        });
    }

    @Override
    public void thisUsesUnstableApi() {

    }
}
当客户端发起一个请求的时候,我们构建一个 HttpBasicCredential 对象,并传入用户名和密码。该对象核心的处理逻辑在 applyRequestMetadata 方法中,我们先按照 username + ":" + password 的形式将用户名和密码拼接成一个字符串,并对这个字符串进行 Base64 编码。最后将编码结果放在请求头中,请求头的 KEY 就是 AuthConstant.AUTH_HEADER 变量,对应的具体值是 Authorization,请求头的 value 是通过 String.format 函数拼接出来的,实际上就是在 Base64 的编码的字符串上加上了 Basic 前缀。这块就是纯手工操作,技术原理跟我们之前讲的 JWT+gRPC 没有任何差别,基本上是一模一样的,所以我就不啰嗦了。
来看下前端请求该如何发起:
public class LoginClient {
    public static void main(String[] args) throws InterruptedException, SSLException {

        File certFile = Paths.get( "certs", "ca.crt").toFile();
        SslContext sslContext = GrpcSslContexts.forClient().trustManager(certFile).build();

        ManagedChannel channel = NettyChannelBuilder.forAddress("local.javaboy.org", 50051)
                .useTransportSecurity()
                .sslContext(sslContext)
                .build();

        LoginServiceGrpc.LoginServiceStub stub = LoginServiceGrpc.newStub(channel).withDeadline(Deadline.after(3, TimeUnit.SECONDS));
        sayHello(channel);
    }

    private static void sayHello(ManagedChannel channel) throws InterruptedException {
        CountDownLatch countDownLatch = new CountDownLatch(1);
        HelloServiceGrpc.HelloServiceStub helloServiceStub = HelloServiceGrpc.newStub(channel);
        helloServiceStub
                .withCallCredentials(new HttpBasicCredential("javaboy", "123"))
                .sayHello(StringValue.newBuilder().setValue("wangwu").build(), new StreamObserver<StringValue>() {
            @Override
            public void onNext(StringValue stringValue) {
                System.out.println("stringValue.getValue() = " + stringValue.getValue());
            }

            @Override
            public void onError(Throwable throwable) {
                System.out.println("throwable.getMessage() = " + throwable.getMessage());
            }

            @Override
            public void onCompleted() {
                countDownLatch.countDown();
            }
        });
        countDownLatch.await();
    }
}
通过 withCallCredentials 方法,在客户端发起请求的时候,把这段认证信息携带上。再来看看服务端的处理。服务端通过一个拦截器来统一处理,从请求头中提取出来认证信息并解析判断,逻辑如下:
public class AuthInterceptor implements ServerInterceptor {
    private JwtParser parser = Jwts.parser().setSigningKey(AuthConstant.JWT_KEY);

    @Override
    public <ReqT, RespT> ServerCall.Listener<ReqT> interceptCall(ServerCall<ReqT, RespT> serverCall, Metadata metadata, ServerCallHandler<ReqT, RespT> serverCallHandler) {
        String authorization = metadata.get(Metadata.Key.of(AuthConstant.AUTH_HEADER, Metadata.ASCII_STRING_MARSHALLER));
        Status status = Status.OK;
        if (authorization == null) {
            status = Status.UNAUTHENTICATED.withDescription("miss authentication token");
        } else if (!authorization.startsWith(AuthConstant.AUTH_TOKEN_TYPE)) {
            status = Status.UNAUTHENTICATED.withDescription("unknown token type");
        } else {
            try {
                String token = authorization.substring(AuthConstant.AUTH_TOKEN_TYPE.length()).trim();
                String[] split = new String(Base64.getDecoder().decode(token)).split(":");
                String username = split[0];
                String password = split[1];
                if ("javaboy".equals(username) && "123".equals(password)) {
                    Context ctx = Context.current()
                            .withValue(AuthConstant.AUTH_CLIENT_ID, username);
                    return Contexts.interceptCall(ctx, serverCall, metadata, serverCallHandler);
                }
            } catch (JwtException e) {
                status = Status.UNAUTHENTICATED.withDescription(e.getMessage()).withCause(e);
            }
        }
        serverCall.close(status, new Metadata());
        return new ServerCall.Listener<ReqT>() {
        };
    }
}
1.首先从请求头中取出 Base64 编码之后的令牌。
2.如果取出的值为 null,则返回 miss authentication token。
3.如果取出的令牌的起始字符不对,则返回 unknown token type。
4.如果前面都没问题,则开始对拿到的字符串进行 Base64 解码,解码之后做字符串拆分,然后分别判断用户名和密码是否正确,如果正确,则将用户名存入到 Context 中,在后续的业务逻辑中就可以使用了。
服务端的启动代码如下:
public class LoginServer {
    Server server;

    public static void main(String[] args) throws IOException, InterruptedException {
        LoginServer server = new LoginServer();
        server.start();
        server.blockUntilShutdown();
    }

    public void start() throws IOException {
        int port = 50051;
        File certFile = Paths.get( "certs", "server.crt").toFile();
        File keyFile = Paths.get("certs", "server.pem").toFile();
        server = ServerBuilder.forPort(port)
                .addService(ServerInterceptors.intercept(new HelloServiceImpl(), new AuthInterceptor()))
                .useTransportSecurity(certFile,keyFile)
                .build()
                .start();
        Runtime.getRuntime().addShutdownHook(new Thread(() -> {
            LoginServer.this.stop();
        }));
    }

    private void stop() {
        if (server != null) {
            server.shutdown();
        }
    }

    private void blockUntilShutdown() throws InterruptedException {
        if (server != null) {
            server.awaitTermination();
        }
    }
}
小伙伴们看下,就是用了下这个拦截器而已。
最后,在业务代码中,也可以直接访问到刚刚认证成功的用户名:
public class HelloServiceImpl extends HelloServiceGrpc.HelloServiceImplBase {
    @Override
    public void sayHello(StringValue request, StreamObserver<StringValue> responseObserver) {
        String clientId = AuthConstant.AUTH_CLIENT_ID.get();
        responseObserver.onNext(StringValue.newBuilder().setValue(clientId + " say hello:" + request.getValue()).build());
        responseObserver.onCompleted();
    }
}
好啦,大功告成。
3. 小结
和之前的 JWT 相比,Http Basic 认证的缺点还是非常明显的,但是从认证流程来说,感觉两者差别不大,只是创建令牌和解析令牌的方式不同而已。感兴趣的小伙伴可以尝试一下哦。


 闽公网安备 35020302035485号