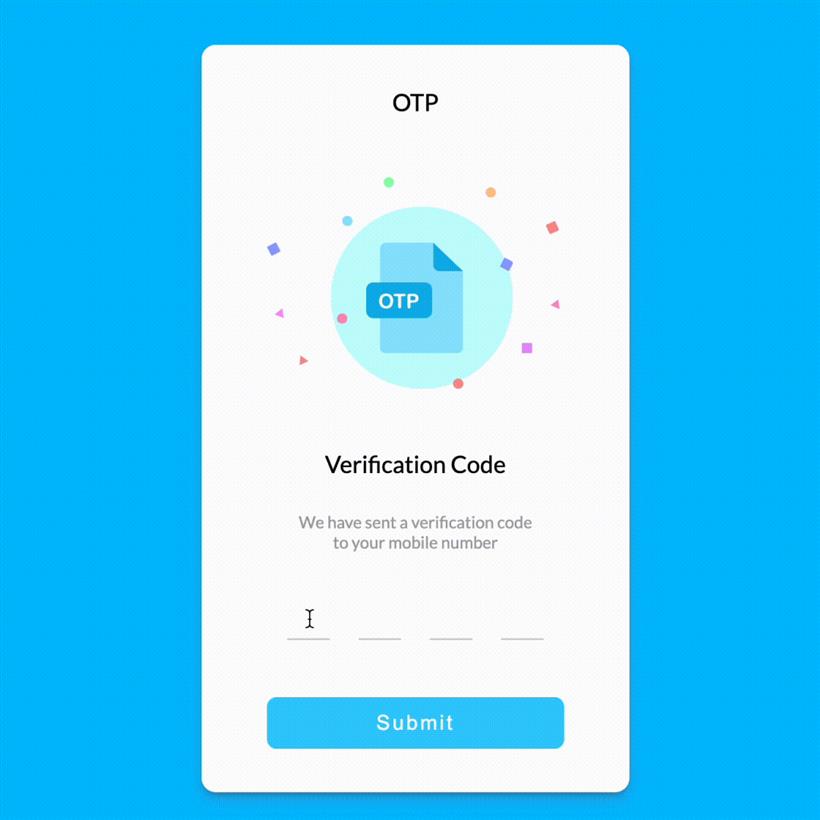
大家好,今天给大家分享一个常见的案例,想必大家都遇到过。在开发注册用户或用户登录功能时,经常会使用手机验证码的验证方式。如下图所示,有4个下划线输入框,每个输入框只能输入1个数字。输入完后自动跳转到下一个输入框内。如果让你实现这个需求,你会怎么做呢?案例的交互效果如下图所示:
 HTML结构
这是我们HTML结构的图形表示。
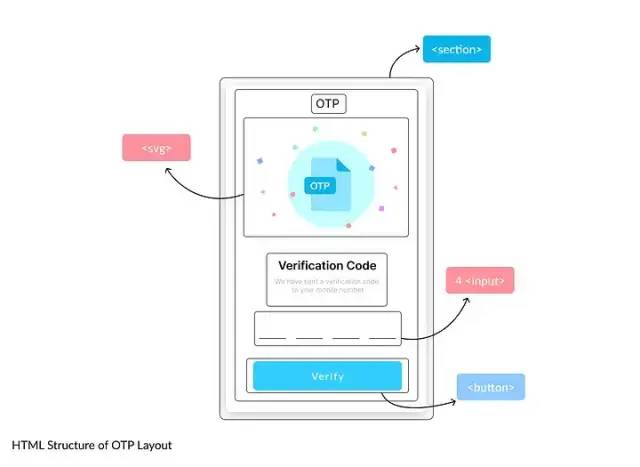
接下来,我们来编写HTML结构
<section>
  <div class="title">OTP</div>
  // Illustration
  <div class="title">Verification Code</div>
  <p>We have sent a verification code to your mobile number</p>
  <div id='inputs'>
    <input id='input1' type='text' maxLength="1" />
    <input id='input2' type='text' maxLength="1" />
    <input id='input3' type='text' maxLength="1" />
    <input id='input4' type='text' maxLength="1" />
  </div>
  <button>Submit</button>
</section>
如果您需要实现一个6位的验证码,那么只需在输入div中添加两个更多的输入标签。
CSS部分
CSS一直是比较麻烦的部分,但是让我来为您简化它。我们这里有一个使用了display flex和alignment center的部分,这使得我们可以将此部分内的每个子元素都居中对齐。接下来,我们有4个输入框。它们只是带有底部边框的32x32正方形div。下面展示了所有应用的CSS。
 完整的CSS部分如下:
<!-- 堆代码 duidaima.com -->
@import url("https://fonts.googleapis.com/css2?family=Lato:wght@100;300;400;700&display=swap");
html {
  background-color: deepskyblue;
  display: flex;
  justify-content: center;
  align-items: center;
  height: 100vh;
  text-align: center;
  font-family: "Lato", sans-serif;
}

section {
  display: flex;
  align-items: center;
  flex-direction: column;
  justify-content: space-around;
  width: 40vw;
  min-width: 350px;
  height: 80vh;
  background-color: white;
  border-radius: 12px;
  box-shadow: rgba(50, 50, 93, 0.25) 0px 6px 12px -2px,
    rgba(0, 0, 0, 0.3) 0px 3px 7px -3px;
  padding: 24px 0px;
}
svg {
  margin: 16px 0;
}
title {
  font-size: 20px;
  font-weight: bold;
}

p {
  color: #a3a3a3;
  font-size: 14px;
  width: 200px;
  margin-top: 4px;
}
input {
  width: 32px;
  height: 32px;
  text-align: center;
  border: none;
  border-bottom: 1.5px solid #d2d2d2;
  margin: 0 10px;
}

input:focus {
  border-bottom: 1.5px solid deepskyblue;
  outline: none;
}

button {
  width: 250px;
  letter-spacing: 2px;
  margin-top: 24px;
  padding: 12px 16px;
  border-radius: 8px;
  border: none;
  background-color: #33cdff;
  color: white;
  cursor: pointer;
}
JS部分
在JS中,我们需要为输入框添加功能。我们将创建一个函数来为每个输入框添加事件监听器。我们需要监听“keyup”事件。一旦释放按键,该事件就会触发。我们需要获取输入值并检查它是否为整数。如果不是,则简单地清空输入框。如果输入是介于0到9之间的整数,则获取此输入框的下一个兄弟节点并将焦点移动到它上面。当按下退格键或删除键时,我们将应用相反的逻辑。我们将获取前一个兄弟节点并将焦点移动到它上面。
function addListener(input) {
  input.addEventListener("keyup", () => {
    const code = parseInt(input.value);
    if (code >= 0 && code <= 9) {
      const n = input.nextElementSibling;
      if (n) n.focus();
    } else {
      input.value = "";
    }

    const key = event.key; // const {key} = event; ES6+
    if (key === "Backspace" || key === "Delete") {
      const prev = input.previousElementSibling;
      if (prev) prev.focus();
    }
  });
}
最后,获取所有的input输入框,并将监听事件绑定上,示例代码如下:
const inputs = ["input1", "input2", "input3", "input4"];
inputs.map((id) => {
  const input = document.getElementById(id);
  addListener(input);
});
到这里,案例相关的代码就介绍到这里。
结束
今天的文章就介绍到这里,你学会了吗?建议大家还是亲自实践下,才能印象深刻。感谢你的阅读。


 闽公网安备 35020302035485号