- 联系我们
- duidaima.com 版权声明
- 闽ICP备2020021581号
-
 闽公网安备 35020302035485号
闽公网安备 35020302035485号

git clone https://github.com/AUTOMATIC1111/stable-diffusion-webui.git随后进入项目的目录:
cd stable-diffusion-webui官方文档建议直接在目录中运行shell脚本:
./webui.sh但事实上,shell脚本很容易在过程中报错,该项目的核心代码其实是launch.py,所以理论上,我们只需要正常运行launch.py文件即可。
pip3 install -r requirements.txt pip3 install -r requirements_versions.txt依赖文件中,有一个库可能会出问题,就是GFPGAN,它是腾讯开源的人脸识别模块,这里推荐使用GFPGAN官方网站(https://github.com/TencentARC/GFPGAN)的安装方式:
# 堆代码 duidaima.com
# Install basicsr - https://github.com/xinntao/BasicSR
# We use BasicSR for both training and inference
pip install basicsr

# Install facexlib - https://github.com/xinntao/facexlib
# We use face detection and face restoration helper in the facexlib package
pip install facexlib

pip install -r requirements.txt
python setup.py develop

# If you want to enhance the background (non-face) regions with Real-ESRGAN,
# you also need to install the realesrgan package
pip install realesrgan
安装成功后,最好验证一下:
➜  ~ python3
Python 3.10.9 (main, Dec 15 2022, 17:11:09) [Clang 14.0.0 (clang-1400.0.29.202)] on darwin
Type "help", "copyright", "credits" or "license" for more information.
>>> import gfpgan
>>>
所有依赖安装成功后,就可以直接运行launch.py文件即可:
python3 launch.py程序返回:
Python 3.10.9 (main, Dec 15 2022, 17:11:09) [Clang 14.0.0 (clang-1400.0.29.202)]
Commit hash: 0cc0ee1bcb4c24a8c9715f66cede06601bfc00c8
Installing requirements for Web UI
Launching Web UI with arguments: --upcast-sampling --use-cpu interrogate
Warning: caught exception 'Torch not compiled with CUDA enabled', memory monitor disabled
No module 'xformers'. Proceeding without it.
==============================================================================
You are running torch 1.13.0.
The program is tested to work with torch 1.13.1.
To reinstall the desired version, run with commandline flag --reinstall-torch.
Beware that this will cause a lot of large files to be downloaded, as well as
there are reports of issues with training tab on the latest version.

Use --skip-version-check commandline argument to disable this check.
==============================================================================
Loading weights [6ce0161689] from /Users/liuyue/wodfan/work/stable-diffusion-webui/models/Stable-diffusion/v1-5-pruned-emaonly.safetensors
Creating model from config: /Users/liuyue/wodfan/work/stable-diffusion-webui/configs/v1-inference.yaml
LatentDiffusion: Running in eps-prediction mode
DiffusionWrapper has 859.52 M params.
Applying cross attention optimization (InvokeAI).
Textual inversion embeddings loaded(0):
Model loaded in 8.2s (create model: 0.6s, apply weights to model: 5.0s, apply half(): 1.9s, move model to device: 0.5s).
Running on local URL:  http://127.0.0.1:7860
Stable-Diffusion-Webui服务会运行在系统的7860端口上。需要注意的是,如果本地系统不支持cuda模式,需要修改运行命令:
python3 launch.py --skip-torch-cuda-test --upcast-sampling --use-cpu interrogate这里使用CPU来进行模型训练。另外如果是M系列的Mac,其实是支持MPS模式的,但Stable Diffusion目前的最新版并不支持MPS,所以需要单独设置环境变量,关闭MPS模式:
export PYTORCH_ENABLE_MPS_FALLBACK=1最后访问http://127.0.0.1:7860即可,本地构建Stable-Diffusion-Webui服务就完成了。
git clone https://github.com/AbdBarho/stable-diffusion-webui-docker.git随后进入项目的目录:
stable-diffusion-webui-docker接着运行命令下载相关的依赖镜像:
docker compose --profile download up --build下载完成后,运行命令构建容器:
docker compose --profile auto up --build这里需要注意的是,模型数据和输出文件夹会以/data和/output的形式挂载到容器中,如果想在宿主机往容器内传入模型或者其他图片,需要写入项目中的data目录。
Found no NVIDIA driver on your system这是因为容器内找不到NVIDIA的显卡驱动。
docker run -ti --runtime=nvidia -e NVIDIA_DRIVER_CAPABILITIES=compute,utility -e NVIDIA_VISIBLE_DEVICES=all allennlp/allennlp总的来说,安装过程简单,但是调试比较费劲,一旦启动出问题,就得进入容器内部修改代码,或者反复修改Dockerfile文件,所以Docker比较适合封装业务改动频繁的容器,而不是依赖环境繁多并且版本需要反复调整的场景。
配置好Stable-Diffusion-Webui环境之后,访问http://127.0.0.1:7860:
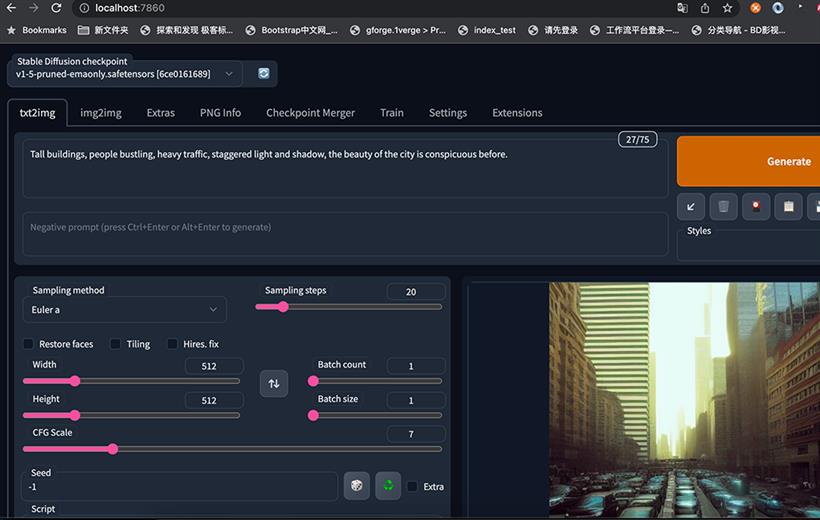
Tall buildings, people bustling, heavy traffic, staggered light and shadow, the beauty of the city is conspicuous before.随后点击右侧Generate生成按钮即可,这里引导词的意思是:高楼林立,人群熙熙攘攘,车水马龙,光影交错,城市之美尽显眼前。

(Tall buildings:1.1), people bustling(1.61),(heavy traffic:0.3),(staggered light and shadow:1.3)Stable-Diffusion-Webui也支持Negative prompt(反向引导词)。
lowres,bad anatomy,bad hands,text,error,missing fingers,
extra digit,fewer digits,cropped,worst quality,
low quality,normal quality,jpeg artifacts,signature,
watermark,username,blurry,missing arms,long neck,
Humpbacked,missing limb,too many fingers,
mutated,poorly drawn,out of frame,bad hands,
owres,unclear eyes,poorly drawn,cloned face,bad face
除了引导词,还可以调整采样迭代步数 (Sampling Steps)。系统先随机生成一个基础的图片,然后一步步的调整图片,向引导词 Prompt 靠拢Sampling Steps参数就是告诉人工智能,这样的步骤应该进行多少次。次数越多,每一步训练也就越小越精确。当然了,成本也会越高,同时每一次训练的时间也会成同比增长。
/stable-diffusion-webui/models/Stable-diffusion模型名称是v1-5-pruned-emaonly.safetensors,体积是4.27GB。
python3 launch.py --skip-torch-cuda-test --upcast-sampling --use-cpu interrogate在页面表单中的Stable Diffusion checkpoint选项里选择对应的模型: