- 联系我们
- duidaima.com 版权声明
- 闽ICP备2020021581号
-
 闽公网安备 35020302035485号
闽公网安备 35020302035485号

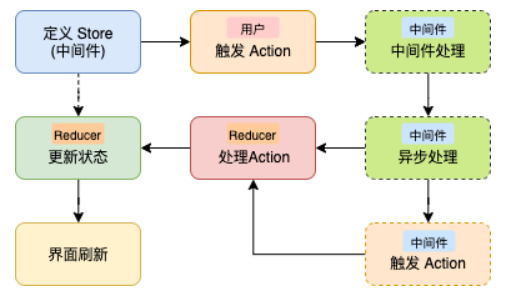
上篇也说过,Redux 的好处之一就是状态管理的形式是统一的,三个元素 Action、Store 和 Reducer 缺一不可,因此,我们先来梳理联系人列表业务中对应的这三个元素的内容。
首先来定义 Action,列表页面交互上会涉及 2 个Action,刷新和加载更多。但逻辑上还有另外两个动作:获取数据成功和获取数据失败,因此一共有 4 个Action。
刷新:获取第一页的数据,定义为 RefreshAction,在交互时使用下来刷新时调度该 Action。class RefreshAction {}
class LoadAction {}
class SuccessAction {
final List<dynamic> jsonItems;
final int currentPage;
SuccessAction(this.jsonItems, this.currentPage);
}
class FailedAction {
final String errorMessage;
FailedAction(this.errorMessage);
}
接下来是 Store的状态对象,我们要明确需要哪些数据。首先肯定的是,需要有网络请求成功后的联系人列表数据;其次是当前请求的页码,我们在加载更多的时候需要根据该页面请求下一页数据;之后是 Loading 状态标记和错误信息,Loading 状态标记在某些场合可以用于提示,而错误信息则用于错误提醒。因此,Store 对应的状态数据有:class ContactorState {
final List<dynamic> contactors;
final isLoading;
final String? errorMessage;
final int currentPage;
ContactorState(this.contactors,
{this.isLoading = false, this.errorMessage, this.currentPage = 1});
factory ContactorState.initial() => ContactorState(List.unmodifiable([]));
}
最后是 Reducer 了,Reducer 定义是一个函数,根据旧的状态对象和当前的 Action 来返回新的状态对象。这里的业务逻辑如下:// 堆代码 duidaima.com
ContactorState contactorReducer(ContactorState state, dynamic action) {
if (action is RefreshAction) {
ContactorState contactorState = ContactorState(state.contactors,
isLoading: true, errorMessage: null, currentPage: 1);
return contactorState;
}
if (action is LoadAction) {
ContactorState contactorState = ContactorState(state.contactors,
isLoading: true,
errorMessage: null,
currentPage: state.currentPage + 1);
return contactorState;
}
if (action is SuccessAction) {
int currentPage = action.currentPage;
List<dynamic> contactors = state.contactors;
if (currentPage > 1) {
contactors += action.jsonItems;
} else {
contactors = action.jsonItems;
}
ContactorState contactorState = ContactorState(contactors,
isLoading: false, errorMessage: null, currentPage: currentPage);
return contactorState;
}
if (action is FailedAction) {
ContactorState contactorState = ContactorState(
state.contactors,
isLoading: false,
errorMessage: action.errorMessage,
);
return contactorState;
}
return state;
}
void (Store<T> store, action, NextDispatcher next)在这里,我们定义的中间件方法名为:fetchContactorMiddleware,需要在构建 Store 对象时加入到 middleware 参数中。middleware本身是一个数组,因此我们可以添加多种中间件,以便进行不同的处理。
final Store<ContactorState> store = Store(
  contactorReducer,
  initialState: ContactorState.initial(),
  middleware: [
    fetchContactorMiddleware,
  ],
);
在中间件中我们可以获取到当前的 Action和状态,因此可以根据 Action 做不同的业务。在这里我们只需要处理刷新和加载更多:void fetchContactorMiddleware(
Store<ContactorState> store, action, NextDispatcher next) {
const int pageSize = 10;
if (action is RefreshAction) {
// 刷新取第一页数据
ContactorService.list(1, pageSize).then((response) {
if (response != null && response.statusCode == 200) {
store.dispatch(SuccessAction(response.data, 1));
} else {
store.dispatch(FailedAction('请求失败'));
}
}).catchError((error, trace) {
store.dispatch(FailedAction(error.toString()));
});
}
if (action is LoadAction) {
// 加载更多时页码+1
int currentPage = store.state.currentPage + 1;
ContactorService.list(currentPage, pageSize).then((response) {
if (response != null && response.statusCode == 200) {
store.dispatch(SuccessAction(response.data, currentPage));
} else {
store.dispatch(FailedAction('请求失败'));
}
}).catchError((error, trace) {
store.dispatch(FailedAction(error.toString()));
});
}
next(action);
}
class _ViewModel {
  final List<_ContactorViewModel> contactors;

  _ViewModel(this.contactors);

  factory _ViewModel.create(Store<ContactorState> store) {
    List<_ContactorViewModel> items = store.state.contactors
        .map((dynamic item) => _ContactorViewModel.fromJson(item))
        .toList();

    return _ViewModel(items);
  }
}

class _ContactorViewModel {
  final String followedUserId;
  final String nickname;
  final String avatar;
  final String description;

  _ContactorViewModel({
    required this.followedUserId,
    required this.nickname,
    required this.avatar,
    required this.description,
  });

  static _ContactorViewModel fromJson(Map<String, dynamic> json) {
    return _ContactorViewModel(
        followedUserId: json['followedUserId'],
        nickname: json['nickname'],
        avatar: UploadService.uploadBaseUrl + 'image/' + json['avatar'],
        description: json['description']);
  }
}
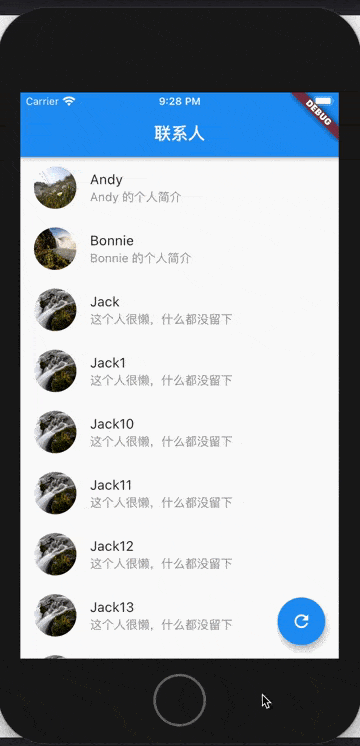
页面的build方法如下,可以看到页面中没有体现中间件部分的代码,而是在 dispatch 过程中自动完成了。@override
Widget build(BuildContext context) {
return StoreProvider<ContactorState>(
store: store,
child: Scaffold(
//省略 appBar
body: StoreConnector<ContactorState, _ViewModel>(
converter: (Store<ContactorState> store) => _ViewModel.create(store),
builder: (BuildContext context, _ViewModel viewModel) {
return EasyRefresh(
child: ListView.builder(
itemBuilder: (context, index) {
return ListTile(
leading:
_getRoundImage(viewModel.contactors[index].avatar, 50),
title: Text(viewModel.contactors[index].nickname),
subtitle: Text(
viewModel.contactors[index].description,
style: TextStyle(fontSize: 14.0, color: Colors.grey),
),
);
},
itemCount: viewModel.contactors.length,
),
onRefresh: () async {
store.dispatch(RefreshAction());
},
onLoad: () async {
store.dispatch(LoadAction());
},
firstRefresh: true,
);
},
),
// 省略其他代码
),
);
这里需要注意,EasyRefresh 组件要放置在 StoreConnector 的下一级,否则会因为在刷新的时候找不到下级ScrollView,报null错误。