- 联系我们
- duidaima.com 版权声明
- 闽ICP备2020021581号
-
 闽公网安备 35020302035485号
闽公网安备 35020302035485号

在 Flutter 开发中,使用人机验证码(也称为 CAPTCHA,即 Completely Automated Public Turing test to tell Computers and Humans Apart)通常是为了增强应用程序的安全性和防止恶意活动。
总之,人机验证码是一种重要的安全措施,可帮助保护 Flutter 应用程序免受各种恶意活动的威胁,并提高用户数据的质量和应用程序的整体安全性。
flutter pub add jc_captcha2.2 编码
import 'package:flutter/material.dart';
import 'package:jc_captcha/jc_captcha.dart';

void main() {
  runApp(const MyApp());
}

class MyApp extends StatelessWidget {
  const MyApp({super.key});
   // 堆代码 duidaima.com
  @override
  Widget build(BuildContext context) {
    return MaterialApp(
      home: Scaffold(
        appBar: AppBar(
          title: const Text('Captcha Plugin Example'),
        ),
        body: CaptchaWidget(
          imageUrl:
              'http://thispage.tech:9680/jclee1995/flutter-jc-captcha/-/raw/master/example/test_picture.png',
          onSuccess: () {
            print('验证成功');
          },
          onFail: () {
            print('验证失败');
          },
        ),
      ),
    );
  }
}
说明: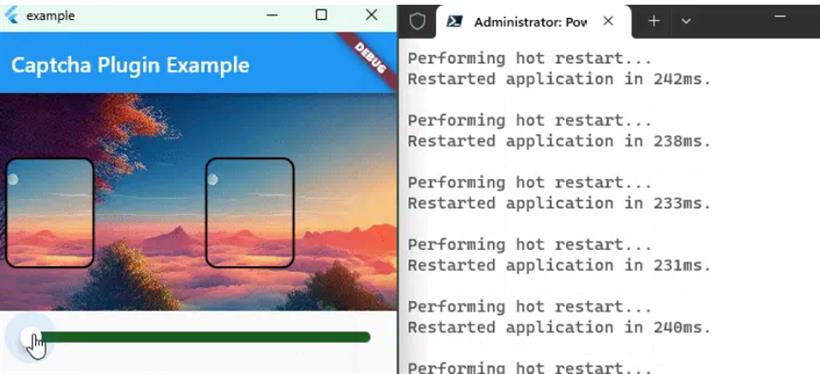
Stack(
  alignment: Alignment.center,
  children: [
    Container(
      width: 200,
      height: 200,
      color: Colors.blue,
    ),
    Positioned(
      left: 50,
      top: 50,
      child: Container(
        width: 100,
        height: 100,
        color: Colors.red,
      ),
    ),
  ],
)
在上述示例中,Stack包含两个容器,一个蓝色的大容器和一个红色的小容器。通过Positioned小部件,我们将小容器定位到了大容器的左上角。Flutter的Slider(滑块)组件是一个用于选择一个范围内数值的交互式控件。用户可以通过滑动滑块来选择数值,这使得它在用户界面中用于调整设置和选择数值非常有用。
class SliderExample extends StatefulWidget {
  const SliderExample({super.key});

  @override
  State<SliderExample> createState() => _SliderExampleState();
}

class _SliderExampleState extends State<SliderExample> {
  double _currentSliderValue = 20;

  @override
  Widget build(BuildContext context) {
    return Scaffold(
      appBar: AppBar(title: const Text('Slider')),
      body: Slider(
        value: _currentSliderValue,
        max: 100,
        divisions: 5,
        label: _currentSliderValue.round().toString(),
        onChanged: (double value) {
          setState(() {
            _currentSliderValue = value;
          });
        },
      ),
    );
  }
}
这个示例是一个基本的Flutter应用程序,来自于Flutter官方。在Flutter中,您可以使用Canvas来进行绘图操作,Canvas是Flutter中的绘图上下文,允许您在屏幕上绘制各种形状、文本和图像。Canvas通常与CustomPaint小部件一起使用,以在Flutter的绘图流程中插入自定义绘图代码。
import 'package:flutter/material.dart';
// 堆代码 duidaima.com
void main() {
  runApp(const MyApp());
}

class MyCustomPainter extends CustomPainter {
  @override
  void paint(Canvas canvas, Size size) {
    final paint = Paint()
      ..color = Colors.blue
      ..style = PaintingStyle.fill;

    final centerX = size.width / 2;
    final centerY = size.height / 2;
    final radius = size.width / 3;

    canvas.drawCircle(Offset(centerX, centerY), radius, paint);
  }

  @override
  bool shouldRepaint(CustomPainter oldDelegate) {
    return false;
  }
}

class MyApp extends StatelessWidget {
  const MyApp({super.key});

  @override
  Widget build(BuildContext context) {
    return MaterialApp(
      home: Scaffold(
        appBar: AppBar(
          title: const Text('Canvas绘图示例'),
        ),
        body: Center(
          child: CustomPaint(
            size: const Size(200, 200),
            painter: MyCustomPainter(),
          ),
        ),
      ),
    );
  }
}
上述示例中,MyCustomPainter类继承自CustomPainter,并在其paint方法中绘制了一个蓝色的圆形。然后,CustomPaint小部件将MyCustomPainter作为其painter属性的值传递,并在UI中显示绘制的圆形。
通过Canvas和CustomPainter,您可以创建各种自定义绘图效果,包括图表、动画、自定义图形和复杂的UI元素。Canvas提供了丰富的绘图功能,可以满足各种绘图需求。
ClipRect(
  child: Image.network(
    'https://example.com/image.jpg',
    width: 200,
    height: 200,
    fit: BoxFit.cover,
  ),
)
上述示例中,ClipRect将Image小部件裁剪为矩形区域内的可见部分。您可以使用其他Clip类型来创建不同形状和效果的裁剪。裁剪在创建各种自定义UI效果时非常有用,例如创建特定形状的按钮、卡片或背景。通过使用不同的Clip类型,您可以实现各种各样的外观和动画效果,从而增强Flutter应用程序的用户界面。
/// 堆代码 duidaima.com
/// 项目地址:http://thispage.tech:9680/jclee1995/flutter-jc-captcha
/// 协议:MIT
import 'dart:math';
import 'package:flutter/material.dart';

/// 验证码组件
///
/// 这个组件用于显示一个验证码图像,用户需要滑动滑块以解锁验证。当验证成功或失败时,
/// 分别触发 [onSuccess] 或 [onFail] 回调函数。你可以设置允许的误差范围 [deviation]
/// 以调整验证的精确性。
class CaptchaWidget extends StatefulWidget {
  /// 用作验证图像的URL
  final String imageUrl;

  /// 当验证成功时触发的回调函数。
  final Function() onSuccess;

  /// 当验证失败时触发的回调函数。
  final Function() onFail;

  /// 允许的误差范围,用于调整验证的精确性。
  static double deviation = 5;

  /// 创建一个 [CaptchaWidget] 小部件,需要指定 [imageUrl]、[onSuccess] 和 [onFail] 回调函数。
  const CaptchaWidget({
    Key? key,
    required this.imageUrl,
    required this.onSuccess,
    required this.onFail,
  }) : super(key: key);

  @override
  State<CaptchaWidget> createState() => _CaptchaWidgetState();
}

class _CaptchaWidgetState extends State<CaptchaWidget> {
  /// 滑块的当前位置。
  double _sliderValue = 0.0;

  late double _offsetRate;

  /// 用于定位的偏移值。
  late double _offsetValue;

  /// 小部件的总宽度。
  late double width;

  /// 用于确保验证仅仅一次有效
  bool _verified = false;

  double _generateRandomNumber() {
    // 创建一个Random对象
    var random = Random();

    // 生成一个介于0.1和0.9之间的随机小数
    double randomValue = 0.1 + random.nextDouble() * 0.7;

    return randomValue;
  }

  @override
  void initState() {
    _offsetRate = _generateRandomNumber();

    super.initState();
  }

  @override
  Widget build(BuildContext context) {
    width = MediaQuery.of(context).size.width;
    _offsetValue = _offsetRate * width;
    return Column(
      children: [
        // 堆叠三层,背景图、裁剪的拼图、拼图的轮廓绘图
        Stack(
          alignment: Alignment.center,
          children: [
            // 背景图层
            Image.network(
              widget.imageUrl,
              height: 200.0,
              fit: BoxFit.cover,
            ),
            // 背景标记层
            CustomPaint(
              size: Size(width, 200.0),
              painter: CaptchaBorderPainter(_offsetValue),
            ),
            // 拼图层
            Positioned(
              left: _sliderValue * width - _offsetValue,
              child: ClipPath(
                clipper: CaptchaClipper(_sliderValue, _offsetValue),
                child: Image.network(
                  widget.imageUrl,
                  height: 200.0,
                  fit: BoxFit.cover,
                ),
              ),
            ),
            // 拼图的轮廓层
            Positioned(
              left: _sliderValue * width - _offsetValue,
              child: CustomPaint(
                size: Size(width, 200.0),
                painter: CaptchaBorderPainter(_offsetValue),
              ),
            ),
          ],
        ),
        //
        SliderTheme(
          data: SliderThemeData(
            thumbColor: Colors.white, // 滑块颜色为白色
            activeTrackColor: Colors.green[900], // 激活轨道颜色为深绿色
            inactiveTrackColor: Colors.green[900], // 非激活轨道颜色为深绿色
            trackHeight: 10.0, // 轨道高度
            thumbShape: const RoundSliderThumbShape(
                enabledThumbRadius: 10.0), // 滑块形状为圆形
          ),
          child: Slider(
            value: _sliderValue,
            onChanged: (value) {
              setState(() {
                _sliderValue = value;
              });
            },
            onChangeEnd: (value) {
              if (_verified == false) {
                if (_sliderValue.abs() * width >
                        _offsetValue - CaptchaWidget.deviation &&
                    _sliderValue.abs() * width <
                        _offsetValue + CaptchaWidget.deviation) {
                  widget.onSuccess();
                  _verified = true;
                } else {
                  widget.onFail();
                  _verified = true;
                }
              }
            },
          ),
        ),
      ],
    );
  }
}

/// 用于创建中滑动拼图的自定义剪切器。
class CaptchaClipper extends CustomClipper<Path> {
  final double sliderValue;
  final double offsetValue;

  /// 创建一个 [CaptchaClipper],需要指定 [sliderValue] 和 [offsetValue]。
  CaptchaClipper(this.sliderValue, this.offsetValue);

  @override
  Path getClip(Size size) {
    final path = Path();

    final rect = RRect.fromRectAndRadius(
      Rect.fromPoints(
        Offset(offsetValue + size.width * sliderValue, 60),
        Offset(
          offsetValue + size.width * sliderValue + 80,
          size.height - 40,
        ),
      ),
      const Radius.circular(10.0),
    );

    path.addRRect(rect);
    return path;
  }

  @override
  bool shouldReclip(CustomClipper<Path> oldClipper) {
    return false;
  }
}

class CaptchaBorderPainter extends CustomPainter {
  final double offsetValue;

  CaptchaBorderPainter(this.offsetValue);

  @override
  void paint(Canvas canvas, Size size) {
    final paint = Paint()
      ..color = Colors.black
      ..style = PaintingStyle.stroke
      ..strokeWidth = 2.0;

    final rect = Rect.fromPoints(
      Offset(offsetValue, 60),
      Offset(
        offsetValue + 80,
        size.height - 40,
      ),
    );

    final path = Path()
      ..addRRect(RRect.fromRectAndRadius(rect, const Radius.circular(10.0)));

    canvas.drawPath(path, paint);
  }

  @override
  bool shouldRepaint(CustomPainter oldDelegate) {
    return false;
  }
}
4.2 控制逻辑// 背景图层 Image.network( widget.imageUrl, height: 200.0, fit: BoxFit.cover, ),TODO: 这一版本都使用了固定的高度,日后可以给个调整的值。
// 背景标记层
CustomPaint(
  size: Size(width, 200.0),
  painter: CaptchaBorderPainter(_offsetValue),
),
中层:被裁剪的图片,即拼图
// 拼图层
Positioned(
  left: _sliderValue * width - _offsetValue,
  child: ClipPath(
    clipper: CaptchaClipper(_sliderValue, _offsetValue),
    child: Image.network(
      widget.imageUrl,
      height: 200.0,
      fit: BoxFit.cover,
    ),
  ),
),
上层:拼图轮廓// 拼图的轮廓层
Positioned(
left: _sliderValue * width - _offsetValue,
child: CustomPaint(
size: Size(width, 200.0),
painter: CaptchaBorderPainter(_offsetValue),
),
),
4.4 水平位置确定/// 小部件的总宽度。 late double width;4.5 图片偏移逻辑
double _generateRandomNumber() {
  // 创建一个Random对象
  var random = Random();

  // 生成一个介于0.1和0.9之间的随机小数
  double randomValue = 0.1 + random.nextDouble() * 0.7;

  return randomValue;
}
这个便宜率需要在初始化状态时固定并暂存下来,放在_offsetRate中,可以使用State类的initState实现: @override
void initState() {
_offsetRate = _generateRandomNumber();
super.initState();
}
_offsetRate 的固定对于基于Clip的CaptchaClipper类的getClip方法中没有什么影响,应为在Flutter中Clip是不需要总是去重新绘制的,但是在基于Canvas的CaptchaBorderPainter就不一样了——毕竟CustomPainter类的paint方法会被不断调用,以至于如果不固定随机生成的_offsetRate ,则不断调用_generateRandomNumber方法导致描边位置错乱。实际的偏移量,无非是媒体查询出来的宽度去乘以这个便宜率:width = MediaQuery.of(context).size.width; _offsetValue = _offsetRate * width;背景标记层偏移
CustomPaint(
  size: Size(width, 200.0),
  painter: CaptchaBorderPainter(_offsetValue),
),
在 CaptchaBorderPainter 中:
@override
  void paint(Canvas canvas, Size size) {
    final paint = Paint()
      ..color = Colors.black
      ..style = PaintingStyle.stroke
      ..strokeWidth = 2.0;

    final rect = Rect.fromPoints(
      Offset(offsetValue, 60),
      Offset(
        offsetValue + 80,
        size.height - 40,
      ),
    );

    final path = Path()
      ..addRRect(RRect.fromRectAndRadius(rect, const Radius.circular(10.0)));

    canvas.drawPath(path, paint);
  }
可见,offsetValue不变则水平位置再不变。@override
Path getClip(Size size) {
final path = Path();
final rect = RRect.fromRectAndRadius(
Rect.fromPoints(
Offset(offsetValue + size.width * sliderValue, 60),
Offset(
offsetValue + size.width * sliderValue + 80,
size.height - 40,
),
),
const Radius.circular(10.0),
);
path.addRRect(rect);
return path;
}
前面有一个“offsetValue + …”。就是初始在相对于原图片左边的偏移量。正因为有了这个量,裁剪的不是图片左边的一部分,但是下面滑块却是初始时位于最左边的,我们需要在堆叠时将这个偏移量减去,就使得偏移的裁剪与底下的滑块初始时是“对齐”的:// 拼图层
Positioned(
// 减去偏移量与滑块对齐
left: _sliderValue * width - _offsetValue,
child: ClipPath(
clipper: CaptchaClipper(_sliderValue, _offsetValue),
child: Image.network(
widget.imageUrl,
height: 200.0,
fit: BoxFit.cover,
),
),
),
这样也就是表明,一开始的位置是最左边的位置,只有用户滑动滑块才会有可能移动到验证成功的位置!// 拼图的轮廓层
Positioned(
left: _sliderValue * width - _offsetValue,
child: CustomPaint(
size: Size(width, 200.0),
painter: CaptchaBorderPainter(_offsetValue),
),
),
五. 总结、展望/后续版本上面绘制的轮廓是简单的圆角矩形,不过如果改版为拼图的常见形状,比如: