- 联系我们
- duidaima.com 版权声明
- 闽ICP备2020021581号
-
 闽公网安备 35020302035485号
闽公网安备 35020302035485号

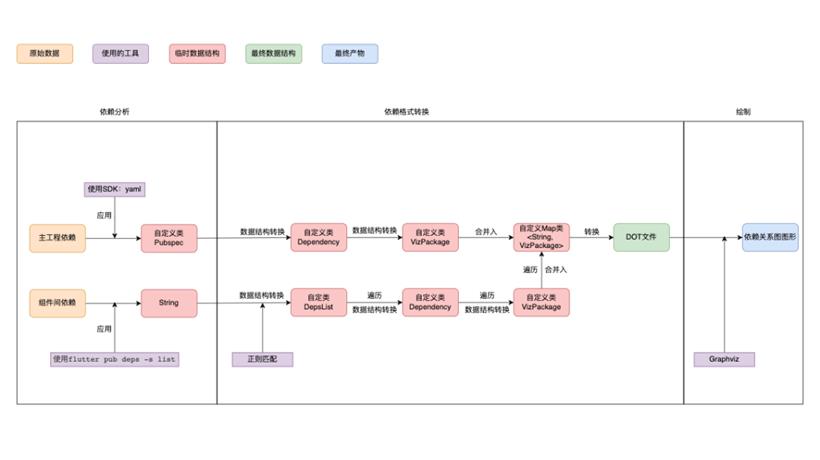
Graphviz 的主要特点和用途包括:
1.灵活的渲染功能:Graphviz 可以生成多种格式的图形文件,包括 raster 和 vector 格式,如 PNG、PDF、SVG 等。
2.自动布局:Graphviz 的一个主要特点是其自动布局能力。用户只需定义图的元素和它们之间的关系,Graphviz 就能够自动计算出合适的布局。
3.扩展性:Graphviz 提供了多种工具和库,可以用于各种应用,如 Web 服务、生成报告,或与其他软件的集成。
4.广泛的应用:Graphviz 被广泛用于各种领域,包括软件工程(如代码依赖关系图)、网络设计和分析、生物信息学(如基因表达网络)等。
name: moudule_a
version: 1.0.0

environment:
  sdk: '>=2.17.0 <3.0.0'

dependencies:
  path: ^1.8.0
  module_b:
    path: module_b
可以看出组件 A 依赖了组件 B(module_b)和其他 SDK。 组件 B 的依赖关系如下:name: moudule_b version: 0.0.1 environment: sdk: '>=2.17.0 <3.0.0' dependencies: meta: 1.7.04.1 我们要实现的效果


/// 基于 .yaml 文件生成 Pubspec 类
Pubspec rootPubspec() {
  assert(
    Directory(rootPackageDir).existsSync(),
    '`$rootPackageDir` does not exist.',
  );

  // 获取 pubspec.yaml 文件路径
  final pubspecPath = p.join(rootPackageDir, 'pubspec.yaml');

  // 将 pubspec.yaml 文件转换成 Pubspec 对象
  return Pubspec.parse(
    File(pubspecPath).readAsStringSync(),
    sourceUrl: Uri.parse(pubspecPath),
  );
}

final commandArgs = _pubCommand(['deps', '-s', 'list']);

/// 执行 flutter pub deps -s list 命令,获取命令行执行结果
String _pubCommand(List<String> commandArgs) {
  final proc = _isFlutterPkg ? 'flutter' : 'dart';
  final args = [
    ...['pub'],
    ...commandArgs
  ];

  final result = Process.runSync(
    proc,
    args,
    runInShell: true,
    workingDirectory: rootPackageDir,
  );

  return result.stdout as String;
}
解析出来的结果如下所示:Dart SDK 2.17.0 Flutter SDK 3.0.0 module_a 1.0.0 dependencies: path 1.8.3 module_b 0.0.1 meta 1.7.0 transitive dependencies: meta 1.7.0
/// pubspec为5.1.1中获取主工程依赖
final pubspec = rootPubspec();
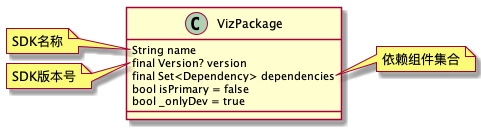
/// 主工程的依赖信息 转 VizPackage
VizPackage rootPackage = VizPackage(
pubspec.name,
null,
Dependency.getDependencies(
pubspec,
includeDevDependencies: !productionDependenciesOnly,
),
null,
);
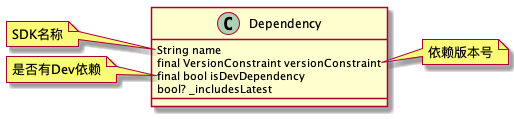
/// Pubspec 转 Dependency
static Set<Dependency> getDependencies(
parse.Pubspec pubspec, {
bool includeDevDependencies = true,
}) {
// 依赖关系结果集
final deps = <Dependency>{};
// 堆代码 duidaima.com
// 正式依赖:对应 pubspec.yaml 中的 dependencies
_populateFromSection(pubspec.dependencies, deps, false);
if (includeDevDependencies) {
// 开发依赖:对应 pubspec.yaml 中的 dev_dependencies
_populateFromSection(pubspec.devDependencies, deps, true);
}
return deps;
}
5.2.1.2 组件依赖数据结构转换
// 匹配一个包的名字的正则表达式
const _identifierRegExp = r'[a-zA-Z_]\w*';

// 匹配允许的软件包名称的正则表达式
const _pkgName = '$_identifierRegExp(?:\\.$_identifierRegExp)*';

/// Section头匹配正则,例如:dependencies:
final _sectionHeaderLine = RegExp(r'([a-zA-Z ]+):\n');
/// 一级包依赖匹配正则,例如:http 0.13.4
final _usageLine = RegExp('- ($_pkgName) (.+)\n');
/// 二级包依赖匹配正则,例如:async ^2.5.0
final _depLine = RegExp('  - ($_pkgName) (.+)\n');

/// scanner就是4.1.2中获取到的所有组件依赖关系的字符串
MapEntry<String, Map<VersionedEntry, Map<String, VersionConstraint>>>
    _scanSection(StringScanner scanner) {
  /// 开始匹配Section头
  scanner.expect(_sectionHeaderLine, name: 'section header');
  final header = scanner.lastMatch![1]!;

  /// 依赖关系结果集,key: 一级包信息,value: 二级包依赖信息
  final entries = <VersionedEntry, Map<String, VersionConstraint>>{};

  void scanUsage() {
    /// 开始匹配一级包依赖
    scanner.expect(_usageLine, name: 'dependency');
    final entry = VersionedEntry.fromMatch(scanner.lastMatch!);
    assert(!entries.containsKey(entry.name));

    final deps = entries[entry] = {};

    /// 开始匹配二级包依赖
    while (scanner.scan(_depLine)) {
      deps[scanner.lastMatch![1]!] =
          VersionConstraint.parse(scanner.lastMatch![2]!);
    }
  }

  do {
    scanUsage();
  } while (scanner.matches(_usageLine));

  return MapEntry(header, entries);
}
至此,组件间依赖的数据结构被转换成了 DepsList 类型。但是主工程的依赖是 VizPackage 类型。二者数据结构不同,仍然不能直接合并。接下来需要对就需要再将 DepsList 转换为 VizPackage 类型。由于 DepsList 中的 sections 存储了所有组件的依赖关系,下面展示一下如何将单个 section 转换为 VizPackage。全部转换只需遍历调用即可。/// 将DepsList中,sections中单个元素的格式转换为 VizPackage
VizPackage addPkg(VersionedEntry key, Map<String, VersionConstraint> value) {
final pkg = VizPackage(
key.name,
key.version,
SplayTreeSet.of(
value.entries
.where((element) => !_ignoredPackages.contains(element.key))
.map(
(entry) => Dependency(entry.key, entry.value.toString(), false),
),
),
flagOutdated ? _latest(key.name) : null,
);
return pkg;
}
5.2.2 依赖合并/// 获取主工程依赖关系
Pubspec rootPubspec() {
// ...参考 5.1.1 章节代码
}
/// 获取所有组件的依赖关系
/// ...参考 5.1.2 章节代码
DepsList rootDeps() {
final commandOutput = _pubCommand(['deps', '-s', 'list']);
return DepsList.parse(commandOutput);
}
/// 所有依赖关系合并
Future<Map<String, VizPackage>> getReferencedPackages(
bool flagOutdated,
bool directDependenciesOnly,
bool productionDependenciesOnly,
) async {
/// 1. 创建最后的依赖关系结果集
final map = SplayTreeMap<String, VizPackage>();
/// 2.1 获取主工程依赖关系
final deps = rootPubspec();
/// 2.2 主工程的依赖关系转换
rootPackge = VizPackage(
pubspec.name,
null,
Dependency.getDependencies(
pubspec,
includeDevDependencies: !productionDependenciesOnly,
),
null,
);
/// 2.3 主工程的依赖关系保存
map[rootPackge.name] = rootPackge;
/// 3.1 获取组件间依赖关系
final deps = rootDeps();
/// 3.2 组件间依赖关系转换并保存
addSectionValues(deps.sections['dependencies'] ?? const {})
/// 3.2.1 遍历组件间依赖,转换依赖关系
void addSectionValues(
Map<VersionedEntry, Map<String, VersionConstraint>> section,
) {
for (var entry in section.entries) {
addPkg(entry.key, entry.value);
}
}
/// 3.2.2 将依赖关系转换为 VizPackage,并保存
void addPkg(VersionedEntry key, Map<String, VersionConstraint> value) {
final pkg = VizPackage(
key.name,
key.version,
SplayTreeSet.of(
value.entries
.where((element) => !_ignoredPackages.contains(element.key))
.map(
(entry) => Dependency(entry.key, entry.value.toString(), false),
),
),
flagOutdated ? _latest(key.name) : null,
);
map[pkg.name] = pkg;
}
return map;
}
至此,两部分依赖关系被转换成为了同一个数据结构,并合并到了一起。接下来只需要将最终结果转换成 DOT 就可以愉快地拿去可视化了。dependencies: gviz: ^0.4.0具体的转换逻辑封装到了toDot方法中:
import 'package:gviz/gviz.dart';

/// 将依赖关系结果集转换成 dot 文本
/// [packages] 项目依赖关系结果集
/// [ignorePackages] 需要忽略的 package 名称
String toDot(
  Map<String, VizPackage> packages, {
  bool escapeLabels = false,
  Iterable<String> ignorePackages = const [],
}) {
  // 初始化 Gviz,设置绘制属性
  final gviz = Gviz(
    name: 'demo',
    graphProperties: {'nodesep': '0.2'},
    edgeProperties: {'fontcolor': 'gray'},
  );
  for (var pack
      in packages.values.where((v) => !ignorePackages.contains(v.name))) {
    gviz.addBlankLine();
    _writeDot(pack, gviz, 'demo', escapeLabels, ignorePackages);
  }
  return gviz.toString();
}

// 绘制点和连线
void _writeDot(
  VizPackage pkg,
  Gviz gviz,
  String rootName,
  bool escapeLabels,
  Iterable<String> ignorePackages,
) {
  final isRoot = rootName == pkg.name;
  final newLine = escapeLabels ? r'\n' : '\n';

  // 模块展示内容:名称+版本号
  var label = pkg.name;
  if (pkg.version != null) {
    label = '$label$newLine${pkg.version}';
  }
  final props = {'label': label};

  // ...设置字体,间距等样式,此部分代码省略

  // 追加节点
  gviz.addNode(pkg.name, properties: props);
  final orderedDeps = pkg.dependencies.toList(growable: false)..sort();
  for (var dep in orderedDeps.where((d) => !ignorePackages.contains(d.name))) {
    if (!dep.isDevDependency || isRoot) {
      final edgeProps = <String, String>{};
      // 连线展示内容
      if (!dep.versionConstraint.isAny) {
        edgeProps['label'] = '${dep.versionConstraint}';
      }
      // ...设置字体,间距等样式,此部分代码省略
      if (dep.name == rootName) {
        // 如果一个包依赖于根节点,它不应该影响布局
        edgeProps['constraint'] = 'false';
      }
      // 绘制连线
      gviz.addEdge(pkg.name, dep.name, properties: edgeProps);
    }
  }
}
以前面的 Demo 工程为例,输出的 .dot 文件内容如下:digraph demo {
graph [nodesep="0.2"];
edge [fontcolor=gray];
meta [label="meta 1.7.0", shape=box, margin="0.25,0.15"];
module_a [label=module_a, fontsize="18", style=bold, shape=box, margin="0.25,0.15"];
module_a -> module_b [label="<empty>", penwidth="2"];
module_a -> path [label="^1.8.0", penwidth="2"];
module_b [label="module_b 0.0.1", shape=box, margin="0.25,0.15", style=bold];
module_b -> meta [label="1.7.0"];
path [label="path 1.8.3", shape=box, margin="0.25,0.15", style=bold];
}
5.3 绘制可视化关系图// 堆代码 duidaima.com brew install graphviz执行 dot 命令输出依赖关系图:
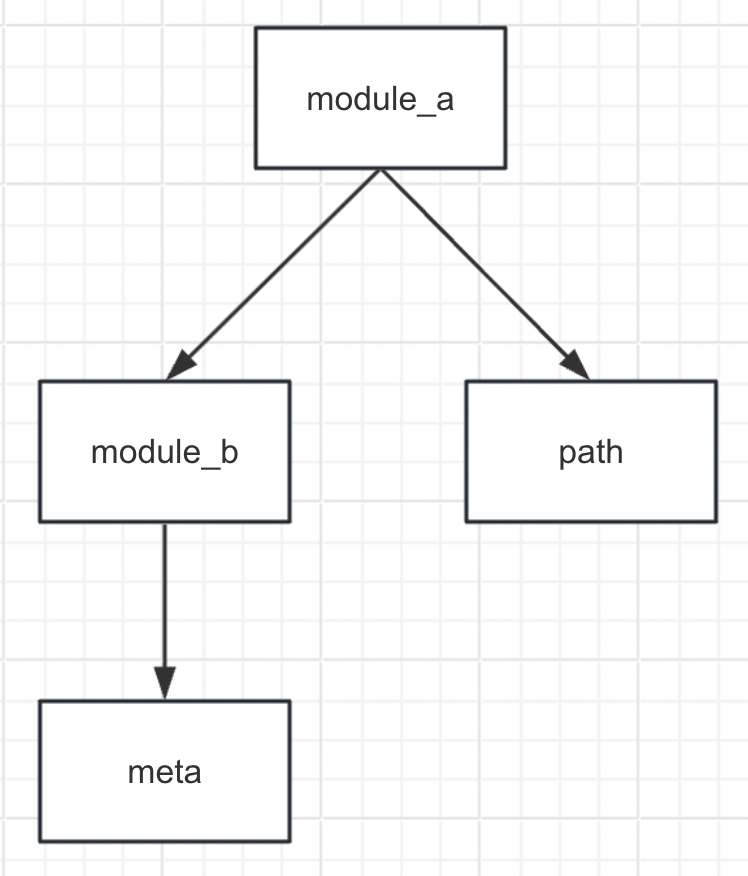
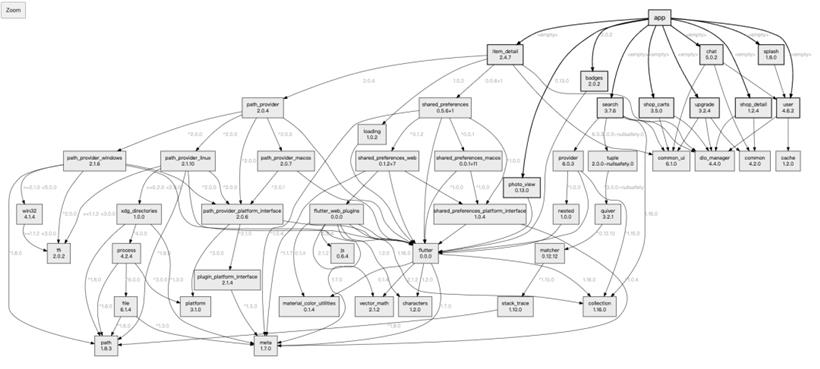
dot x.dot -T png -o x.png至此我们已经可以从一个工程中,分析依赖,并得到了一张清晰明了的依赖关系图。 例如,Demo工程的依赖关系图如下:

通过前面的分析可知,gviz 分别用了 2 种不同的方式来解析主工程和子组件工程的依赖清单,并且解析结果的数据结构也不一致,需要额外进行合并操作,经实测,统一采用同一种方式解析就可以实现,个人更推荐第二种 (命令行方式) 。作者做 yaml 文件解析目的主要是为了获取主工程 pubsepc.yaml 文件配置信息,便于后续绘制依赖关系图能区分出主工程做一些特殊处理。
#自定义的yaml文件节点
dependency_rules:
  # 需要统计的组件清单
  include:
    - search
    - chat
    - ...
在解析依赖树时,用此清单(白名单)进行过滤,这样,用于生成dot文件的组件清单全部在白名单内。#自定义的yaml文件节点
dependency_rules:
# 需要统计的路径
include:
- plugins/**
- packages/common/**
在 include 指定的路径下扫描出所有工程的 pubspec.yaml 文件,并解析出所有的组件名(库名)列表,也就是自动生成白名单,剩下的跟方法一相同。#自定义的yaml文件节点
dependency_rules:
# 需要统计的路径
include:
- plugins/**
- packages/common/**
# 不需要统计的路径
exclude:
- example/**
- plugins/**/example/
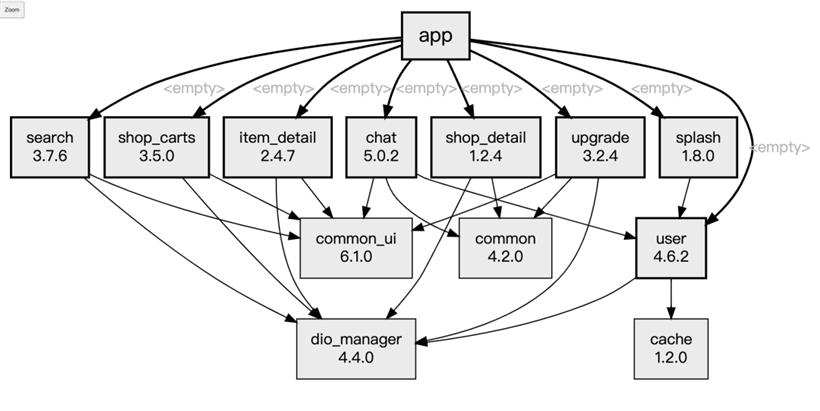
知其然,知其所以然,才能做到化繁为简,更好的结合和服务自身的业务。经过过滤之后,我们得到的依赖关系图就可以是下面这样的了: