- 联系我们
- duidaima.com 版权声明
- 闽ICP备2020021581号
-
 闽公网安备 35020302035485号
闽公网安备 35020302035485号

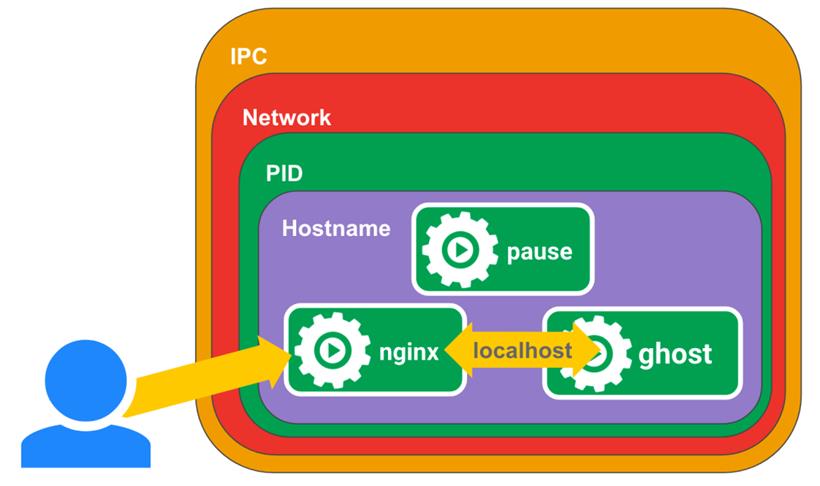
3.ghost 容器,加入到 Pause 容器的 Namespace 中,共享资源
// 引入各种头文件

// 信号注册处理函数 (SIGINT, SIGTERM)
// 这种属于正常退出情况,所以退出码为 0
static void sigdown(int signo) {
  psignal(signo, "Shutting down, got signal");
  exit(0);
}
// 堆代码 duidaima.com
// 信号注册处理函数 (SIGCHLD)
// 由操作系统发送给父进程,通知子进程的状态变化
//   子进程终止:
//   子进程暂停或恢复运行:
static void sigreap(int signo) {
  // 等待指定的子进程退出

  // 函数原型:
  //   pid_t waitpid(pid_t pid, int *status, int options);

  // 参数说明:
  //   -1: 任意子进程
  //   NULL: 子进程的退出状态无需存储
  //   WNOHANG: 非阻塞,没有找到子进程时直接返回 0
  while (waitpid(-1, NULL, WNOHANG) > 0)
    ;
  // 如果子进程的数量大于 0, 无限循环
}

int main(int argc, char **argv) {
  // 打印版本号 ...

  if (getpid() != 1)
    // 如果 Pause 进程 ID 不等于 1, 输出警告信息

    // 因为进程 ID 等于 1 是 init 进程,负责接收处理僵尸进程
    // 所以如果 Pause 进程 ID 不等于 1, 可能产生僵尸进程的堆积
    fprintf(stderr, "Warning: pause should be the first process\n");

  // 注册 SIGINT 信号 (Ctrl + C)
  if (sigaction(SIGINT, &(struct sigaction){.sa_handler = sigdown}, NULL) < 0)
    return 1;
  // 注册 SIGTERM 信号 (例如执行 kill, systemctl stop 等命令)
  if (sigaction(SIGTERM, &(struct sigaction){.sa_handler = sigdown}, NULL) < 0)
    return 2;
  // 注册 SIGCHLD 信号
  if (sigaction(SIGCHLD, &(struct sigaction){.sa_handler = sigreap,
                                             .sa_flags = SA_NOCLDSTOP},
                NULL) < 0)
    return 3;

  // 无限循环
  for (;;)
    // pause 函数可以使当前进程陷入睡眠状态,避免浪费 CPU 资源
    // 直到捕获到一个信号后被唤醒
    pause();

  // 为什么退出码是 42 ? 因为作者比较任性 ?
  // 感兴趣的读者可以看看回答
  // https://stackoverflow.com/questions/16236182/what-is-the-origin-of-magic-number-42-indispensable-in-coding
  return 42;
}
通过上面的源代码可以看到,Pause 容器的本质就是一个独立的进程,该进程作为容器内第一个进程启动之后变身为父进程,后续启动的进程都会成为该进程的子进程, 父进程通过信号量的变化来执行对应的操作。Pause 容器唯一的作用是 保证即使 Pod 中没有任何容器运行也不会被删除,因为这时候还有 Pause 容器在运行。// https://github.com/kubernetes/kubernetes/blob/f8a4e343a106a73145464e8de8a919d13b59d25a/pkg/kubelet/kuberuntime/kuberuntime_manager.go#L1053
// SyncPod 方法通过执行下列步骤使 Pod 运行并达到预期的状态
//
// 1. 计算 Pause 容器和其他容器的状态变化
// 2. 清理 Pause 容器
// 3. 清理还在运行中,但是状态不合理的容器 (也就是早应该退出的容器)
// 4. 创建 Pause 容器
// 5. 创建临时容器
// 6. 创建 init 容器
// 7. 调整运行容器的状态
// 8. 创建具体的业务容器
func (m *kubeGenericRuntimeManager) SyncPod(ctx context.Context, ...) (result kubecontainer.PodSyncResult) {
// Step 1: 计算 Pause 容器和其他容器的状态变化
podContainerChanges := m.computePodActions(ctx, pod, podStatus)
...
// Step 2: 如果 Pause 容器发生了变化,结束 Pod
if podContainerChanges.KillPod {
...
} else {
// Step 3: 结束 Pod 内所有不需要运行的容器
for containerID, containerInfo := range podContainerChanges.ContainersToKill {
...
}
}
// 默认使用参数 Pod 状态对象的 IP 地址作为 Pod 的 IP
var podIPs []string
if podStatus != nil {
podIPs = podStatus.IPs
}
// Step 4: 创建 Pause 容器
podSandboxID := podContainerChanges.SandboxID
if podContainerChanges.CreateSandbox {
podSandboxID, msg, err = m.createPodSandbox(ctx, pod, podContainerChanges.Attempt)
...
}
...
// 针对各种类型容器的通用启动函数
// 参数说明:
// typeName: 容器类型 (例如临时容器,init 容器等)
// metricLabel: 容器的标签,主要用于 metric 采集
start := func(ctx context.Context, typeName, metricLabel string, spec *startSpec) error {
...
// 启动容器
// 真正启动容器的方法
if msg, err := m.startContainer(ctx, ...); err != nil {
...
}
return nil
}
// Step 5: 创建临时容器
for _, idx := range podContainerChanges.EphemeralContainersToStart {
start(ctx, "ephemeral container", ...)
}
if !utilfeature.DefaultFeatureGate.Enabled(features.SidecarContainers) {
// Step 6: 创建单个 init 容器
if container := podContainerChanges.NextInitContainerToStart; container != nil {
if err := start(ctx, "init container", ...); err != nil {
...
}
}
} else {
// Step 6: 创建多个 init 容器
for _, idx := range podContainerChanges.InitContainersToStart {
container := &pod.Spec.InitContainers[idx]
if err := start(ctx, "init container", ...); err != nil {
...
}
}
}
// Step 7: 调整运行容器的状态
if isInPlacePodVerticalScalingAllowed(pod) {
...
}
// Step 8: 创建具体的业务容器
for _, idx := range podContainerChanges.ContainersToStart {
start(ctx, "container", ...)
}
return
}
上面的 SyncPod 方法主要完成了 Pod 的创建和 Pod 内各种容器的创建,从方法内部的调用可以看到,真正启动容器的操作实现在 startContainer 方法中:// startContainer 方法启动容器并返回执行结果
// 主要分为如下几个步骤:
// 1. 拉取镜像
// 2. 创建容器
// 3. 启动容器
// 4. 执行生命周期事件钩子函数 (容器启动后函数)
func (m *kubeGenericRuntimeManager) startContainer(ctx context.Context, ...) (string, error) {
container := spec.container
// Step 1: 拉取镜像
imageRef, msg, err := m.imagePuller.EnsureImageExists(ctx, ...)
...
// Step 2: 创建容器
// 新容器的重启次数为 0
// 旧容器的重启次数递增
restartCount := 0
containerStatus := podStatus.FindContainerStatusByName(container.Name)
if containerStatus != nil {
restartCount = containerStatus.RestartCount + 1
} else {
...
}
...
// 为容器设置资源限制
...
// 生成容器配置
containerConfig, cleanupAction, err := m.generateContainerConfig(ctx, ...)
...
// Step 3: 启动容器
err = m.runtimeService.StartContainer(ctx, containerID)
...
// 将容器日志文件通过软链接 连接到遗留的历史容器日志位置
if _, err := m.osInterface.Stat(containerLog); !os.IsNotExist(err) {
...
}
// Step 4: 执行生命周期事件钩子函数 (容器启动后函数)
if container.Lifecycle != nil && container.Lifecycle.PostStart != nil {
msg, handlerErr := m.runner.Run(ctx, ...)
if handlerErr != nil {
// 如果钩子函数执行失败,杀死容器
if err := m.killContainer(ctx, ...); err != nil {
...
}
return msg, ErrPostStartHook
}
}
return "", nil
}
到这里,容器的创建和启动代码就分析完了。