- 联系我们
- duidaima.com 版权声明
- 闽ICP备2020021581号
-
 闽公网安备 35020302035485号
闽公网安备 35020302035485号

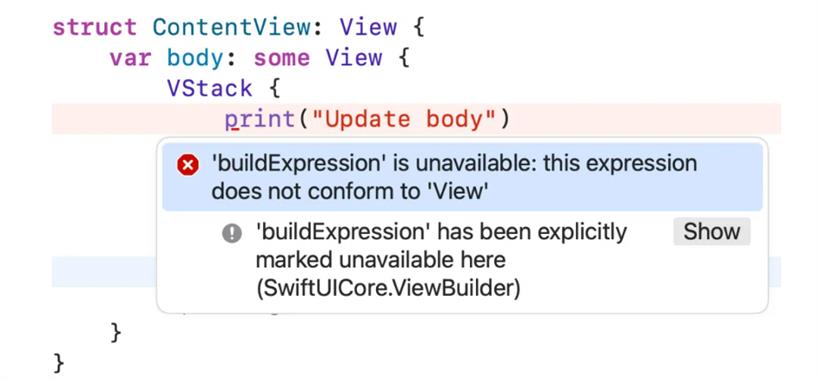
struct ContentView: View {
    var body: some View {
        print("Update body")  // 编译错误!
        Text("Hello, World!")
    }
}
结果 Xcode 直接给我来了个 "'buildExpression' is unavailable: this expression does not conform to 'View'" 编译错误。
struct ContentView: View {
    var body: some View {
        let _ = print("Update body")  // 正确!
        Text("Hello, World!")
    }
}
这里用下划线 _ 来忽略 print 的返回值,既解决了编译问题,又避免了编译器警告。struct ContentView: View {
var body: some View {
var x = print("Update body") // 也可以
let y = print("Update body") // 也行
Text("Hello, World!")
}
}
但用下划线的方式最优雅,因为我们确实不需要 print 的返回值。struct ContentView: View {
@Stateprivatevar isTrue = true
var body: some View {
VStack {
let_ = print("ContentView 刷新了")
Text(isTrue ? "True" : "False")
Button("切换") {
isTrue.toggle()
}
SpyView()
}
}
}
struct SpyView: View {
var body: some View {
let_ = print("SpyView 刷新了")
Text("我是监视器")
}
}
运行后点击按钮,你会发现只有 ContentView 会打印刷新信息,SpyView 不会。这说明 SwiftUI 的刷新机制很智能,只会刷新依赖状态发生变化的 View。struct ContentView: View {
@Stateprivatevar isTrue = true
var body: some View {
VStack {
let_ = Self._printChanges()
Text(isTrue ? "True" : "False")
Button("切换") {
isTrue.toggle()
}
}
}
}
这个方法会在控制台输出详细的刷新原因,比如 @State 变量的变化等。注意这里要用 Self._printChanges(),因为这是一个静态方法。struct DebugView: View {
let title: String
var body: some View {
let _ = print("[\(title)] 视图更新: \(Date())")
Text(title)
}
}
给每个 View 加上时间戳和标识,这样就能清楚地看到各个组件的刷新时序了。配合断点使用:print 调试和断点调试结合起来效果更好