- 联系我们
- duidaima.com 版权声明
- 闽ICP备2020021581号
-
 闽公网安备 35020302035485号
闽公网安备 35020302035485号

<dependency>
  <groupId>io.rest-assured</groupId>
  <artifactId>rest-assured</artifactId>
  <version>5.3.0</version>
  <scope>test</scope>
</dependency>
Rest Assured结构
Show Me Code
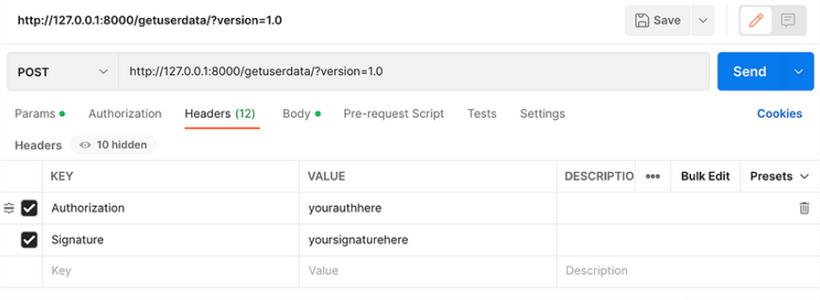
我们现在通过一个例子来演示下如何使用Rest Assured,首先我们看下postman的例子: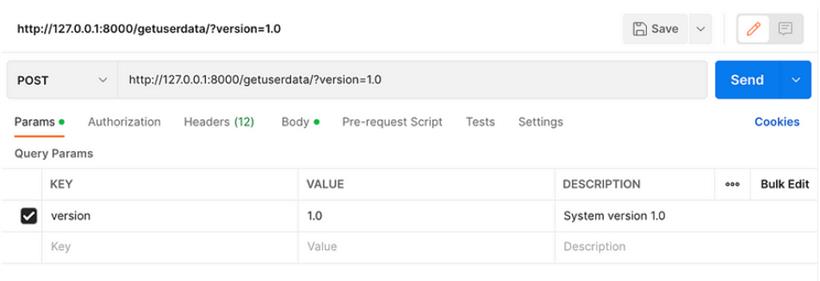

import io.restassured.builder.RequestSpecBuilder;
import io.restassured.response.Response;
import io.restassured.specification.RequestSpecification;
import org.testng.annotations.Test;

import static io.restassured.RestAssured.given;
import static org.hamcrest.Matchers.equalTo;
import static org.hamcrest.Matchers.lessThan;
// 堆代码 duidaima.com
public class TestRestAssured {
    @Test
    public void testMyApi() {
        String jsonBody = "{"email":"dhadiprasetyo@gmail.com","uid":"Jzr0sOORprar10kay6CweZ5FNYP2"}";

        Response response = given().baseUri("http://127.0.0.1:8000")
            .queryParam("version", "1.0")
            .header("Authorization", "yourauthhere")
            .header("Signature", "yoursignaturehere")
            .body(jsonBody)
            .when().post("/getuserdata/")
            .then().assertThat().statusCode(200)
            .header("Content-Type", "application/json")
            .header("Cache-Control", "max-age=3600")
            .body("name", equalTo("Darmawan Hadiprasetyo"))
            .time(lessThan(5000L))
            .extract().response();
    }
}
首先我们在given() 中设置前置条件given().baseUri("http://127.0.0.1:8000")
.queryParam("version", "1.0")
.header("Authorization", "yourauthhere")
.header("Signature", "yoursignaturehere")
.body(jsonBody)
然后在when()中定义请求方法,本例中为POST.when().post("/getuserdata/")
然后我们从我们的请求中断言状态代码、标头、正文和响应时间.then().assertThat().statusCode(200)
.header("Content-Type", "application/json")
.header("Cache-Control", "max-age=3600")
.body("name", equalTo("Darmawan Hadiprasetyo"))
.time(lessThan(5000L))
.extract().response();
如何提取响应体?{
"name": "alvin",
"role": "SDET"
}
以下是我们如何提取这些数据:JsonPath responseBody = response.jsonPath();
String fullName = responseBody.getString("name");
String role = responseBody.getString("role");
import io.restassured.builder.RequestSpecBuilder;
import io.restassured.path.json.JsonPath;
import io.restassured.response.Response;
import io.restassured.specification.RequestSpecification;
import org.testng.annotations.Test;
import static io.restassured.RestAssured.given;
import static org.hamcrest.Matchers.equalTo;
import static org.hamcrest.Matchers.lessThan;
public class TestRestAssured {
public static RequestSpecification requestSpecification() {
return new RequestSpecBuilder().setBaseUri("http://127.0.0.1:8000")
.addQueryParam("version", "1.0")
.addHeader("Authorization", "yourauthhere")
.addHeader("Signature", "yoursignaturehere")
.build();
}
@Test
public void testMyApi() {
String jsonBody = "{"email":"dhadiprasetyo@gmail.com","uid":"Jzr0sOORprar10kay6CweZ5FNYP2"}";
Response response = given().spec(requestSpecification())
.body(jsonBody)
.when().post("/getuserdata/")
.then().assertThat().statusCode(200)
    .header("Content-Type", "application/json")
    .header("Cache-Control", "max-age=3600")
    .body("name", equalTo("Darmawan Hadiprasetyo"))
    .time(lessThan(5000L))
    .extract().response();
JsonPath responseBody = response.jsonPath();
String fullName = responseBody.getString("name");
String linkedIn = responseBody.getString("linkedin");
String role = responseBody.getString("role");
}
}
现在,您可以在具有相同前提条件的任何其他需要的测试中重用 requestSpecification() 方法。查看与我们之前代码的区别:// previous
Response response = given().baseUri("http://127.0.0.1:8000")
.queryParam("version", "1.0")
.header("Authorization", "yourauthhere")
.header("Signature", "yoursignaturehere")
.body(jsonBody)
.when().post("/getuserdata/")
// then
Response response = given().spec(requestSpecification())
.body(jsonBody)
.when().post("/getuserdata/")
通过使用 given().spec(),我们的代码现在变得简单多了。