- 联系我们
- duidaima.com 版权声明
- 闽ICP备2020021581号
-
 闽公网安备 35020302035485号
闽公网安备 35020302035485号

.spring aop技术;
public interface MessagePlugin {

    public String sendMsg(Map msgMap);

}
定义两个不同的实现public class AliyunMsg implements MessagePlugin {
@Override
public String sendMsg(Map msgMap) {
// 堆代码 duidaima.com
System.out.println("aliyun sendMsg");
return "aliyun sendMsg";
}
}
public class TencentMsg implements MessagePlugin {
@Override
public String sendMsg(Map msgMap) {
System.out.println("tencent sendMsg");
return "tencent sendMsg";
}
}
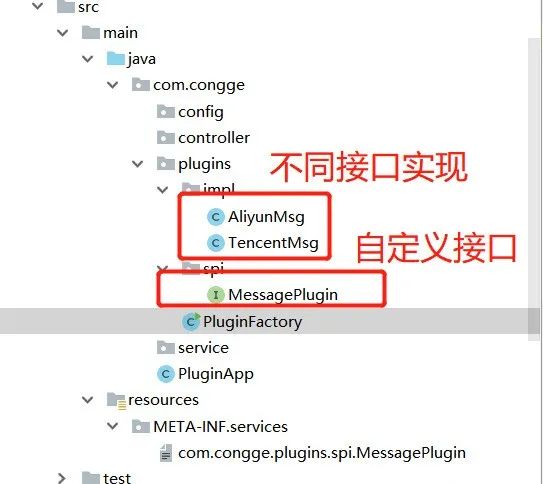
在resources目录按照规范要求创建文件目录,并填写实现类的全类名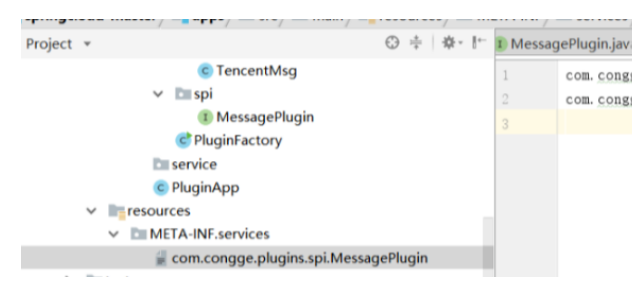
 public static void main(String[] args) {
        ServiceLoader<MessagePlugin> serviceLoader = ServiceLoader.load(MessagePlugin.class);
        Iterator<MessagePlugin> iterator = serviceLoader.iterator();
        Map map = new HashMap();
        while (iterator.hasNext()){
            MessagePlugin messagePlugin = iterator.next();
            messagePlugin.sendMsg(map);
        }
    }
运行上面的程序后,可以看到下面的效果,这就是说,使用ServiceLoader的方式可以加载到不同接口的实现,业务中只需要根据自身的需求,结合配置参数的方式就可以灵活的控制具体使用哪一个实现。
server :
  port : 8081
impl:
  name : com.congge.plugins.spi.MessagePlugin
  clazz :
    - com.congge.plugins.impl.TencentMsg
    - com.congge.plugins.impl.AliyunMsg
2.2.2 自定义配置文件加载类import lombok.Getter;
import lombok.Setter;
import lombok.ToString;
import org.springframework.boot.context.properties.ConfigurationProperties;
@ConfigurationProperties("impl")
@ToString
public class ClassImpl {
@Getter
@Setter
String name;
@Getter
@Setter
String[] clazz;
}
2.2.3 自定义测试接口import com.congge.config.ClassImpl;
import com.congge.plugins.spi.MessagePlugin;
import org.springframework.beans.factory.annotation.Autowired;
import org.springframework.web.bind.annotation.GetMapping;
import org.springframework.web.bind.annotation.RestController;
import java.util.HashMap;
@RestController
public class SendMsgController {
@Autowired
ClassImpl classImpl;
//localhost:8081/sendMsg
@GetMapping("/sendMsg")
public String sendMsg() throws Exception{
for (int i=0;i<classImpl.getClazz().length;i++) {
Class pluginClass= Class.forName(classImpl.getClazz()[i]);
MessagePlugin messagePlugin = (MessagePlugin) pluginClass.newInstance();
messagePlugin.sendMsg(new HashMap());
}
return "success";
}
}
2.2.4 启动类@EnableConfigurationProperties({ClassImpl.class})
@SpringBootApplication
public class PluginApp {
public static void main(String[] args) {
SpringApplication.run(PluginApp.class,args);
}
}
启动工程代码后,调用接口:localhost:8081/sendMsg,在控制台中可以看到下面的输出信息,即通过这种方式也可以实现类似serviceloader的方式,不过在实际使用时,可以结合配置参数进行灵活的控制;
@Component
public class ServiceLoaderUtils {
@Autowired
ClassImpl classImpl;
public static void loadJarsFromAppFolder() throws Exception {
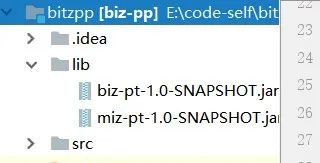
String path = "E:\\code-self\\bitzpp\\lib";
File f = new File(path);
if (f.isDirectory()) {
for (File subf : f.listFiles()) {
if (subf.isFile()) {
loadJarFile(subf);
}
}
} else {
loadJarFile(f);
}
}
public static void loadJarFile(File path) throws Exception {
URL url = path.toURI().toURL();
// 可以获取到AppClassLoader,可以提到前面,不用每次都获取一次
URLClassLoader classLoader = (URLClassLoader) ClassLoader.getSystemClassLoader();
// 加载
//Method method = URLClassLoader.class.getDeclaredMethod("sendMsg", Map.class);
Method method = URLClassLoader.class.getMethod("sendMsg", Map.class);
method.setAccessible(true);
method.invoke(classLoader, url);
}
public void main(String[] args) throws Exception{
System.out.println(invokeMethod("hello"));;
}
public String doExecuteMethod() throws Exception{
String path = "E:\\code-self\\bitzpp\\lib";
File f1 = new File(path);
Object result = null;
if (f1.isDirectory()) {
for (File subf : f1.listFiles()) {
//获取文件名称
String name = subf.getName();
String fullPath = path + "\\" + name;
//执行反射相关的方法
//ServiceLoaderUtils serviceLoaderUtils = new ServiceLoaderUtils();
//result = serviceLoaderUtils.loadMethod(fullPath);
File f = new File(fullPath);
URL urlB = f.toURI().toURL();
URLClassLoader classLoaderA = new URLClassLoader(new URL[]{urlB}, Thread.currentThread()
.getContextClassLoader());
String[] clazz = classImpl.getClazz();
for(String claName : clazz){
if(name.equals("biz-pt-1.0-SNAPSHOT.jar")){
if(!claName.equals("com.congge.spi.BitptImpl")){
continue;
}
Class<?> loadClass = classLoaderA.loadClass(claName);
if(Objects.isNull(loadClass)){
continue;
}
//获取实例
Object obj = loadClass.newInstance();
Map map = new HashMap();
//获取方法
Method method=loadClass.getDeclaredMethod("sendMsg",Map.class);
result = method.invoke(obj,map);
if(Objects.nonNull(result)){
break;
}
}else if(name.equals("miz-pt-1.0-SNAPSHOT.jar")){
if(!claName.equals("com.congge.spi.MizptImpl")){
continue;
}
Class<?> loadClass = classLoaderA.loadClass(claName);
if(Objects.isNull(loadClass)){
continue;
}
//获取实例
Object obj = loadClass.newInstance();
Map map = new HashMap();
//获取方法
Method method=loadClass.getDeclaredMethod("sendMsg",Map.class);
result = method.invoke(obj,map);
if(Objects.nonNull(result)){
break;
}
}
}
if(Objects.nonNull(result)){
break;
}
}
}
return result.toString();
}
public Object loadMethod(String fullPath) throws Exception{
File f = new File(fullPath);
URL urlB = f.toURI().toURL();
URLClassLoader classLoaderA = new URLClassLoader(new URL[]{urlB}, Thread.currentThread()
.getContextClassLoader());
Object result = null;
String[] clazz = classImpl.getClazz();
for(String claName : clazz){
Class<?> loadClass = classLoaderA.loadClass(claName);
if(Objects.isNull(loadClass)){
continue;
}
//获取实例
Object obj = loadClass.newInstance();
Map map = new HashMap();
//获取方法
Method method=loadClass.getDeclaredMethod("sendMsg",Map.class);
result = method.invoke(obj,map);
if(Objects.nonNull(result)){
break;
}
}
return result;
}
public static String invokeMethod(String text) throws Exception{
String path = "E:\\code-self\\bitzpp\\lib\\miz-pt-1.0-SNAPSHOT.jar";
File f = new File(path);
URL urlB = f.toURI().toURL();
URLClassLoader classLoaderA = new URLClassLoader(new URL[]{urlB}, Thread.currentThread()
.getContextClassLoader());
Class<?> product = classLoaderA.loadClass("com.congge.spi.MizptImpl");
//获取实例
Object obj = product.newInstance();
Map map = new HashMap();
//获取方法
Method method=product.getDeclaredMethod("sendMsg",Map.class);
//执行方法
Object result1 = method.invoke(obj,map);
// TODO According to the requirements , write the implementation code.
return result1.toString();
}
public static String getApplicationFolder() {
String path = ServiceLoaderUtils.class.getProtectionDomain().getCodeSource().getLocation().getPath();
return new File(path).getParent();
}
}
2.3.3 添加测试接口@GetMapping("/sendMsgV2")
public String index() throws Exception {
String result = serviceLoaderUtils.doExecuteMethod();
return result;
}
以上全部完成之后,启动工程,测试一下该接口,仍然可以得到预期结果;
public static List<String> loadFactoryNames(Class<?> factoryClass, ClassLoader classLoader) {
    String factoryClassName = factoryClass.getName();
    try {
        Enumeration<URL> urls = (classLoader != null ? classLoader.getResources(FACTORIES_RESOURCE_LOCATION) :
                ClassLoader.getSystemResources(FACTORIES_RESOURCE_LOCATION));
        List<String> result = new ArrayList<String>();
        while (urls.hasMoreElements()) {
            URL url = urls.nextElement();
            Properties properties = PropertiesLoaderUtils.loadProperties(new UrlResource(url));
            String factoryClassNames = properties.getProperty(factoryClassName);
            result.addAll(Arrays.asList(StringUtils.commaDelimitedListToStringArray(factoryClassNames)));
        }
        return result;
    }
    catch (IOException ex) {
        throw new IllegalArgumentException("Unable to load [" + factoryClass.getName() +
                "] factories from location [" + FACTORIES_RESOURCE_LOCATION + "]", ex);
    }
}
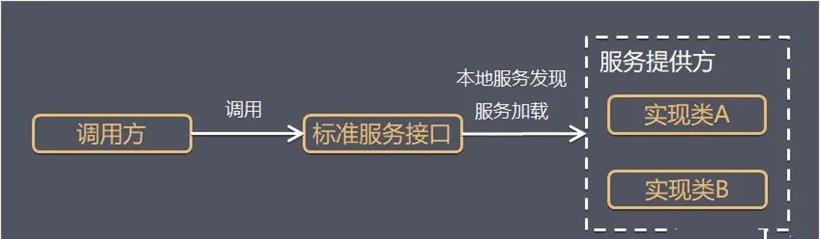
从代码中我们可以知道,在这个方法中会遍历整个ClassLoader中所有jar包下的spring.factories文件,就是说我们可以在自己的jar中配置spring.factories文件,不会影响到其它地方的配置,也不会被别人的配置覆盖。com.xxx.interface=com.xxx.classname如果一个接口希望配置多个实现类,可以使用’,’进行分割
public interface SmsPlugin {
    // 堆代码 duidaima.com
    public void sendMessage(String message);

}
3.3.2 定义2个服务实现public class BizSmsImpl implements SmsPlugin {
@Override
public void sendMessage(String message) {
System.out.println("this is BizSmsImpl sendMessage..." + message);
}
}
实现类2public class SystemSmsImpl implements SmsPlugin {
@Override
public void sendMessage(String message) {
System.out.println("this is SystemSmsImpl sendMessage..." + message);
}
}
3.3.3 添加spring.factories文件com.congge.plugin.spi.SmsPlugin=\ com.congge.plugin.impl.SystemSmsImpl,\ com.congge.plugin.impl.BizSmsImpl3.3.4 添加自定义接口
@GetMapping("/sendMsgV3")
public String sendMsgV3(String msg) throws Exception{
    List<SmsPlugin> smsServices= SpringFactoriesLoader.loadFactories(SmsPlugin.class, null);
    for(SmsPlugin smsService : smsServices){
        smsService.sendMessage(msg);
    }
    return "success";
}
启动工程之后,调用一下该接口进行测试,localhost:8087/sendMsgV3?msg=hello,通过控制台,可以看到,这种方式能够正确获取到系统中可用的服务实现;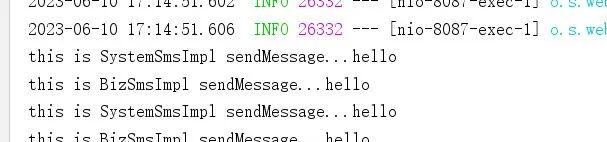
public interface MessagePlugin {
    public String sendMsg(Map msgMap);
}
4.2.2 打成jar包并安装到仓库import com.congge.plugin.spi.MessagePlugin;
import com.congge.spi.BitptImpl;
import com.congge.spi.MizptImpl;
import java.util.*;
public class PluginFactory {
public void installPlugin(){
Map context = new LinkedHashMap();
context.put("_userId","");
context.put("_version","1.0");
context.put("_type","sms");
ServiceLoader<MessagePlugin> serviceLoader = ServiceLoader.load(MessagePlugin.class);
Iterator<MessagePlugin> iterator = serviceLoader.iterator();
while (iterator.hasNext()){
MessagePlugin messagePlugin = iterator.next();
messagePlugin.sendMsg(context);
}
}
public static MessagePlugin getTargetPlugin(String type){
ServiceLoader<MessagePlugin> serviceLoader = ServiceLoader.load(MessagePlugin.class);
Iterator<MessagePlugin> iterator = serviceLoader.iterator();
List<MessagePlugin> messagePlugins = new ArrayList<>();
while (iterator.hasNext()){
MessagePlugin messagePlugin = iterator.next();
messagePlugins.add(messagePlugin);
}
MessagePlugin targetPlugin = null;
for (MessagePlugin messagePlugin : messagePlugins) {
boolean findTarget = false;
switch (type) {
case "aliyun":
if (messagePlugin instanceof BitptImpl){
targetPlugin = messagePlugin;
findTarget = true;
break;
}
case "tencent":
if (messagePlugin instanceof MizptImpl){
targetPlugin = messagePlugin;
findTarget = true;
break;
}
}
if(findTarget) break;
}
return targetPlugin;
}
public static void main(String[] args) {
new PluginFactory().installPlugin();
}
}
4.2.4 自定义接口@RestController
public class SmsController {
@Autowired
private SmsService smsService;
@Autowired
private ServiceLoaderUtils serviceLoaderUtils;
//localhost:8087/sendMsg?msg=sendMsg
@GetMapping("/sendMsg")
public String sendMessage(String msg){
return smsService.sendMsg(msg);
}
}
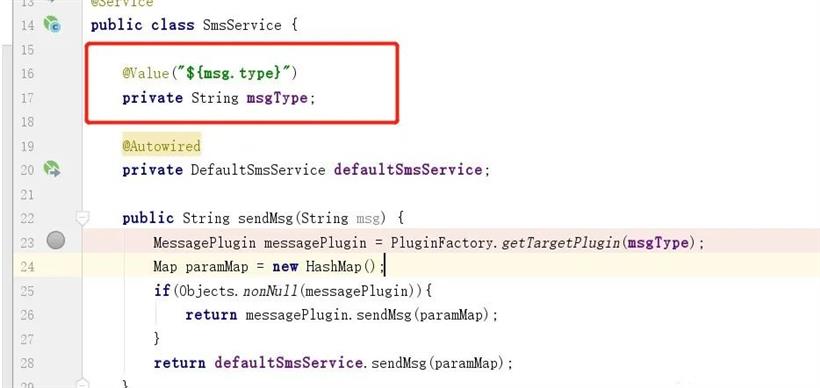
4.2.5 接口实现@Service
public class SmsService {
@Value("${msg.type}")
private String msgType;
@Autowired
private DefaultSmsService defaultSmsService;
public String sendMsg(String msg) {
MessagePlugin messagePlugin = PluginFactory.getTargetPlugin(msgType);
Map paramMap = new HashMap();
if(Objects.nonNull(messagePlugin)){
return messagePlugin.sendMsg(paramMap);
}
return defaultSmsService.sendMsg(paramMap);
}
}
4.2.6 添加服务依赖<dependencies>
<dependency>
<groupId>org.springframework.boot</groupId>
<artifactId>spring-boot-starter-web</artifactId>
</dependency>
<!--依赖具体的实现-->
<dependency>
<groupId>com.congge</groupId>
<artifactId>biz-pt</artifactId>
<version>1.0-SNAPSHOT</version>
</dependency>
<dependency>
<groupId>com.congge</groupId>
<artifactId>miz-pt</artifactId>
<version>1.0-SNAPSHOT</version>
</dependency>
<dependency>
<groupId>org.projectlombok</groupId>
<artifactId>lombok</artifactId>
</dependency>
</dependencies>
biz-pp的核心代码实现就到此结束了,后面再具体测试的时候再继续;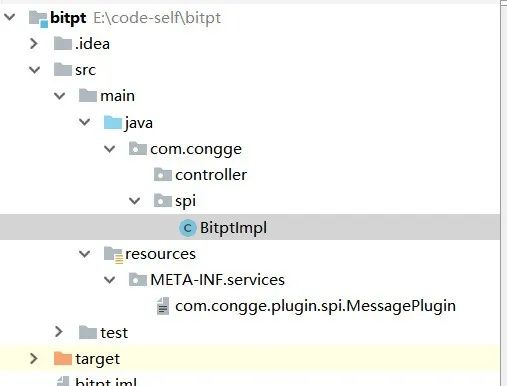
<dependencies>
    <dependency>
        <groupId>com.congge</groupId>
        <artifactId>biz-app</artifactId>
        <version>1.0-SNAPSHOT</version>
    </dependency>
</dependencies>
4.3.2 添加MessagePlugin接口的实现public class BitptImpl implements MessagePlugin {
@Override
public String sendMsg(Map msgMap) {
Object userId = msgMap.get("userId");
Object type = msgMap.get("_type");
//TODO 参数校验
System.out.println(" ==== userId :" + userId + ",type :" + type);
System.out.println("aliyun send message success");
return "aliyun send message success";
}
}
4.3.3 添加SPI配置文件com.congge.spi.BitptImpl4.3.4 将jar安装到仓库中