JavaEE领域有几种常用的模板引擎: Jsp, Thymeleaf, Freemarker, Velocity等.对于前端页面渲染效率来说 JSP 其实还是最快的, Velocity次之.Thymeleaf虽然渲染效率不是很快,但语法比较轻巧。Thymeleaf 支持html5标准, Thymeleaf页面无需部署到servlet开发到服务器上,以 .html 后缀结尾,可直接通过浏览器就能打开.可完全替代JSP(前后端分离不是很好).
Thymeleaf可以让美工在浏览器查看页面的静态效果,也可以让程序员在服务器查看带数据的动态页面效果.(支持html原型,在html标签增加额外的属性来达到 模板+数据 的展示方式).浏览器解锁html时会忽略未定义的标签属性,模板可以静态运行;当有数据返回到页面时,Thymeleaf标签会动态的替换静态内容,使页面动态显示.
Thymeleaf提供标准和spring标准两种方言,可以直接套用模板实现JSTL,OGNL表达式效果.提供spring标准方言和一个与springMVC完美集成的可选模块,可以快速实现表单绑定,属性编辑器,国际化等功能.
快速入门
1.添加依赖
<dependency>
    <groupId>org.springframework.boot</groupId>
    <artifactId>spring-boot-starter-thymeleaf</artifactId>
</dependency>
2.thymeleaf的配置
spring:
  thymeleaf:
    cache: false
    encoding: utf-8
    mode: HTML5
    suffix: .html
    prefix: classpath:/templates/
3.模板文件所在位置
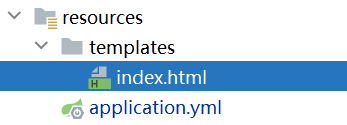
index.html
<!DOCTYPE html>
<html>
<head>
    <title>堆代码 duidaima.com</title>
</head>
<body>
<h1 th:text="${message}">Message</h1>
</body>
</html>
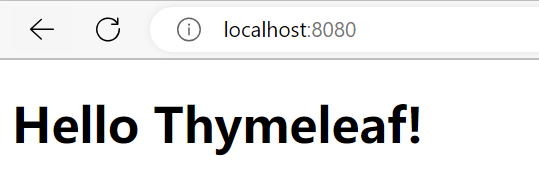
最后,用controller去访问
@Controller
public class IndexController {
    @RequestMapping("/")
    public String index(Model model) {
        model.addAttribute("message", "Hello Thymeleaf!");
        return "index";
    }
}
注意,这边要用 @Controller ,不能用 @RestController。
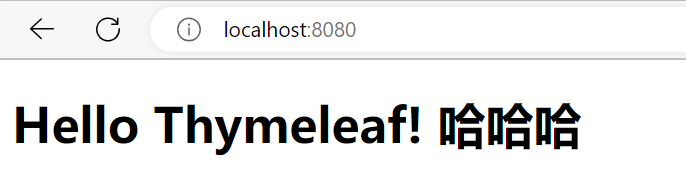
启动项目,访问 http://localhost:8080/
 更新页面不生效解决
很多用themeleaf的小伙伴,都会发现修改了页面后必须要重启才能生效,还不如jsp呢,简直是技术的倒退!其实,我们只需要在idea里面设置一下就解决了,网上很多说加这个那个配置的,很多都是胡扯,根本不是那个原因。
看步骤:

点这个
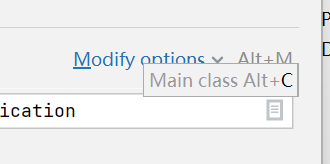
这两个
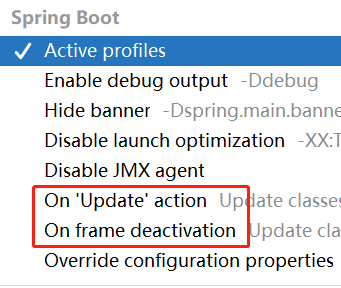
选择:
On ‘Update’ action: update classes and resources
On frame deactivation: update classes and resources
重启项目,你就会发现修改页面实时更新了,搞定。
thymeleaf常用指令
以下是thymeleaf常用指令的示例,包含前后端代码。
th:text指令:
前端代码:
<h1 th:text="${name}">默认名称</h1>
后端代码:
@GetMapping("/example")
public String example(@RequestParam String name, Model model) {
    model.addAttribute("name", name);
    return "example";
}
th:text 还可以拼接,有点类似于vue 比如:
<h1 th:text="${message} + ' 哈哈哈'">Message</h1>
 th:each指令
:
前端代码:
<ul th:each="item : ${items}">
    <li th:text="${item}"></li>
</ul>
后端代码:
@GetMapping("/example")
public String example(Model model) {
    List<String> items = Arrays.asList("Item 1", "Item 2", "Item 3");
    model.addAttribute("items", items);
    return "example";
}
th:if指令:
前端代码:
<div th:if="${condition}">条件为真时显示</div>
后端代码:
@GetMapping("/example")
public String example(Model model) {
    boolean condition = true; // 根据实际情况设置条件值
    model.addAttribute("condition", condition);
    return "example";
}
th:unless指令:
前端代码:
<div th:unless="${condition}">条件为假时显示</div>
后端代码:
@GetMapping("/example")
public String example(Model model) {
    boolean condition = false; // 根据实际情况设置条件值
    model.addAttribute("condition", condition);
    return "example";
}


 闽公网安备 35020302035485号