- 联系我们
- duidaima.com 版权声明
- 闽ICP备2020021581号
-
 闽公网安备 35020302035485号
闽公网安备 35020302035485号

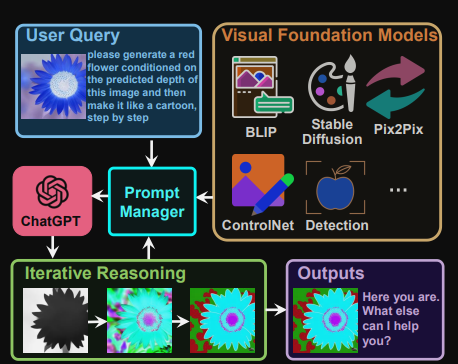
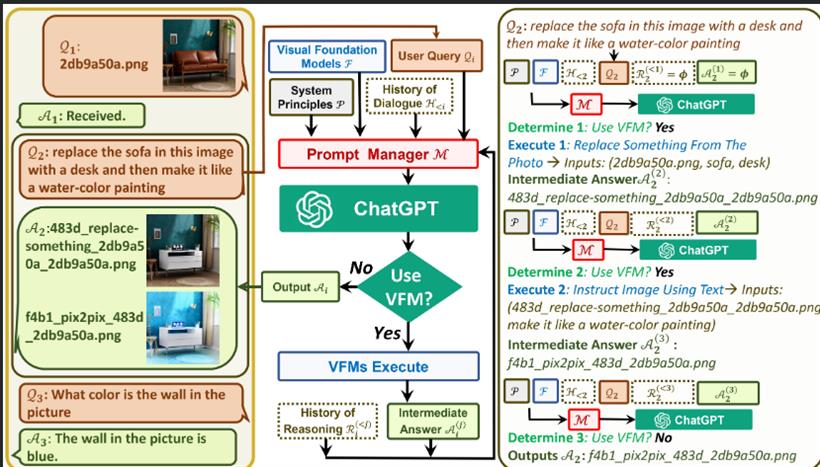
VFM 全称是 Visual Foundation Model(视觉基础模型),像 Stable Diffusion、ControlNet、BLIP 等图像处理类模型,都属于该分类。作为 ChatGPT 和 VFM 之间的桥梁,提示管理器(Prompt Manger)明确告知 ChatGPT 每个 VFM 的功能并指定必要的输入输出格式。
# 堆代码 duidaima.com
# clone the repo
git clone https://github.com/microsoft/visual-chatgpt.git
# Go to directory
cd visual-chatgpt
# create a new environment
conda create -n visgpt python=3.8
# activate the new environment
conda activate visgpt
#  prepare the basic environments
pip install -r requirements.txt
# prepare your private OpenAI key (for Linux)
export OPENAI_API_KEY={Your_Private_Openai_Key}
# prepare your private OpenAI key (for Windows)
set OPENAI_API_KEY={Your_Private_Openai_Key}

# Start Visual ChatGPT !
# You can specify the GPU/CPU assignment by "--load", the parameter indicates which
# Visual Foundation Model to use and where it will be loaded to
# The model and device are sperated by underline '_', the different models are seperated by comma ','
# The available Visual Foundation Models can be found in the following table
# For example, if you want to load ImageCaptioning to cpu and Text2Image to cuda:0
# You can use: "ImageCaptioning_cpu,Text2Image_cuda:0"

# Advice for CPU Users
python visual_chatgpt.py --load ImageCaptioning_cpu,Text2Image_cpu
# Advice for 1 Tesla T4 15GB  (Google Colab)
python visual_chatgpt.py --load "ImageCaptioning_cuda:0,Text2Image_cuda:0"
# Advice for 4 Tesla V100 32GB
python visual_chatgpt.py --load "ImageCaptioning_cuda:0,ImageEditing_cuda:0,
    Text2Image_cuda:1,Image2Canny_cpu,CannyText2Image_cuda:1,
    Image2Depth_cpu,DepthText2Image_cuda:1,VisualQuestionAnswering_cuda:2,
    InstructPix2Pix_cuda:2,Image2Scribble_cpu,ScribbleText2Image_cuda:2,
    Image2Seg_cpu,SegText2Image_cuda:2,Image2Pose_cpu,PoseText2Image_cuda:2,
    Image2Hed_cpu,HedText2Image_cuda:3,Image2Normal_cpu,
    NormalText2Image_cuda:3,Image2Line_cpu,LineText2Image_cuda:3"
详情可以访问开头贴的github地址