- 联系我们
- duidaima.com 版权声明
- 闽ICP备2020021581号
-
 闽公网安备 35020302035485号
闽公网安备 35020302035485号

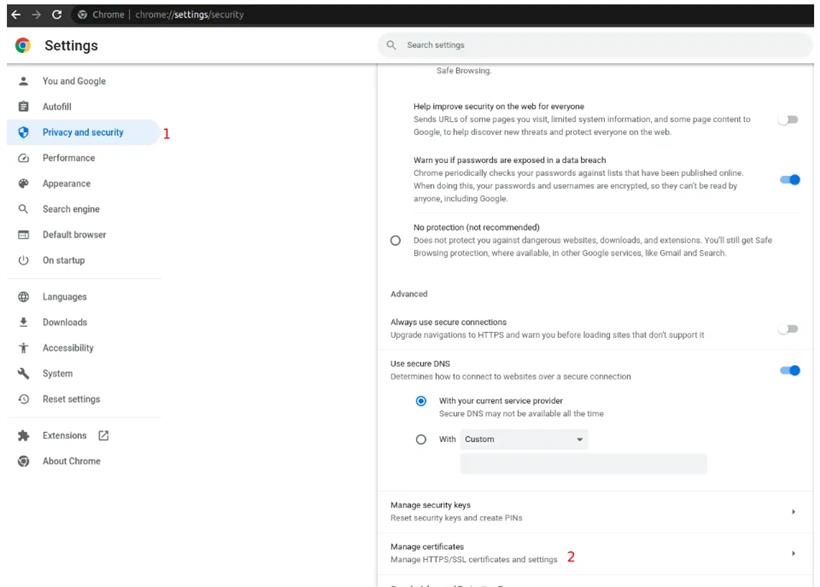
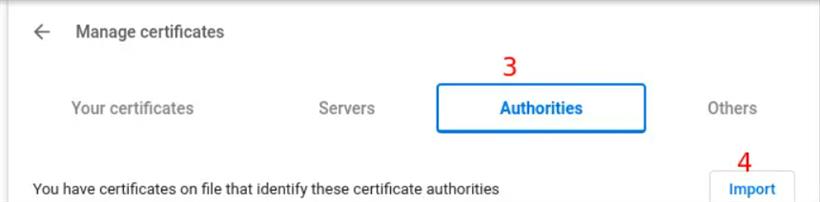
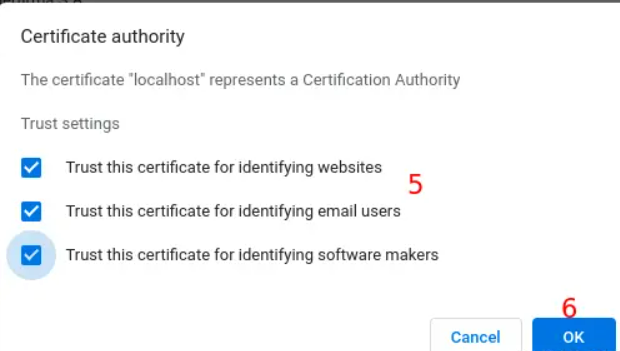
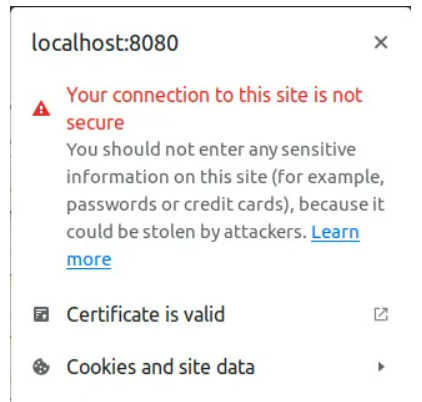
本文将介绍为本地服务器提供 SSL 证书的过程。在部署生产服务器的 Web 应用程序之前需要进行本地测试。也可以在本地环境中运行 Web 应用程序,并通过互联网访问它。
同样重要的是,为此获得 SSL 证书,以使用户信任该站点,并消除地址栏上的“不安全”消息。
6.文字编辑器 - VS Code。
$ mkdir cert
$ cd cert
$ mkdir CA
$ cd CA
$ openssl genrsa -out CA.key -des3 2048
上述命令将生成一个私钥,并要求输入密钥的简单密码。用户将输入密码,并再次确认。接下来,我们将使用生成的密钥生成根 CA 证书,在我们的情况下有效期为十年。将要求密钥和证书信息的密码。用户可以输入所需的证书信息或将其保留为默认值。
$ openssl req -x509 -sha256 -new -nodes -days 3650 -key CA.key -out CA.pem
现在,在 cert/CA 文件夹中,我们有两个文件,CA.key 和 CA.pem。
$ mkdir localhost
$ cd localhost
$ touch localhost.ext
需要写入签名 SSL 证书的信息将包含在此 localhost.ext 文件中。
authorityKeyIdentifier = keyid,issuer
basicConstraints = CA:FALSE
keyUsage = digitalSignature, nonRepudiation, keyEncipherment, dataEncipherment
subjectAltName = @alt_names

[alt_names]
DNS.1 = localhost
IP.1 = 127.0.0.1
请注意,该证书将适用于 localhost 和 127.0.0.1。您可以决定将更多域名或 IP 地址添加到文件中,但请确保编辑 /etc/hosts 文件,使这些域名指向本地计算机(127.0.0.1)。
$ openssl genrsa -out localhost.key -des3 2048该命令将生成 localhost 私钥,并要求密钥的密码,并要求用户再次确认。
$ openssl req -new -key localhost.key -out localhost.csr现在,有了这个 CSR,我们可以请求 CA 签署证书,如下所示。请注意,CA.key 和 CA.pem 文件的路径取决于用户从何处运行命令。在这种情况下,下面的命令在 /cert/CA/localhost 中运行。
$ openssl x509 -req -in localhost.csr -CA ../CA.pem -CAkey ../CA.key -CAcreateserial -days 3650 -sha256 -extfile localhost.ext -out localhost.crt该命令获取 CSR(localhost.csr)、CA 证书(CA.pem 和 CA.key)和证书扩展文件(localhost.ext)。这些输入将生成一个有效期为十年的 localhost.crt 证书文件。
$ npm init -y
$ npm i express https
$ touch index.js
然后将 index.js 文件编辑如下:
const fs = require('fs');
const key = fs.readFileSync('./CA/localhost/localhost.decrypted.key');
const cert = fs.readFileSync('./CA/localhost/localhost.crt');

const express = require('express');
const app = express();

app.get('/', (req, res, next) => {
res.status(200).send('Hello world!');
});

const https = require('https');
const server = https.createServer({ key, cert }, app);

const port = 3000;
server.listen(port, () => {
console.log(`Server is listening on https://localhost:${port}`);
});
使用以下命令运行服务器:$ node index.js
控制台上将显示一个成功消息:“Server is Listening on https://localhost:3000”。