- 联系我们
- duidaima.com 版权声明
- 闽ICP备2020021581号
-
 闽公网安备 35020302035485号
闽公网安备 35020302035485号

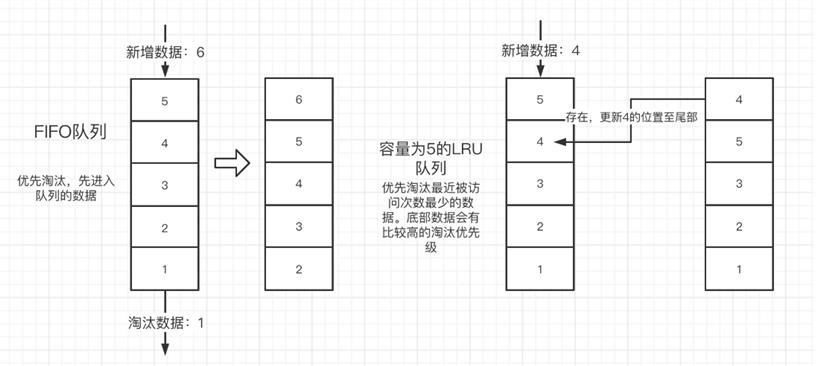
3.当链表满的时候,将链表头部的数据丢弃。
// ./LRU.ts
// 堆代码 duidaima.com
export class LRUCache {
  capacity: number; // 容量
  cache: Map<number, number | null>; // 缓存
  constructor(capacity: number) {
    this.capacity = capacity;
    this.cache = new Map();
  }
  get(key: number): number {
    if (this.cache.has(key)) {
      let temp = this.cache.get(key) as number;
      //访问到的 key 若在缓存中,将其提前
      this.cache.delete(key);
      this.cache.set(key, temp);
      return temp;
    }
    return -1;
  }
  put(key: number, value: number): void {
    if (this.cache.has(key)) {
      this.cache.delete(key);
      //存在则删除,if 结束再提前
    } else if (this.cache.size >= this.capacity) {
      // 超过缓存长度,淘汰最近没使用的
      this.cache.delete(this.cache.keys().next().value);
      console.log(`refresh: key:${key} , value:${value}`)
    }
    this.cache.set(key, value);
  }
  toString(){
    console.log('capacity',this.capacity)
    console.table(this.cache)
  }
}
// ./index.ts
import {LRUCache} from './lru'
const list = new LRUCache(4)
list.put(2,2)   // 入 2,剩余容量3
list.put(3,3)   // 入 3,剩余容量2
list.put(4,4)   // 入 4,剩余容量1
list.put(5,5)   // 入 5,已满    从头至尾         2-3-4-5
list.put(4,4)   // 入4,已存在 ——> 置队尾         2-3-5-4
list.put(1,1)   // 入1,不存在 ——> 删除队首 插入1  3-5-4-1
list.get(3)     // 获取3,刷新3——> 置队尾         5-4-1-3
list.toString()
// ./index.ts
import {LRUCache} from './lru'
const list = new LRUCache(4)

list.put(2,2)   // 入 2,剩余容量3
list.put(3,3)   // 入 3,剩余容量2
list.put(4,4)   // 入 4,剩余容量1
list.put(5,5)   // 入 5,已满    从头至尾                  2-3-4-5
list.put(4,4)   // 入4,已存在 ——> 置队尾                  2-3-5-4
list.put(1,1)   // 入1,不存在 ——> 删除队首 插入1  3-5-4-1
list.get(3)     // 获取3,刷新3——> 置队尾                  5-4-1-3
list.toString()
结果如下: 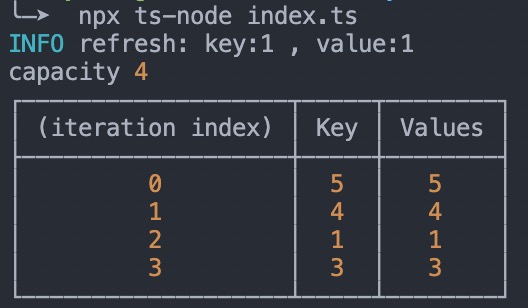
const KeepAliveImpl: ComponentOptions = {
  name: `KeepAlive`,
  props: {
    include: [String, RegExp, Array],
    exclude: [String, RegExp, Array],
    max: [String, Number],
  },
  setup(props: KeepAliveProps, { slots }: SetupContext) {
    // 初始化数据
    const cache: Cache = new Map();
    const keys: Keys = new Set();
    let current: VNode | null = null;
    // 当 props 上的 include 或者 exclude 变化时移除缓存
    watch(
      () => [props.include, props.exclude],
      ([include, exclude]) => {
      include && pruneCache((name) => matches(include, name));
      exclude && pruneCache((name) => !matches(exclude, name));
      },
      { flush: "post", deep: true }
    );
    // 缓存组件的子树 subTree
    let pendingCacheKey: CacheKey | null = null;
    const cacheSubtree = () => {
      // fix #1621, the pendingCacheKey could be 0
      if (pendingCacheKey != null) {
        cache.set(pendingCacheKey, getInnerChild(instance.subTree));
      }
    };
    // KeepAlive 组件的设计,本质上就是空间换时间。
    // 在 KeepAlive 组件内部,
    // 当组件渲染挂载和更新前都会缓存组件的渲染子树 subTree
    onMounted(cacheSubtree);
    onUpdated(cacheSubtree);
    onBeforeUnmount(() => {
    // 卸载缓存表里的所有组件和其中的子树...
    }
    return ()=>{
      // 返回 keepAlive 实例
    }
  }
}

return ()=>{
  // 省略部分代码,以下是缓存逻辑
  pendingCacheKey = null
  const children = slots.default()
  let vnode = children[0]
  const comp = vnode.type as Component
  const name = getName(comp)
  const { include, exclude, max } = props
  // key 值是 KeepAlive 子节点创建时添加的,作为缓存节点的唯一标识
  const key = vnode.key == null ? comp : vnode.key
  // 通过 key 值获取缓存节点
  const cachedVNode = cache.get(key)
  if (cachedVNode) {
    // 缓存存在,则使用缓存装载数据
    vnode.el = cachedVNode.el
    vnode.component = cachedVNode.component
    if (vnode.transition) {
      // 递归更新子树上的 transition hooks
      setTransitionHooks(vnode, vnode.transition!)
    }
      // 阻止 vNode 节点作为新节点被挂载
      vnode.shapeFlag |= ShapeFlags.COMPONENT_KEPT_ALIVE
      // 刷新key的优先级
      keys.delete(key)
      keys.add(key)
  } else {
      keys.add(key)
      // 属性配置 max 值,删除最久不用的 key ,这很符合 LRU 的思想
      if (max && keys.size > parseInt(max as string, 10)) {
        pruneCacheEntry(keys.values().next().value)
      }
    }
    // 避免 vNode 被卸载
    vnode.shapeFlag |= ShapeFlags.COMPONENT_SHOULD_KEEP_ALIVE
    current = vnode
    return vnode;
}
将组件移出缓存表// 遍历缓存表
function pruneCache(filter?: (name: string) => boolean) {
cache.forEach((vnode, key) => {
const name = getComponentName(vnode.type as ConcreteComponent);
if (name && (!filter || !filter(name))) {
// !filter(name) 即 name 在 includes 或不在 excludes 中
pruneCacheEntry(key);
}
});
}
// 依据 key 值从缓存表中移除对应组件
function pruneCacheEntry(key: CacheKey) {
const cached = cache.get(key) as VNode;
if (!current || cached.type !== current.type) {
/* 当前没有处在 activated 状态的组件
* 或者当前处在 activated 组件不是要删除的 key 时
* 卸载这个组件
*/
unmount(cached); // unmount方法里同样包含了 resetShapeFlag
} else if (current) {
// 当前组件在未来应该不再被 keepAlive 缓存
// 虽然仍在 keepAlive 的容量中但是需要刷新当前组件的优先级
resetShapeFlag(current);
// resetShapeFlag
}
cache.delete(key);
keys.delete(key);
}
function resetShapeFlag(vnode: VNode) {
let shapeFlag = vnode.shapeFlag; // shapeFlag 是 VNode 的标识
// ... 清除组件的 shapeFlag
}
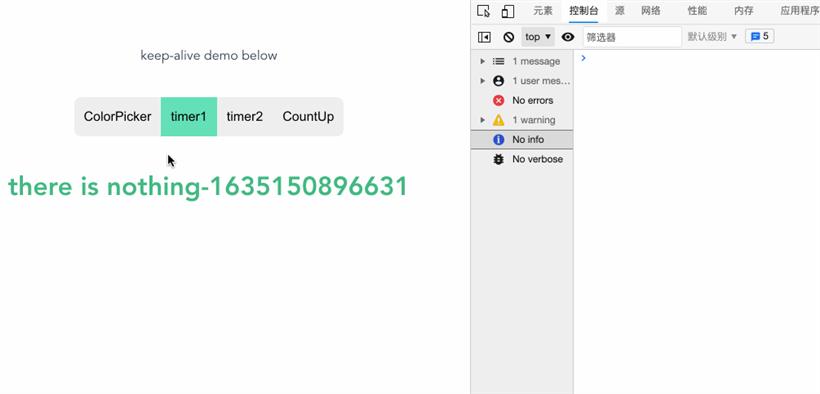
keep-alive案例// index.vue
<script setup>
import { ref } from "vue"
import CountUp from '../components/CountUp.vue'
import ColorRandom from '../components/ColorRandom.vue'
import Timer from '../components/Timer.vue'
const tabs = ref([ // 组件列表
{
title: "ColorPicker",
comp: ColorRandom,
},
{
title: "timer1",
comp: Timer,
},
{
title: "timer2",
comp: Timer,
},
{
title: "CountUp",
comp: CountUp,
},
])
const currentTab = ref(tabs.value[0]) // tab 默认展示第一个组件
const tabSwitch = (tab) => {
currentTab.value = tab
}
</script>
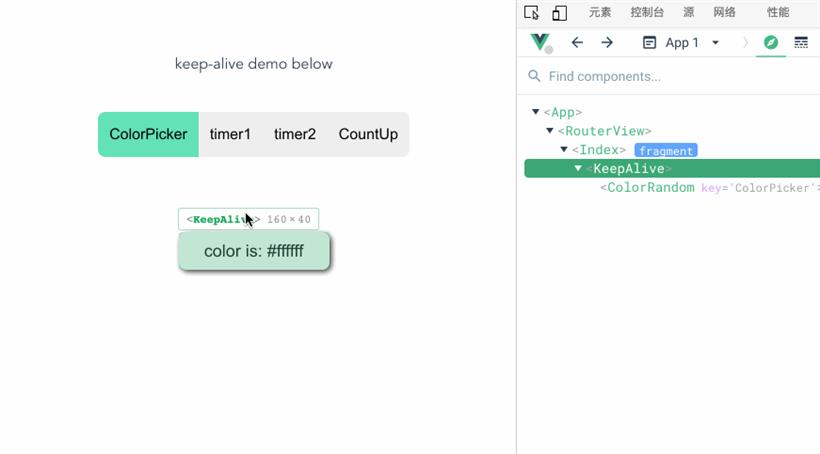
<template>
<div id="main-page">keep-alive demo below</div>
<div class="tab-group">
<button
v-for="tab in tabs"
:key="tab"
:class="['tab-button', { active: currentTab === tab }]"
@click="tabSwitch(tab)"
>
{{ tab.title }}
</button>
</div>
<keep-alive max="2">
<!-- 动态组件渲染 tab 当前的组件 -->
<component
v-if="currentTab"
:is="currentTab.comp"
:key="currentTab.title"
:name="currentTab.title"
/>
</keep-alive>
</template>
缓存状态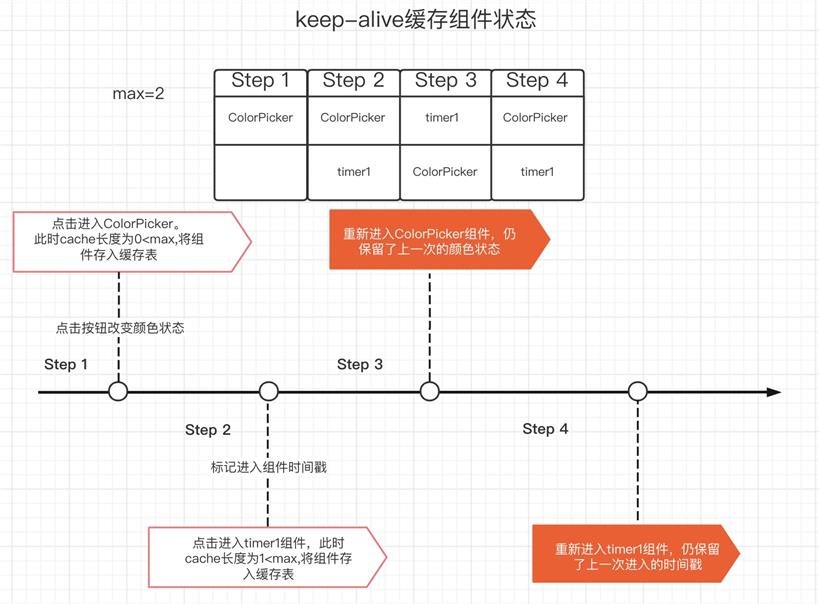
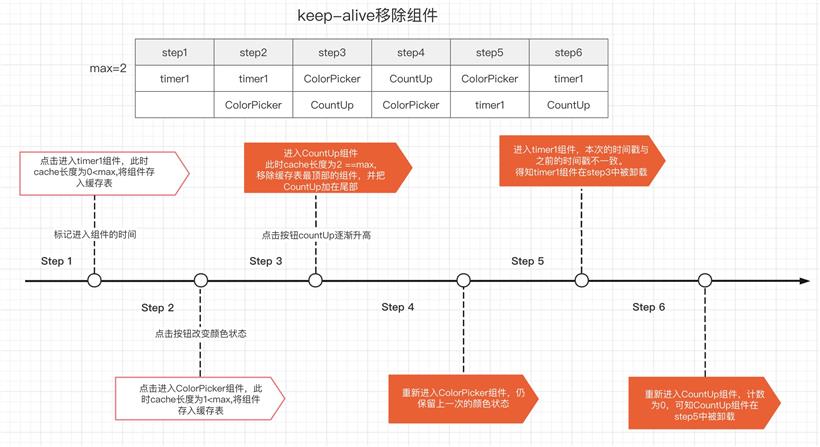
onUnmounted(()=>{
  console.log(`${props.name} 组件被卸载`)
})
1.当缓存数据长度小于等于 max ,切换组件并不会卸载其他组件,就像上面在 vue devtools 里展示的一样,只会触发组件的 activated 和 deactivated 两个生命周期