- 联系我们
- duidaima.com 版权声明
- 闽ICP备2020021581号
-
 闽公网安备 35020302035485号
闽公网安备 35020302035485号

// 堆代码 duidaima.com
// 创建IntersectionObserver实例
const observer = new IntersectionObserver((entries, observer) => {
  // 遍历观察的元素
  entries.forEach(entry => {
    // 如果元素可见
    if (entry.isIntersecting) {
      // 加载图片
      const img = entry.target;
      const src = img.getAttribute('data-src');
      img.setAttribute('src', src);
      // 停止观察该元素
      observer.unobserve(img);
    }
  });
});

// 获取所有需要懒加载的图片元素
const lazyImages = document.querySelectorAll('.lazy-image');

// 观察每个图片元素
lazyImages.forEach(image => {
  observer.observe(image);
});
🚀 实践import { onMounted, Ref } from "vue";
const options = {
// root: document.querySelector(".container"), // 根元素,默认为视口
rootMargin: "0px", // 根元素的边距
threshold: 0.5, // 可见性比例阈值
once: true,
};
function callback(
entries: IntersectionObserverEntry[],
observer: IntersectionObserver
) {
entries.forEach((entry) => {
// 处理每个目标元素的可见性变化
if (entry.intersectionRatio <= 0) return;
const img: Element = entry.target;
const src = img.getAttribute("data-src");
img.setAttribute("src", src ?? ""); // 将真实的图片地址赋给 src 属性
observer.unobserve(img);
});
}
export const useInView = (ref: Ref) => {
const observer = new IntersectionObserver(callback, options);
onMounted(() => {
Object.keys(ref.value).forEach((e) => observer.observe(ref.value[e]));
});
};
<script setup lang="ts">
import { ref } from "vue";
import { useInView } from "./hooks/useInView";
const imgRef = ref(null);
useInView(imgRef);
</script>
<template>
<h4>堆代码:duidaima.com</h4>
<div
v-for="(_, idx) in new Array(200).fill(11)"
>
<img
ref="imgRef"
src="https://via.placeholder.com/200"
:data-src="`https://picsum.photos/200/${180 + idx}`"
alt="b"
/>
</div>
</template>
实际效果如下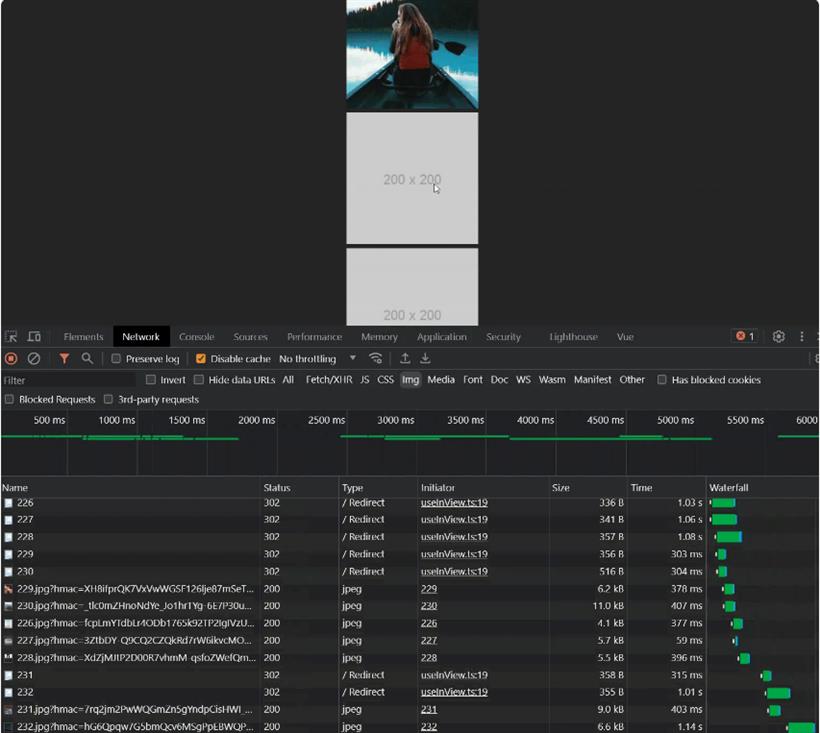
虽然基本的功能要求已经完成了,但是现在还不够优雅!!!
img.onload = () => {
  img.setAttribute('class', 'fade-in')
}

@keyframes fadeIn {
  from {
    opacity: 0;
  }
  to {
    opacity: 1;
  }
}

/* 应用淡入动画到元素 */
.fade-in {
  animation: fadeIn 0.6s ease-in;
}
完整代码如下:import { onMounted, Ref } from "vue";
const options = {
// root: document.querySelector(".container"), // 根元素,默认为视口
rootMargin: "0px", // 根元素的边距
threshold: 0.5, // 可见性比例阈值
once: true,
};
function callback(
entries: IntersectionObserverEntry[],
observer: IntersectionObserver
) {
entries.forEach((entry) => {
if (entry.intersectionRatio <= 0) return;
const img = entry.target as HTMLImageElement;
const src = img.getAttribute("data-src");
img.setAttribute("src", src ?? ""); // 将真实的图片地址赋给 src 属性
img.onload = () => {
img.setAttribute("class", "fade-in");
};
observer.unobserve(img);
});
}
export const useInView = (ref: Ref) => {
const observer = new IntersectionObserver(
callback,
options
);
onMounted(() => {
Object.keys(ref.value)
.forEach((e) => observer.observe(ref.value[e]));
});
};
<script setup lang="ts">
import { ref } from "vue";
import { useInView } from "./hooks/useInView";
const imgRef = ref(null);
useInView(imgRef);
</script>
<template>
<h4>堆代码 duidaima.com</h4>
<div
v-for="(_, idx) in new Array(200).fill(11)"
style="width: 200px height: 200px;"
>
<img
ref="imgRef"
style="height: 100%"
src="https://via.placeholder.com/200"
:data-src="`https://picsum.photos/200/${180 + idx}`"
alt="b"
/>
</div>
</template>
<style scoped>
/* 定义淡入动画 */
@keyframes fadeIn {
from {
opacity: 0;
}
to {
opacity: 1;
}
}
/* 应用淡入动画到元素 */
.fade-in {
animation: fadeIn 0.6s ease-in;
}
</style>