- 联系我们
- duidaima.com 版权声明
- 闽ICP备2020021581号
-
 闽公网安备 35020302035485号
闽公网安备 35020302035485号

Canvas是HTML5提供的一个绘图环境。我们使用<canvas>标签来创建一个画布,之后在这个画布上绘制箭头。canvas.getContext('2d')提供了一个2D绘图上下文,通过这个上下文可以绘制图形、设置颜色、处理旋转等操作。
我们使用JavaScript的mousemove事件监听器,实时捕捉鼠标在画布上的位置。每次鼠标移动时,事件监听器都会记录鼠标的x和y坐标,这样我们就知道鼠标在哪里了。
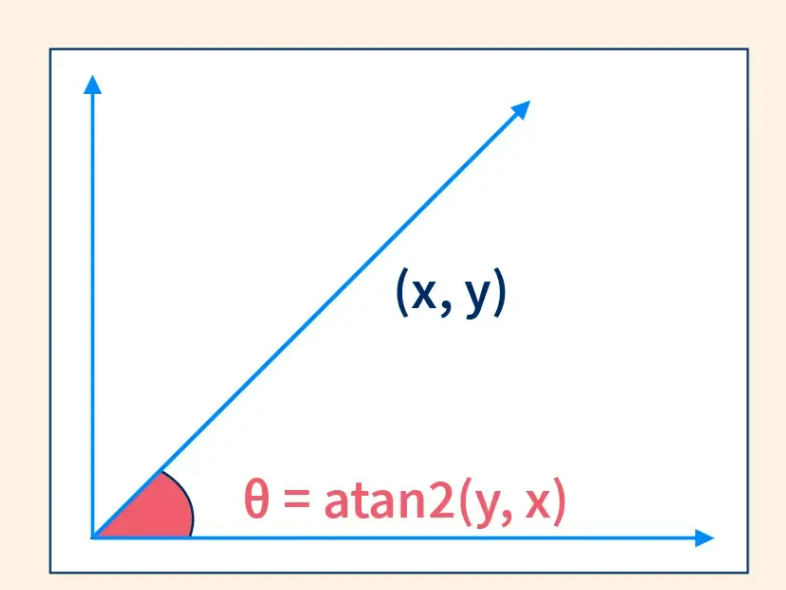
当我们知道鼠标的位置后,接下来要做的就是计算箭头应该朝向哪个方向。通过Math.atan2(dy, dx)计算出箭头的旋转角度,然后使用Canvas的rotate方法,让箭头旋转到正确的角度,指向鼠标。
<!doctype html>
<html lang="en">
<head>
    <meta charset="UTF-8">
    <meta name="viewport" content="width=device-width, initial-scale=1.0">
    <title>堆代码 duidaima.com</title>
    <style>
        body {
            font-family: Arial, sans-serif;
            display: flex;
            flex-direction: column;
            align-items: center;
            justify-content: center;
            height: 100vh;
            margin: 0;
            background-color: #f0f0f0;
        }
        canvas {
            border: 1px solid #000;
        }
        header {
            margin-bottom: 20px;
        }
        aside {
            margin-top: 10px;
            font-size: 14px;
        }
    </style>
</head>
<body>
    <header>
        Example from <a href="https://qianduandaren.com"><em>前端达人</em></a>
    </header>
    <canvas id="canvas" width="400" height="400"></canvas>
    <aside>请移动鼠标</aside>

    <script>
        class Utils {
            static captureMouse(element) {
                const mouse = { x: 0, y: 0, event: null };
                element.addEventListener('mousemove', event => {
                    const rect = element.getBoundingClientRect();
                    mouse.x = event.clientX - rect.left;
                    mouse.y = event.clientY - rect.top;
                    mouse.event = event;
                });
                return mouse;
            }
        }

        class Arrow {
            constructor() {
                this.x = 0;
                this.y = 0;
                this.color = "#ffff00";
                this.rotation = 0;
            }

            draw(context) {
                context.save();
                context.translate(this.x, this.y);
                context.rotate(this.rotation);
                context.lineWidth = 2;
                context.fillStyle = this.color;
                context.beginPath();
                context.moveTo(-50, -25);
                context.lineTo(0, -25);
                context.lineTo(0, -50);
                context.lineTo(50, 0);
                context.lineTo(0, 50);
                context.lineTo(0, 25);
                context.lineTo(-50, 25);
                context.lineTo(-50, -25);
                context.closePath();
                context.fill();
                context.stroke();
                context.restore();
            }
        }

        window.onload = () => {
            const canvas = document.getElementById('canvas');
            const context = canvas.getContext('2d');
            const mouse = Utils.captureMouse(canvas);
            const arrow = new Arrow();

            arrow.x = canvas.width / 2;
            arrow.y = canvas.height / 2;

            const drawFrame = () => {
                requestAnimationFrame(drawFrame);
                context.clearRect(0, 0, canvas.width, canvas.height);

                const dx = mouse.x - arrow.x;
                const dy = mouse.y - arrow.y;

                arrow.rotation = Math.atan2(dy, dx);
                arrow.draw(context);
            };

            drawFrame();
        };
    </script>
</body>
</html>
分步解释const canvas = document.getElementById('canvas');
const context = canvas.getContext('2d');
获取Canvas元素和上下文:首先,在onload函数中,我们通过getElementById获取HTML中的canvas元素,并通过getContext('2d')获取2D绘图上下文,这个上下文是我们用来绘制图形的基础。class Utils {
static captureMouse(element) {
//堆代码 duidaima.com
const mouse = { x: 0, y: 0, event: null };
element.addEventListener('mousemove', event => {
const rect = element.getBoundingClientRect();
mouse.x = event.clientX - rect.left;
mouse.y = event.clientY - rect.top;
mouse.event = event;
});
return mouse;
}
}
Utils类简介:Utils类提供了一个静态方法captureMouse,这个方法的作用是帮助我们实时捕捉鼠标在画布中的位置。最后返回这个mouse对象,以便我们在后续的代码中随时获取鼠标的位置。
class Arrow {
    constructor() {
        this.x = 0;
        this.y = 0;
        this.color = "#ffff00";
        this.rotation = 0;
    }

    draw(context) {
        context.save();
        context.translate(this.x, this.y);
        context.rotate(this.rotation);
        context.lineWidth = 2;
        context.fillStyle = this.color;
        context.beginPath();
        context.moveTo(-50, -25);
        context.lineTo(0, -25);
        context.lineTo(0, -50);
        context.lineTo(50, 0);
        context.lineTo(0, 50);
        context.lineTo(0, 25);
        context.lineTo(-50, 25);
        context.lineTo(-50, -25);
        context.closePath();
        context.fill();
        context.stroke();
        context.restore();
    }
}
Arrow类用于定义箭头的初始属性,包括位置(x、y)、颜色和旋转角度。draw方法:用于在画布上绘制箭头。这个方法使用了Canvas的绘图API,首先保存当前绘图状态(context.save()),然后移动并旋转画布(translate和rotate),根据预定的路径绘制出一个箭头形状,最后填充颜色和描边(fill和stroke),并恢复画布状态(context.restore())。
   const drawFrame = () => {
       requestAnimationFrame(drawFrame);
       context.clearRect(0, 0, canvas.width, canvas.height);

       const dx = mouse.x - arrow.x;
       const dy = mouse.y - arrow.y;

       arrow.rotation = Math.atan2(dy, dx);
       arrow.draw(context);
   };

   drawFrame();
动画帧更新:使用requestAnimationFrame(drawFrame)来实现平滑的动画效果。这个方法让浏览器在每次重绘时调用drawFrame,从而以高效的方式不断更新箭头的位置和方向。