- 联系我们
- duidaima.com 版权声明
- 闽ICP备2020021581号
-
 闽公网安备 35020302035485号
闽公网安备 35020302035485号


mkdir zkevm-erc20; cd zkevm-erc20; git init; pnpx hardhat; # Expected Prompts # 888 888 888 888 888 # 888 888 888 888 888 # 888 888 888 888 888 # 8888888888 8888b. 888d888 .d88888 88888b. 8888b. 888888 # 888 888 "88b 888P" d88" 888 888 "88b "88b 888 # 888 888 .d888888 888 888 888 888 888 .d888888 888 # 888 888 888 888 888 Y88b 888 888 888 888 888 Y88b. # 888 888 "Y888888 888 "Y88888 888 888 "Y888888 "Y888 # # 👷 Welcome to Hardhat v2.12.3 👷 # # ? What do you want to do? … # Create a JavaScript project # ❯ Create a TypeScript project # Create an empty hardhat.config.js # Quit # ? Hardhat project root: › /path/to/zkevm-erc20 # ? Do you want to add a .gitignore? (Y/n) › y # ? Do you want to install this sample project's dependencies with npm (@nomicfoundation/hardhat-toolbox)? (Y/n) › y pnpm install;让我们通过运行一个节点,部署默认的合约,然后测试该合约,来仔细检查我们的 Hardhat 设置是否按预期工作。
# 堆代码 www.duidaima.com
# FROM: ./zkevm-erc20

./node_modules/.bin/hardhat node;

# Expected Output:
# Started HTTP and WebSocket JSON-RPC server at http://127.0.0.1:8545/
#
# Accounts
# ========
#
# WARNING: These accounts, and their private keys, are publicly known.
# Any funds sent to them on Mainnet or any other live network WILL BE LOST.
# ...
在终端 2
# FROM: ./zkevm-erc20

./node_modules/.bin/hardhat run scripts/deploy.ts

# Expected Output:
# Compiled 1 Solidity file successfully
# Lock with 1 ETH and unlock timestamp 1701595951 deployed to 0x5FbDB2315678afecb367f032d93F642f64180aa3
运行由原始脚手架项目生成的测试:
# FROM: ./zkevm-erc20

./node_modules/.bin/hardhat test;

# Expected Output:
#   Lock
#     Deployment
#       ✔ Should set the right unlockTime (894ms)
#       ✔ Should set the right owner
#       ✔ Should receive and store the funds to lock
#       ✔ Should fail if the unlockTime is not in the future
#     Withdrawals
#       Validations
#         ✔ Should revert with the right error if called too soon
#         ✔ Should revert with the right error if called from another account
#         ✔ Shouldn't fail if the unlockTime has arrived and the owner calls it
#       Events
#         ✔ Should emit an event on withdrawals
#       Transfers
#         ✔ Should transfer the funds to the owner
#
#  9 passing (1s)
# FROM: ./zkevm-erc20

pnpm add -D @openzeppelin/contracts;
配置 ERC20使用_OpenZepplin Wizard/_[12]来配置 ERC20 代币:
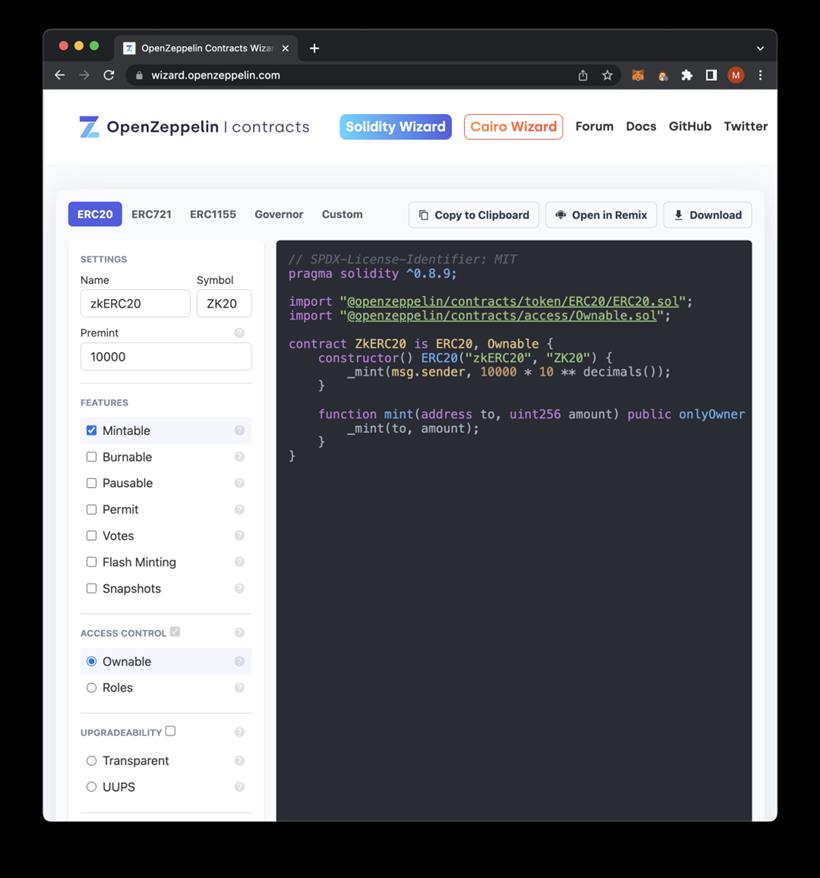
# FROM: ./zkevm-erc20

mv ./contracts/Lock.sol ./contracts/zkERC20.sol;
文件: ./contracts/zkERC20.sol:

// SPDX-License-Identifier: MIT
pragma solidity ^0.8.9;

import "@openzeppelin/contracts/token/ERC20/ERC20.sol";
import "@openzeppelin/contracts/access/Ownable.sol";

contract ZkERC20 is ERC20, Ownable {
    constructor() ERC20("zkERC20", "ZK20") {
        _mint(msg.sender, 10000 * 10 ** decimals());
    }

    function mint(address to, uint256 amount) public onlyOwner {
        _mint(to, amount);
    }
}
测试 ERC20 合约// Imports
// =====堆代码 www.duidaima.com =================================
import { ethers } from "hardhat";
// Main Deployment Script
// ========================================================
async function main() {
// Make sure in the contract factory that it mateches the contract name in the solidity file
// Ex: contract ZkERC20
const zkERC20Contract = await ethers.getContractFactory("ZkERC20");
const contract = await zkERC20Contract.deploy();
await contract.deployed();
console.log(`ZkERC20 deployed to ${contract.address}`);
};
// Init
// ========================================================
// We recommend this pattern to be able to use async/await everywhere
// and properly handle errors.
main().catch((error) => {
console.error(error);
process.exitCode = 1;
});
# FROM: ./zkevm-erc20

mv ./test/Lock.ts ./test/zkERC20.test.ts;
文件: ./test/zkERC20.test.ts:

// Imports
// ==========堆代码 www.duidaima.com ============================
import { loadFixture } from "@nomicfoundation/hardhat-network-helpers";
import { expect } from "chai";
import { ethers } from "hardhat";

// Tests
// ========================================================
describe("zkERC20", function () {
  // We define a fixture to reuse the same setup in every test.
  // We use loadFixture to run this setup once, snapshot that state,
  // and reset Hardhat Network to that snapshot in every test.
  async function deployZkERC20() {
    // Contracts are deployed using the first signer/account by default
    const [owner, otherAccount] = await ethers.getSigners();
    // Make sure in the contract factory that it mateches the contract name in the solidity file
    // Ex: contract ZkERC20
    const zkERC20Contract = await ethers.getContractFactory("ZkERC20");
    const zkERC20 = await zkERC20Contract.deploy();

    return { zkERC20, owner, otherAccount };
  };

  /**
   *
   */
  describe("Deployment", function () {
    /**
     *
     */
    it("Should deploy with initial 10,000 supply", async function () {
      // Setup
      const { zkERC20 } = await loadFixture(deployZkERC20);

      // Init + Test
      expect(await zkERC20.totalSupply()).to.equal(ethers.utils.parseEther(`10000`).toString());
    });
  });

  /**
   *
   */
   describe("Minting", function () {
    /**
     *
     */
    it("Should mint and increase the supply by 137", async function () {
      // Setup
      const { zkERC20, owner } = await loadFixture(deployZkERC20);

      // Init
      await zkERC20.connect(owner).mint(owner.address, ethers.utils.parseUnits('137', 18));

      // Init + Test
      expect(await zkERC20.totalSupply()).to.equal(ethers.utils.parseEther(`10137`).toString());
    });
  });
});
让我们运行 Hardhat 节点并测试这个合约。# FROM: ./zkevm-erc20 ./node_modules/.bin/hardhat node; # Expected Output: # Started HTTP and WebSocket JSON-RPC server at http://127.0.0.1:8545/ # # Accounts # ======== # # WARNING: These accounts, and their private keys, are publicly known. # Any funds sent to them on Mainnet or any other live network WILL BE LOST. # ...
# FROM: ./zkevm-erc20

./node_modules/.bin/hardhat test;

# Expected Output:
#   zkERC20
#     Deployment
#       ✔ Should deploy with initial 10,000 supply (803ms)
#     Minting
#       ✔ Should mint and increase the supply by 137
#
#  2 passing (819ms)

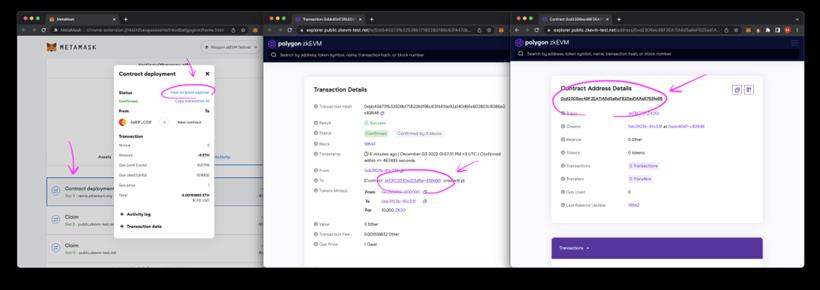
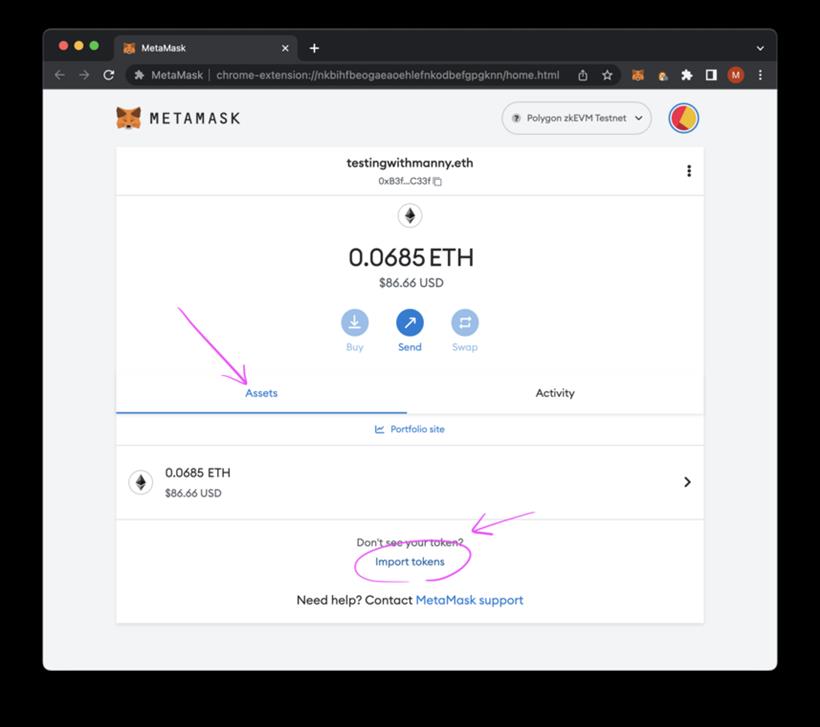
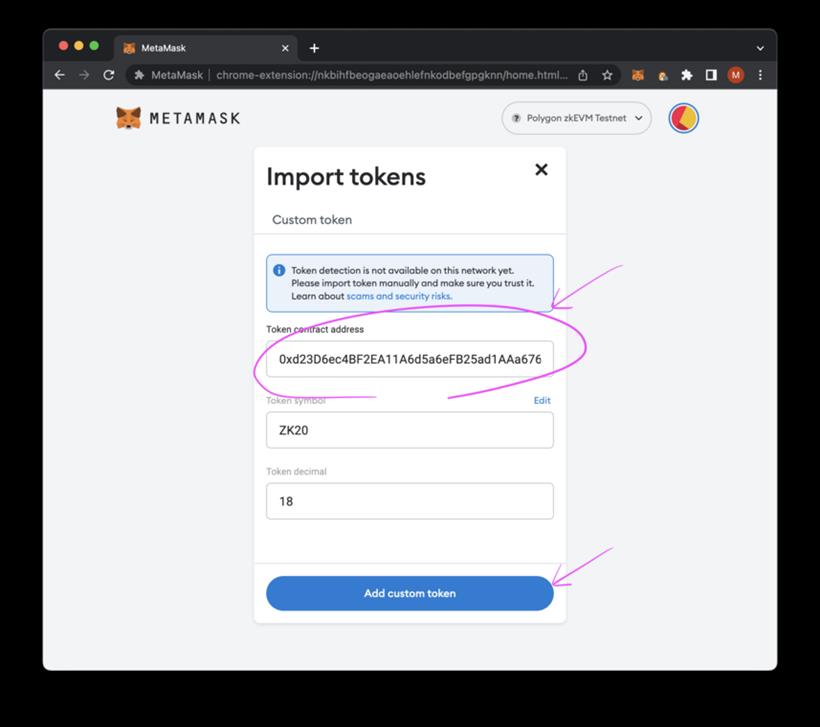
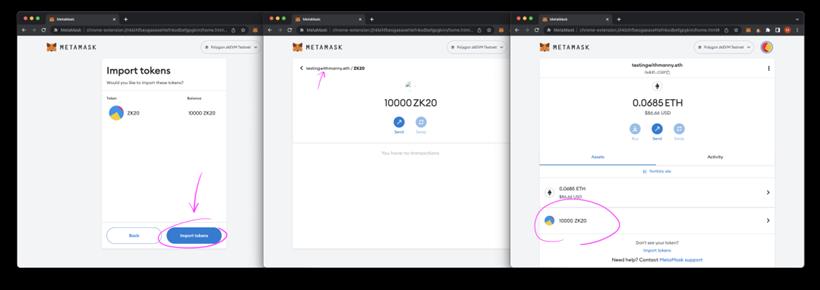
你已经完全部署了一个 ERC20 合约到 Polygon Hermes zkEVM 测试网上。
参考资料
[1]登链翻译计划: https://github.com/lbc-team/Pioneer
[2]翻译小组: https://learnblockchain.cn/people/412
[3]Tiny 熊: https://learnblockchain.cn/people/15
[4]Vitalik 博客:不同类型的 ZK-EVMs: https://vitalik.eth.limo/general/2022/08/04/zkevm.html
[5]状态树: https://medium.com/@eiki1212/ethereum-state-tree-architecture-explained-a30237009d4e
[6]Polygon Wiki For zkEVM: https://wiki.polygon.technology/docs/zkEVM/develop
[7]https://rpc.public.zkevm-test.net: https://rpc.public.zkevm-test.net/
[8]https://explorer.public.zkevm-test.net: https://explorer.public.zkevm-test.net/
[9]QuickNode Goerli Testnet Faucet: https://faucet.quicknode.com/ethereum/goerli
[10]AlchemyGoerli Testnet Faucet: https://goerlifaucet.com/
[11]https://public.zkevm-test.net/: https://public.zkevm-test.net/
[12]OpenZepplin Wizard/: https://wizard.openzeppelin.com/
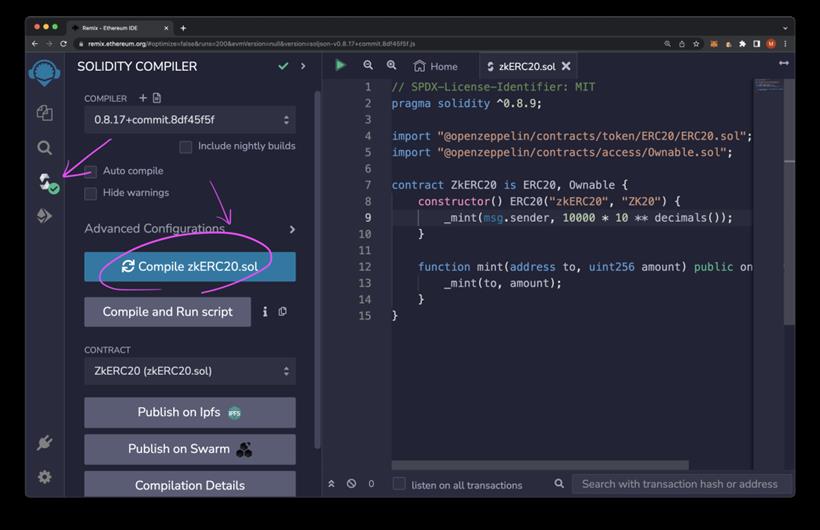
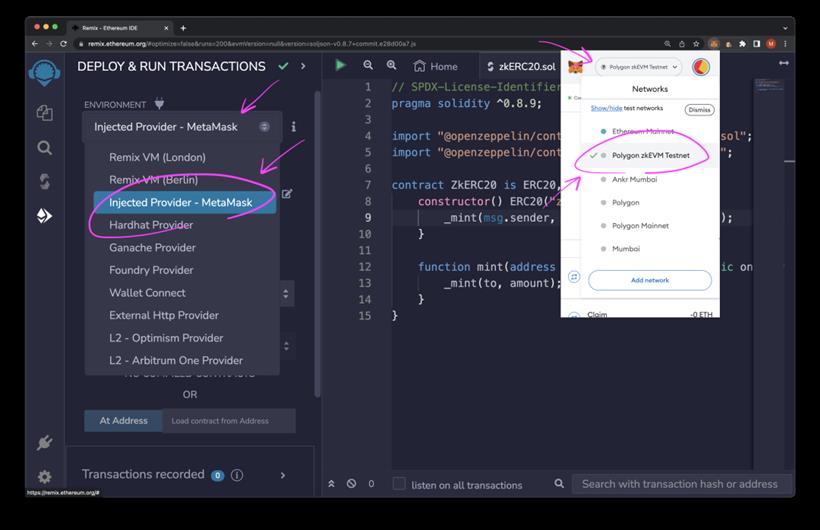
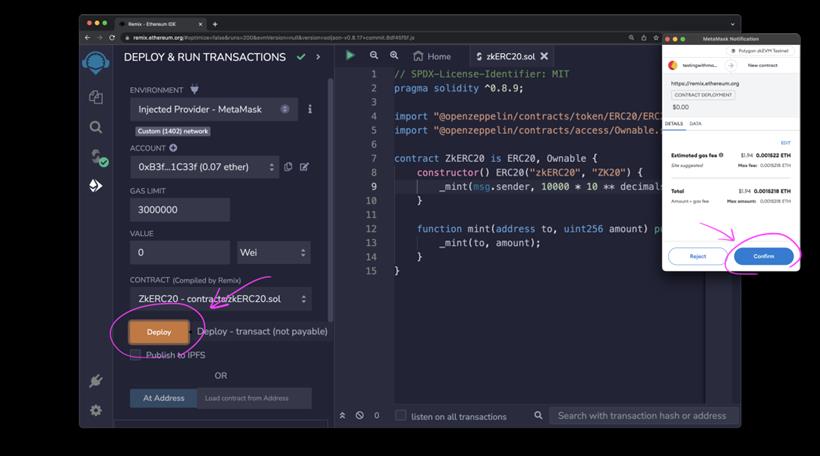
[13]以太坊 Remix: https://remix.ethereum.org/
[14]GitHub - codingwithmanny/zkevm-erc20: https://github.com/codingwithmanny/zkevm-erc20
[15]@登链社区: https://twitter.com/NUpchain