- 联系我们
- duidaima.com 版权声明
- 闽ICP备2020021581号
-
 闽公网安备 35020302035485号
闽公网安备 35020302035485号

npm install -g skpm2. 使用脚手架模板创建插件
skpm create <project-name> --template=<skpm-template>常用的脚手架模板
npm install说明:这一步不仅会安装三方依赖包,并且会自动创建 Symbolic Link,将开发目录下构建的插件实时同步到 Sketch 插件安装目录下,便于开发调试。
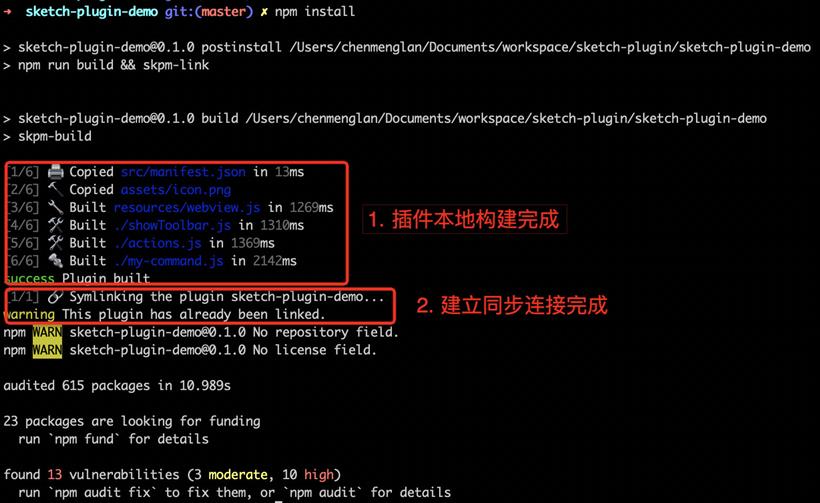
npm run watch说明:watch 命令会监听插件 src 目录的文件,一旦文件变更,会触发重新编译构建。再通过上面提到的 Symbolic Link,将重新编译构建的插件同步到 Sketch 插件的安装目录下,即可实时查看到插件修改的效果。
npm run build
├── assets // 静态资源
│   └── icon.png // 插件显示的Icon图标
├── sketch-plugin-demo.sketchplugin   // skpm构建后生成的插件安装包
│   └── Contents
│       ├── Resources
│       │   └── _webpack_resources
│       │   └── resources_webview.js
│       │   └── resources_webview.js.map
│       └── Sketch
│           ├── manifest.json
│           ├── __my-command.js
│           └── __my-command.js.map
├── package.json
├── webpack.skpm.config.js // webpack配置文件
├── resources // Webview相关资源文件
│  ├── style.css
│  ├── webview.html
│  └── webview.js
└── src
    ├── manifest.json // 插件的清单文件
    └── my-command.js // 命令对应的执行脚本js
manifest.json// 基础配置示例
{
"compatibleVersion": 3, // 兼容版本号
"bundleVersion": 1,
"commands": [ // 定义命令
{
"name": "生成随机色",
"identifier": "sketch-plugin-demo.generate-random-color",
"shortcut": "ctrl shift r",
"script": "./generateColor.js",
"handlers": {
"run": "onRun",
"actions": {
"OpenDocument": "onOpenDocument"
}
}
}
],
"menu": { // 定义菜单项
"title": "sketch-plugin-demo",
"items": [
"my-plugin-with-webview.my-command-identifier" // 对应上面命令的identifier
]
}
}
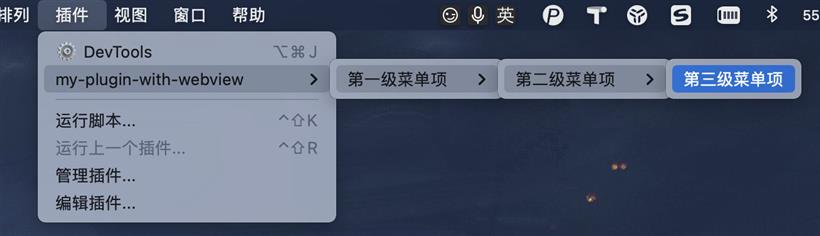
详细释义如下:{
"commands": [
{
"name": "第三级菜单项",
"identifier": "my-plugin-with-webview.my-command-identifier",
"script": "./my-command.js",
"handlers": {
"run": "onRun",
"actions": {
"Shutdown": "onShutdown"
}
}
}
],
"menu": {
"title": "my-plugin-with-webview",
"items": [
{
"title": "第一级菜单项",
"items": [
{
"title": "第二级菜单项",
"items": [
"my-plugin-with-webview.my-command-identifier"
]
}
]
}
]
}
}
// 访问和修改Sketch文档
import SketchDom from 'sketch/dom';
// 处理异步操作。在插件开发中,无法使用ES6的async,需sketch提供async
import Async from 'sketch/async';
// 提供图像或文本数据,直接与Sketch用户界面集成,使内容在整个设计过程中随时可用
import DataSupplier from 'sketch/data-supplier';
// 常用的UI操作,例如:展示message/alert提示信息、获取用户输入等等
import UI from 'sketch/ui';
// 获取/保存用户的自定义数据
import Settings from 'sketch/settings';
// 包含以上5个模块的所有内容
import Sketch from 'sketch';
注意:sketch package 涵盖了所有内容,体积比较大,不建议直接引用。大家可根据实际场景按需引入以上 5 个独立的模块。
import SketchDom from 'sketch/dom';
import UI from 'sketch/ui';
const strArray = [];
// 递归获取每个层级图层中的文本内容,并存储到strArray数组中
const getTextValue = (layers) => {
  if (layers.length) {
    layers.forEach(layer => {
      const { type, layers: subLayers = [] } = layer;
      if (type === 'Text') {
        strArray.push(layer.text);
      }
      if (subLayers.length) {
        getTextValue(subLayers);
      }
    });
  }
}
// 堆代码 duidaima.com
// 用message提示信息的方式展示获取到的文本内容
const print = () => {
  UI.message('已选择的文本内容:' + strArray.toString());
}

export default () => {
  const doc = SketchDom.getSelectedDocument(); // 获取已选中的文档
  const layers = doc.selectedLayers.layers; // 获取已选中的图层
  getTextValue(layers);
  print(strArray);
};
Actions
// 1. 在 manifest.json 文件中注册 Action
"commands": [
    {
      "name": "Actions",
      "identifier": "sketch-plugin-demo.actions",
      "script": "./actions.js",
      "handlers": {
        "actions": {
          "StartUp": "onStartUp",
          "Shutdown": "onShutdown"
        }
      }
    }
]

// 2. 在命令对应的js文件中,定义Action的回调函数
export const onStartUp = context => {
  UI.message('Sketch-plugin-demo 插件已启动');
}
export const onShutdown = context => {
  UI.message('Sketch-plugin-demo 插件已被禁用');
}
Contextselection:当前选中的所有图层
skpm create my-plugin-with-webview --template=skpm/with-webview关于目录结构,前面也有提到过,WebView 相关文件都是存放在 resources 目录下统一管理。但这边有个小坑,通过 Webpack 编译构建后的 JS 文件会自动加上 resources_ 前缀。例如:webview.js 编译后会变成 resources_webview.js。所以,在 HTML 中引用 JS 时,也特别要注意这个点。
const createWebView = () => {
  // options配置信息
  const options = {
    identifier: 'my-plugin-with-webview.webview',
    title: 'This is a WebView',
    width: 600,
    height: 200,
    resizable: true
  };
  // 新建WebView窗口
  const browserWindow = new BrowserWindow(options);
  // 页面载入完成后才显示弹窗,避免窗口白屏
  browserWindow.once('ready-to-show', () => {
    browserWindow.show()
  });
  const webContents = browserWindow.webContents;
  // 页面载入完成后提示信息
  webContents.on('did-finish-load', () => {
    UI.message('UI loaded!');
  });
    // 装载HTML页面
  browserWindow.loadURL(require('../resources/webview.html'));
};
WebView和插件之间的通信// On the plugin
webContents
.executeJavaScript(`setRandomNumber(${Math.random()})`)
.catch(console.error)
// On the WebView
window.setRandomNumber = (randomNumber) => {
document.getElementById('answer').innerHTML = 'Random number from the plugin: ' + randomNumber
};
WebView 发送消息给插件// On the webview
window.postMessage('nativeLog', 'Called from the webview');
// On the plugin
import UI from 'sketch/ui';
webContents.on('nativeLog', s => {
UI.message(s);
});
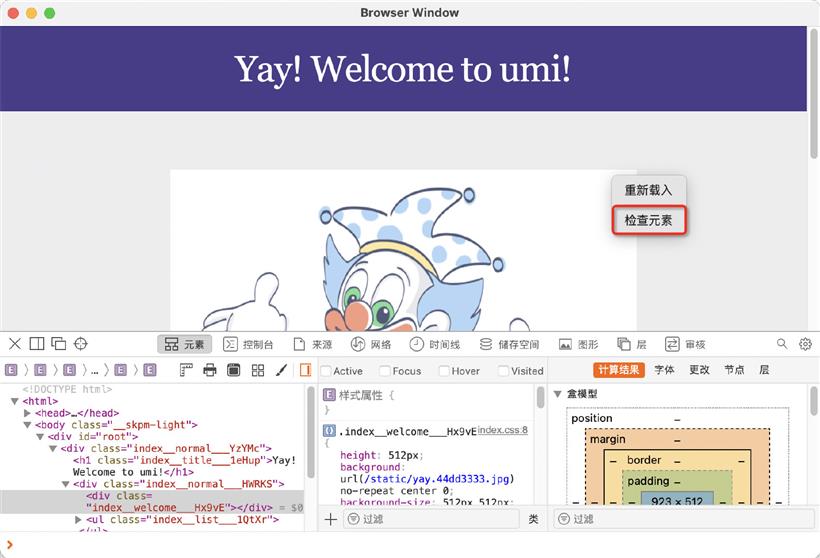
WebView 调试defaults write com.bohemiancoding.sketch3 WebKitDeveloperExtras -bool YES
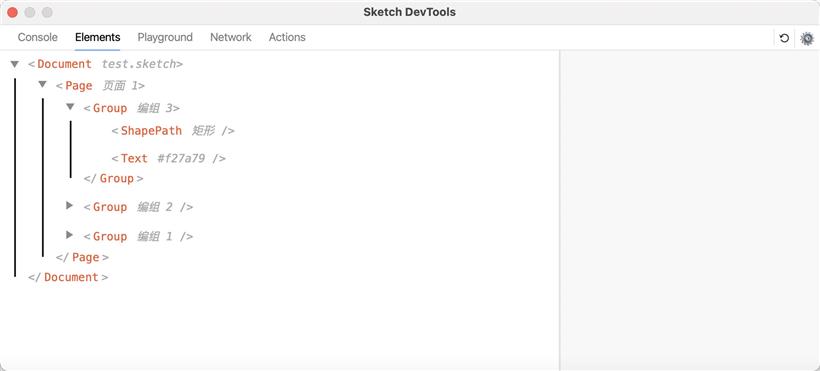
import SketchDom from 'sketch/dom';
import UI from 'sketch/ui';
import Mock from 'mockjs';
const Random = Mock.Random;
export default () => {
const doc = SketchDom.getSelectedDocument(); // 获取已选中文档
const layers = doc.selectedLayers.layers; // 获取已选择图层
if (layers.length) {
layers.forEach(layer => {
const { type, layers: subLayers = [] } = layer;
if (type === 'Group') {
subLayers.forEach(subLayer => {
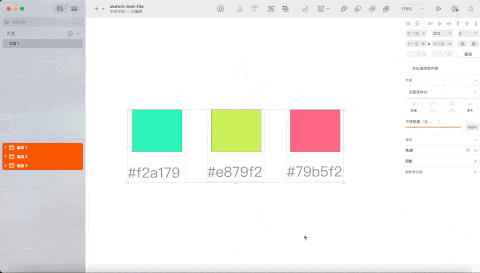
const randomColor = Random.hex(); // 随机生成RGB色值
if (subLayer.type === 'ShapePath') {
subLayer.style.fills[0].color = randomColor; // 更新矩形颜色
}
if (subLayer.type === 'Text') {
subLayer.text = randomColor; // 更新文本内容为RGB色值
}
});
}
});
} else {
UI.message('当前没有元素被选中,请选择');
}
};
场景 2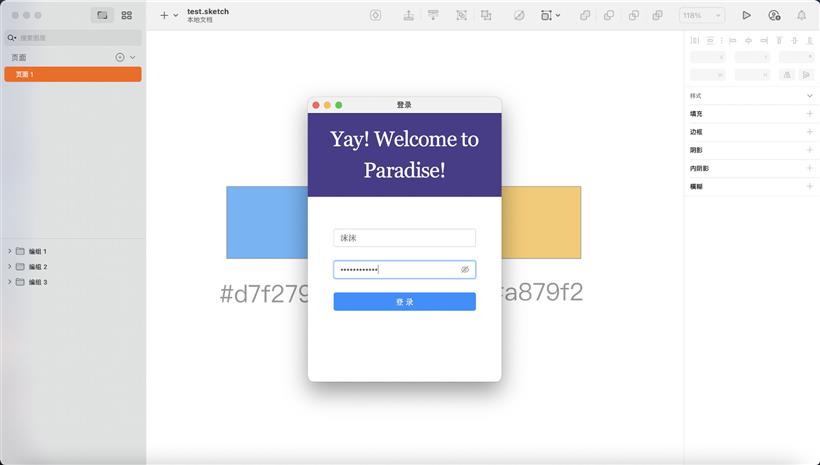
$ mkdir webview && cd webview1.2基于 Umi 模板新建工程,这边我选择的脚手架类型是 app,引入框架包括 antd 和 dva
npm create umi1.3在 .umirc.js 文件中,添加以下配置
outputPath:‘../src/dist‘, // 打包构建输出的目录
exportStatic: {
  dynamicRoot: true // 静态自由部署
},
1.4在 webview/src/pages 目录下,新建 document.ejs 文件,Umi 约定默认以这个文件作为模板<!doctype html>
<html>
<head>
<meta charset="utf-8" />
<title>堆代码 duidaima.com</title>
</head>
<body>
<div id="root"></div>
</body>
</html>
1.5为便于开发调试,可本地启动 web 服务,然后 webview 装载此服务的页面,本地 web 代码更新会实时编译同步到 webview 中const webPage = `http://localhost:8000#${Math.random()}`;
browserWindow.loadURL(webPage)
2.这样一来,我们就可以愉快的使用 Umi 和 Ant Design 了import styles from './index.css';
import { Input, Button } from 'antd';
import { EyeInvisibleOutlined, EyeTwoTone } from '@ant-design/icons';
export default function () {
return (
<div className={styles.normal}>
<div>
<Input
className={styles.antdInput}
placeholder="请输入用户名"
/>
<Input.Password
className={styles.antdInput}
placeholder="请输入密码"
iconRender={visible => (visible ? <EyeTwoTone /> : <EyeInvisibleOutlined />)}
/>
<Button className={styles.antdBtn} type="primary">登录</Button>
</div>
</div>
);
}