- 联系我们
- duidaima.com 版权声明
- 闽ICP备2020021581号
-
 闽公网安备 35020302035485号
闽公网安备 35020302035485号

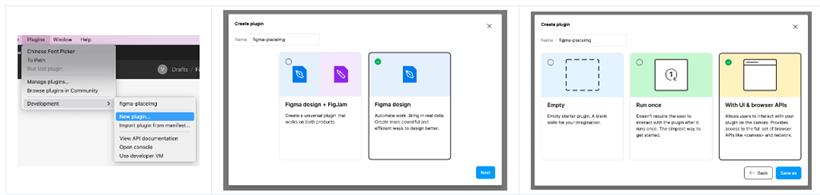
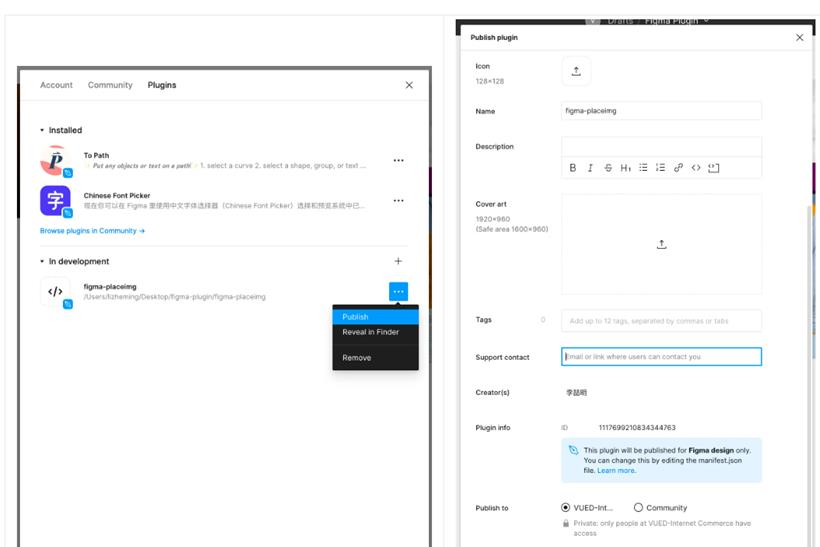
在 Figma 客户端中按照如上操作即可完成插件的初始化。除了默认的三个例子之外,官方也有一个示例插件的仓库,也可以参考。
https://github.com/figma/plugin-samples├── README.md ├── code.js ├── code.ts ├── manifest.json ├── package-lock.json ├── package.json ├── tsconfig.json └── ui.htmlmanifest.json
{
  "name": "figma-placeimg",
  "id": "1117699210834344763",
  "api": "1.0.0",
  "main": "code.js",
  "editorType": [
    "figma"
  ],
  "ui": "ui.html"
}
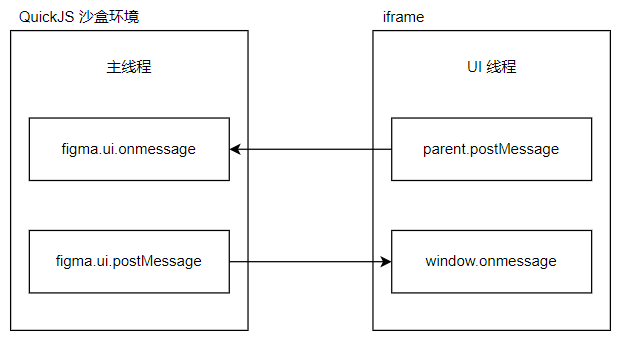
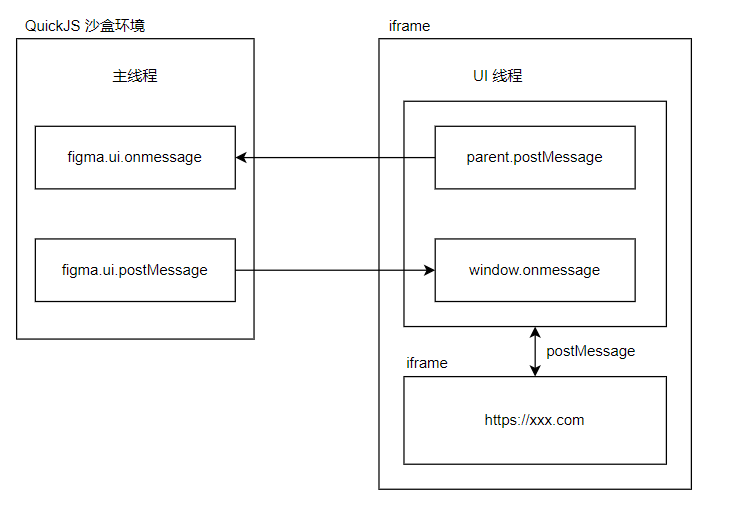
其中重点的是 main 和 ui 两个字段:ui: 指定插件的 UI 代码文件,该文件中的代码会运行在 iframe 中。实际上,UI 代码文件的内容会作为字符串传递给 figma 内置变量 __html__,在沙箱内可以通过 figma.showUI(__html__) 创建 iframe。
<link rel="stylesheet" href="https://unpkg.com/figma-plugin-ds@1.0.1/dist/figma-plugin-ds.css">
<style>
.content { display: flex; }
.icon--swap { animation: rotate 1s linear infinite; }
.hide { display: none; }
@keyframes rotate {
0% { transform: rotate(0deg); }
100% { transform: rotate(360deg); }
}
</style>
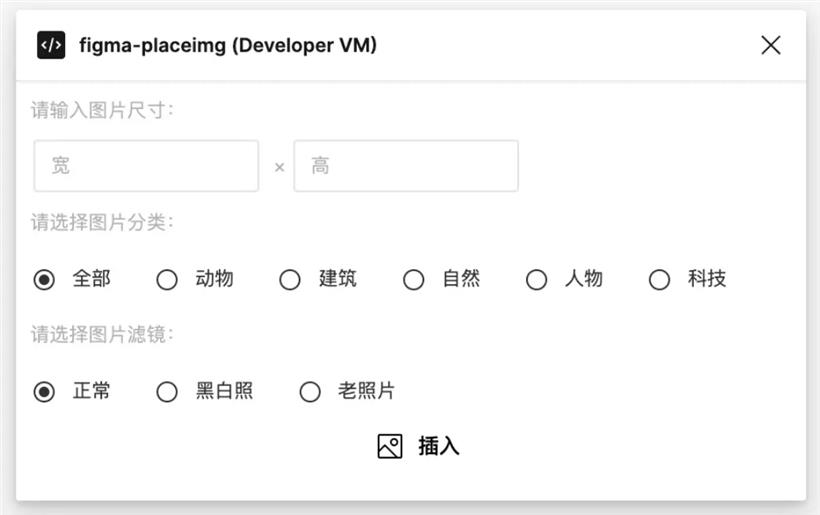
<div id="app">
<div class="field">
<label for="" class="label">请输入图片尺寸:</label>
<div class="content" style="padding-left: 10px;">
<div class="input">
<input type="input" class="input__field" placeholder="宽" name="width">
</div>
<div class="label" style="flex:0;">×</div>
<div class="input">
<input type="input" class="input__field" placeholder="高" name="height">
</div>
</div>
</div>
<div class="field">
<label for="" class="label">请选择图片分类:</label>
<div class="content">
<div class="radio">
<input id="radioButton1" type="radio" class="radio__button" value="any" name="category" checked>
<label for="radioButton1" class="radio__label">全部</label>
</div>
<div class="radio">
<input id="radioButton2" type="radio" class="radio__button" value="animals" name="category" >
<label for="radioButton2" class="radio__label">动物</label>
</div>
<div class="radio">
<input id="radioButton3" type="radio" class="radio__button" value="arch" name="category" >
<label for="radioButton3" class="radio__label">建筑</label>
</div>
<div class="radio">
<input id="radioButton4" type="radio" class="radio__button" value="nature" name="category" >
<label for="radioButton4" class="radio__label">自然</label>
</div>
<div class="radio">
<input id="radioButton5" type="radio" class="radio__button" value="people" name="category" >
<label for="radioButton5" class="radio__label">人物</label>
</div>
<div class="radio">
<input id="radioButton6" type="radio" class="radio__button" value="tech" name="category" >
<label for="radioButton6" class="radio__label">科技</label>
</div>
</div>
</div>
<div class="field">
<label for="" class="label">请选择图片滤镜:</label>
<div class="content">
<div class="radio">
<input id="radioButton7" type="radio" class="radio__button" value="none" name="filter" checked>
<label for="radioButton7" class="radio__label">正常</label>
</div>
<div class="radio">
<input id="radioButton8" type="radio" class="radio__button" value="grayscale" name="filter" >
<label for="radioButton8" class="radio__label">黑白照</label>
</div>
<div class="radio">
<input id="radioButton9" type="radio" class="radio__button" value="sepia" name="filter" >
<label for="radioButton9" class="radio__label">老照片</label>
</div>
</div>
</div>
<div class="field" style="padding:0 10px;">
<div id="create" class="icon-button" style="width: 100%;">
<div class="icon icon--image"></div>
<div class="type type--small type--medium type--inverse">插入</div>
</div>
<div class="icon-button loading hide" style="width: 100%;">
<div class="icon icon--swap"></div>
</div>
</div>
</div>
<!--堆代码 duidaima.com -->
<script>
async function loadImage(url) {
  const resp = await fetch('http://localhost:3000/' + url);
  const buffer = await resp.arrayBuffer();
  return new Uint8Array(buffer);
}

document.getElementById('create').onclick = async (e) => {
  const width = parseInt(document.querySelector('input[name="width"]').value);
  const height = parseInt(document.querySelector('input[name="height"]').value);
  const category = document.querySelector('input[name="category"]:checked').value;
  const filter = document.querySelector('input[name="filter"]:checked').value;
  const loading = document.querySelector('.icon-button.loading');

  e.target.classList.add('hide');
  loading.classList.remove('hide');

  const imgBytes = await loadImage(`https://placeimg.com/${width}/${height}/${category}/${filter}`);
  parent.postMessage({ pluginMessage: { type: 'insert', bytes: imgBytes, width: width, height: height } }, '*');

  loading.classList.add('hide');
  e.target.classList.remove('hide');
}
</script>
由于 UI 线程是一个纯 Web 环境,当我们使用 XMLHttpRequest 或者 fetch 发送请求的时候,肯定会碰到跨域的问题。按照文档 https://www.figma.com/plugin-docs/making-network-requests/ 提供的解决办法,我们只能依靠服务端加层代理来解决。// code.ts
function fetch(url, options) {
const html = `<script>
fetch(${url}, ${JSON.stringify(options)}).then(resp => resp.json()).then(resp => parent.sendMessage({
pluginMessage: { type: 'networkRequest', data: resp }
});
</script>`;
return new Promise(resolve => {
figma.ui.on('message', msg =>
msg.type === 'networkRequest' && resolve(msg.data)
);
figma.ui.show(html, { visible: false });
});
}
插入图片figma.ui.onmessage = msg => {
if (msg.type === 'insert') {
const rectNode = figma.createRectangle();
const image = figma.createImage(msg.bytes);
rectNode.name = 'Image';
rectNode.resize(msg.width, msg.height);
rectNode.fills = [{
imageHash: image.hash,
scaleMode: 'FILL',
scalingFactor: 0.5,
type: 'IMAGE'
}];
figma.currentPage.appendChild(rectNode);
figma.currentPage.selection = [rectNode];
figma.viewport.scrollAndZoomIntoView([rectNode]);
}
figma.closePlugin();
};
除了需要显示的调用 figma.ui.show 来展示 UI 之外,在执行完插件后需要显示的调用 figma.closePlugin() 告知 Figma 进行关闭插件操作。// code.ts
function initSelectionState() {
if (figma.currentPage.selection.length === 1 && figma.currentPage.selection[0].type === 'RECTANGLE') {
const rectNode = figma.currentPage.selection[0];
figma.ui.postMessage({ type: 'update', width: rectNode.width, height: rectNode.height });
}
}
figma.on('selectionchange', initSelectionState);
initSelectionState();
通过在主线程中监听 selectionchange 事件,我们能实时获取到当前选中的元素。我们将尺寸信息发送到 UI 线程后让其填充到输入框中称为默认值。window.onmessage = function(e) {
if (e.data.pluginMessage.type === 'update') {
document.querySelector('input[name="width"]').value = e.data.pluginMessage.width;
document.querySelector('input[name="height"]').value = e.data.pluginMessage.height;
}
}
最后再插入的时候,我们也需要判断如果有选中矩形的话则优先使用选中的矩形,而不是新增矩形。let rectNode: RectangleNode;
if (figma.currentPage.selection.length === 1 && figma.currentPage.selection[0].type === 'RECTANGLE') {
rectNode = figma.currentPage.selection[0];
} else {
rectNode = figma.createRectangle();
}
// const rectNode = figma.createRectangle();
// ui.html
parent.postMessage({ pluginMessage: { type: 'MAIN_CODE', code: 'console.log(figma)' } });
// code.ts
figma.ui.onmessage = (msg) => {
  msg.type === 'MAIN_CODE' && eval(msg.code);
}