- 联系我们
- duidaima.com 版权声明
- 闽ICP备2020021581号
-
 闽公网安备 35020302035485号
闽公网安备 35020302035485号

var add = require('./a.js');
add(1,2)
简单看来 require 其实就是一个函数,引用的 ./a.js 只是函数的一个参数。在这里我们可以认为 exports 是一个对象,MDN export 可以看下具体用法。
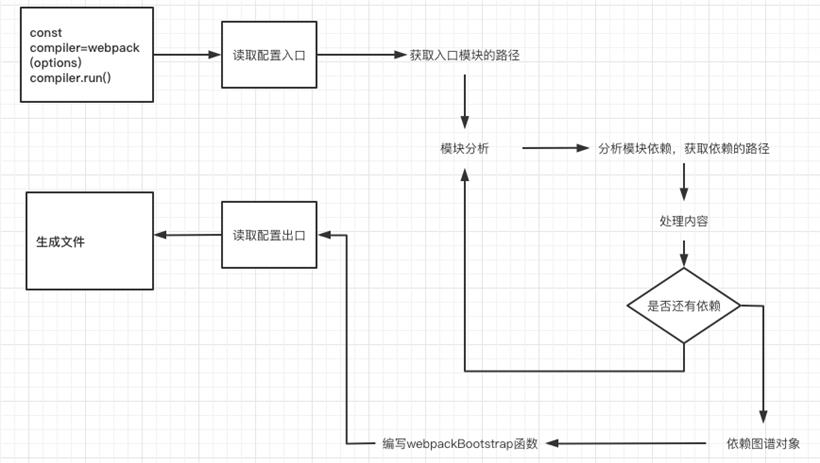
了解了require 和 exports,接下来我们就可以开始打包
我们先看看下面我们打包后的代码结构,我们可以发现经过打包后会出现 require 和 exports。并不是所有的浏览器都能执行 require exports,必须自己去实现一下 require 和 exports 才能保证代码的正常运行。打包后的代码就是一个自执行函数,参数有依赖信息,以及文件的 code,执行的函数体通过 eval 执行 code。
const path = require("path");
module.exports = {
  entry: "./src/index.js",
  output: {
    path: path.resolve(__dirname, "./dist"),//打包后输出的文件地址,需要绝对路径因此需要path
    filename:"main.js"
  },
  mode:"development"
第二步:模块分析import { str } from "./a.js";
console.log(`${str} Webpack`)
a.js文件import { b} from "./b.js"
export const str = "hello"
b.js 文件export const b="bbb"
    const content = fs.readFileSync(entryFile, "utf-8");
    const ast = parser.parse(content, { sourceType: "module" });

    const dirname = path.dirname(entryFile);
    const dependents = {};
    traverse(ast, {
      ImportDeclaration({ node }) {
        // 堆代码 duidaima.com
        // 过滤出import
        const newPathName = "./" + path.join(dirname, node.source.value);
        dependents[node.source.value] = newPathName;
      }
    })
    const { code } = transformFromAst(ast, null, {
      presets: ["@babel/preset-env"]
    })
    return {
      entryFile,
      dependents,
      code
    }
结果如下:
 for (let i = 0; i < this.modules.length; i++) {
      const item = this.modules[i];
      const { dependents } = item;
      if (dependents) {
        for (let j in dependents) {

          this.modules.push(this.parse(dependents[j]));
        }

      }
    }
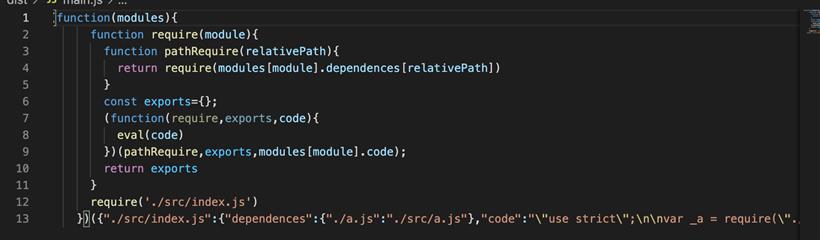
第三步:编写 WebpackBootstrap 函数+生成输出文件 file(code) {
const filePath = path.join(this.output.path, this.output.filename)
const newCode = JSON.stringify(code);
// 生成bundle文件内容
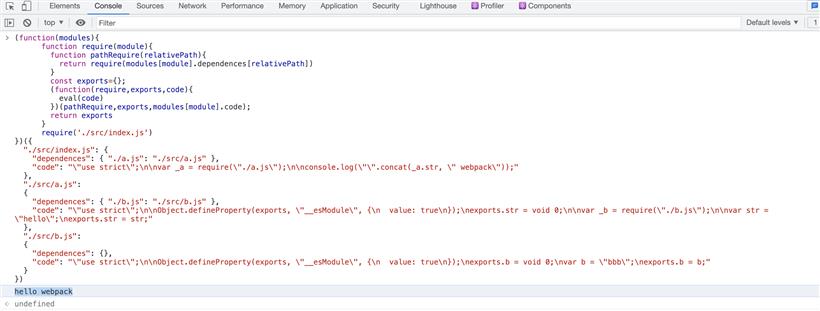
const bundle = `(function(modules){
function require(module){
function pathRequire(relativePath){
return require(modules[module].dependents[relativePath])
}
const exports={};
(function(require,exports,code){
eval(code)
})(pathRequire,exports,modules[module].code);
return exports
}
require('${this.entry}')
})(${newCode})`;
// WebpackBoostrap
// 生成文件。放入dist 目录
fs.writeFileSync(filePath,bundle,'utf-8')
}
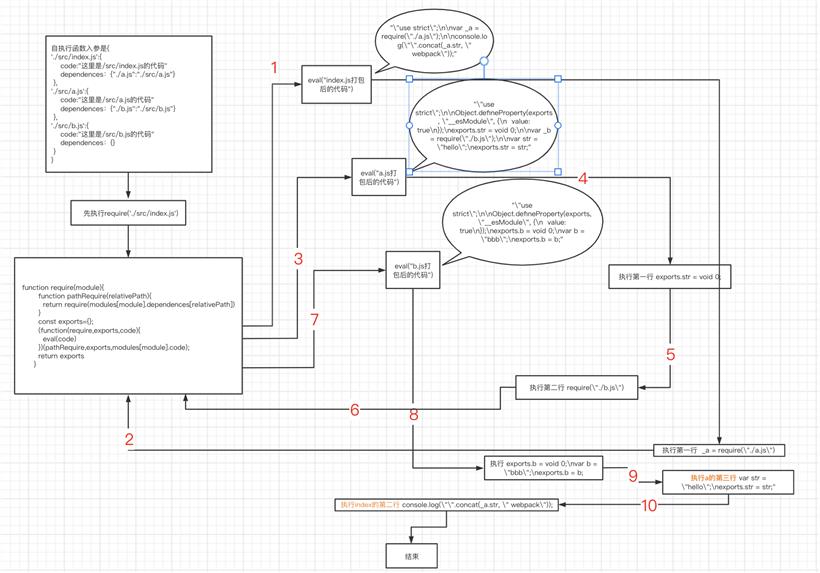
第四步:分析执行顺序