- 联系我们
- duidaima.com 版权声明
- 闽ICP备2020021581号
-
 闽公网安备 35020302035485号
闽公网安备 35020302035485号

import wx
import pandas as pd

# 假设这是你的实体类
class Person:
    def __init__(self, name, age, email):
        self.name = name
        self.age = age
        self.email = email

    def to_dict(self):
        return {"Name": self.name, "Age": self.age, "Email": self.email}

# 用一个 wxPython 窗口展示如何导出数据
class MyFrame(wx.Frame):
    def __init__(self, parent, title):
        super().__init__(parent, title=title, size=(300, 200))

        self.panel = wx.Panel(self)
        self.button = wx.Button(self.panel, label="导出到Excel", pos=(50, 50))

        # 创建一些实体类数据
        self.person_list = [
            Person("Alice", 30, "alice@example.com"),
            Person("Bob", 25, "bob@example.com"),
            Person("Charlie", 35, "charlie@example.com")
        ]

        self.Bind(wx.EVT_BUTTON, self.export_to_excel, self.button)
        self.Show()

    def export_to_excel(self, event):
        # 将实体类列表转换为字典列表
        data = [person.to_dict() for person in self.person_list]

        # 使用 pandas 导出到 Excel
        df = pd.DataFrame(data)
        df.to_excel("exported_data.xlsx", index=False)

        wx.MessageBox("导出成功!", "信息", wx.OK | wx.ICON_INFORMATION)
# 堆代码 duidaima.com
# 启动 wxPython 应用
app = wx.App(False)
frame = MyFrame(None, "导出实体类数据到 Excel")
app.MainLoop()
实体类 (Person):包含一些字段,如 name、age 和 email,并定义了 to_dict 方法,将实体对象转换为字典格式,以便更容易处理。import wx
from openpyxl import Workbook
from openpyxl.styles import Font, PatternFill
# 假设这是你的实体类
class Person:
def __init__(self, name, age, email):
self.name = name
self.age = age
self.email = email
def to_dict(self):
return {"Name": self.name, "Age": self.age, "Email": self.email}
# 用一个 wxPython 窗口展示如何导出数据
class MyFrame(wx.Frame):
def __init__(self, parent, title):
super().__init__(parent, title=title, size=(300, 200))
self.panel = wx.Panel(self)
self.button = wx.Button(self.panel, label="导出到Excel", pos=(50, 50))
# 创建一些实体类数据
self.person_list = [
Person("Alice", 30, "alice@example.com"),
Person("Bob", 25, "bob@example.com"),
Person("Charlie", 35, "charlie@example.com")
]
self.Bind(wx.EVT_BUTTON, self.export_to_excel, self.button)
self.Show()
def export_to_excel(self, event):
# 将实体类列表转换为字典列表
data = [person.to_dict() for person in self.person_list]
# 创建 Excel 工作簿和工作表
wb = Workbook()
ws = wb.active
ws.title = "People Data"
# 设置标题行并加粗背景色
titles = ["Name", "Age", "Email"]
ws.append(titles)
# 设置标题样式:加粗和背景色
title_font = Font(bold=True)
title_fill = PatternFill(start_color="FFFF00", end_color="FFFF00", fill_type="solid") # 黄色背景
for cell in ws[1]:
cell.font = title_font
cell.fill = title_fill
# 填充数据
for person in data:
ws.append([person["Name"], person["Age"], person["Email"]])
# 保存到文件
wb.save("exported_data_with_styles.xlsx")
wx.MessageBox("导出成功!", "信息", wx.OK | wx.ICON_INFORMATION)
# 启动 wxPython 应用
app = wx.App(False)
frame = MyFrame(None, "导出实体类数据到 Excel")
app.MainLoop()
Excel 在 openpyxl 中可以设置自适应列宽或者指定具体的列宽,甚至可以设置框架(边框样式)。虽然 openpyxl 本身并没有直接提供“自动调整列宽”的功能,但我们可以通过遍历列中的所有单元格来计算每列的最大宽度,然后动态调整列宽。import wx
from openpyxl import Workbook
from openpyxl.styles import Font, PatternFill, Border, Side
# 假设这是你的实体类
class Person:
def __init__(self, name, age, email):
self.name = name
self.age = age
self.email = email
def to_dict(self):
return {"Name": self.name, "Age": self.age, "Email": self.email}
# 用一个 wxPython 窗口展示如何导出数据
class MyFrame(wx.Frame):
def __init__(self, parent, title):
super().__init__(parent, title=title, size=(300, 200))
self.panel = wx.Panel(self)
self.button = wx.Button(self.panel, label="导出到Excel", pos=(50, 50))
# 创建一些实体类数据
self.person_list = [
Person("Alice", 30, "alice@example.com"),
Person("Bob", 25, "bob@example.com"),
Person("Charlie", 35, "charlie@example.com")
]
self.Bind(wx.EVT_BUTTON, self.export_to_excel, self.button)
self.Show()
def export_to_excel(self, event):
# 将实体类列表转换为字典列表
data = [person.to_dict() for person in self.person_list]
# 创建 Excel 工作簿和工作表
wb = Workbook()
ws = wb.active
ws.title = "People Data"
# 设置标题行并加粗背景色
titles = ["Name", "Age", "Email"]
ws.append(titles)
# 设置标题样式:加粗和背景色
title_font = Font(bold=True)
title_fill = PatternFill(start_color="FFFF00", end_color="FFFF00", fill_type="solid") # 黄色背景
for cell in ws[1]:
cell.font = title_font
cell.fill = title_fill
# 填充数据
for person in data:
ws.append([person["Name"], person["Age"], person["Email"]])
# 设置列宽(手动指定或根据内容自适应)
# 自动调整列宽
for col in ws.columns:
max_length = 0
column = col[0].column_letter # 获取列字母
for cell in col:
try:
if len(str(cell.value)) > max_length:
max_length = len(cell.value)
except:
pass
adjusted_width = (max_length + 2)
ws.column_dimensions[column].width = adjusted_width
# 设置框架(边框)
border = Border(
left=Side(border_style="thin"),
right=Side(border_style="thin"),
top=Side(border_style="thin"),
bottom=Side(border_style="thin")
)
for row in ws.iter_rows():
for cell in row:
cell.border = border
# 保存到文件
wb.save("exported_data_with_styles_and_borders.xlsx")
wx.MessageBox("导出成功!", "信息", wx.OK | wx.ICON_INFORMATION)
# 启动 wxPython 应用
app = wx.App(False)
frame = MyFrame(None, "导出实体类数据到 Excel")
app.MainLoop()
点击“导出到Excel”按钮后,程序将生成一个包含:.标题行加粗并带黄色背景色的 Excel 文件。
.filename:保存的文件名。
import wx
from openpyxl import Workbook
from openpyxl.styles import Font, PatternFill, Border, Side

def export_to_excel(list_data, display_columns, column_mapping, filename):
    # 解析 display_columns 为列表
    display_columns = display_columns.split(',')

    # 获取映射后的标题
    headers = [column_mapping.get(col, col) for col in display_columns]

    # 创建 Excel 工作簿和工作表
    wb = Workbook()
    ws = wb.active
    ws.title = "Data"

    # 设置标题行并加粗背景色
    ws.append(headers)
    title_font = Font(bold=True)
    title_fill = PatternFill(start_color="FFFF00", end_color="FFFF00", fill_type="solid")  # 黄色背景
    for cell in ws[1]:
        cell.font = title_font
        cell.fill = title_fill

    # 填充数据
    for data_item in list_data:
        row = [data_item.get(col) for col in display_columns]
        ws.append(row)

    # 设置列宽(自动调整)
    for col in ws.columns:
        max_length = 0
        column = col[0].column_letter  # 获取列字母
        for cell in col:
            try:
                if len(str(cell.value)) > max_length:
                    max_length = len(cell.value)
            except:
                pass
        adjusted_width = (max_length + 2)
        ws.column_dimensions[column].width = adjusted_width

    # 设置框架(边框)
    border = Border(
        left=Side(border_style="thin"),
        right=Side(border_style="thin"),
        top=Side(border_style="thin"),
        bottom=Side(border_style="thin")
    )
    for row in ws.iter_rows():
        for cell in row:
            cell.border = border

    # 保存到文件
    wb.save(filename)
    return f"导出成功!文件已保存为 {filename}"
调用代码如下所示 def export(self, event):
display_columns = "name,age,email" # 需要导出的字段
column_mapping = {
"age": "年龄",
"email": "电子邮箱",
"name": "显示名称"
}
filename = "exported_data.xlsx" # 保存的文件名
result = export_to_excel(
[person.to_dict() for person in self.person_list],
display_columns,
column_mapping,
filename
)
wx.MessageBox(result, "信息", wx.OK | wx.ICON_INFORMATION)
你只需调用 export_to_excel 函数并传递数据、要导出的字段(display_columns)、字段映射(column_mapping)和保存的文件名(filename)。它会生成一个 Excel 文件,并按要求设置样式。在 openpyxl 中,自动调整列宽是通过检查列中内容的最大长度来实现的。如果你发现某一列(例如“年龄”列)的宽度过窄,可能是因为该列中的数据(例如数字)被视为较短的字符串,导致列宽过小。 # 设置列宽(自动调整)
for col in ws.columns:
max_length = 0
column = col[0].column_letter # 获取列字母
for cell in col:
try:
if cell.value:
cell_value = str(cell.value)
# 增加补偿宽度:如果是数字列,增加额外宽度
if isinstance(cell.value, (int, float)):
max_length = max(max_length, len(cell_value) + 2) # 数字列增加 2 的宽度
else:
max_length = max(max_length, len(cell_value))
except:
pass
adjusted_width = (max_length + 2) # 留出一些额外的空间
ws.column_dimensions[column].width = max(adjusted_width, 12) # 设置最小宽度为 12
列宽补偿:对于数字列(如 age 列),在计算最大长度时增加一个 +2 的补偿。这将确保数字列的列宽足够显示数字值。from pydantic import BaseModel
class UserDto(BaseModel):
name: str
age: int
email: str
# 创建一个 UserDto 实例
user = UserDto(name="Alice", age=30, email="alice@example.com")
# 使用 model_dump 将对象转换为字典
user_dict = user.model_dump()
print(user_dict)
在这个例子中,model_dump 会自动将 Pydantic 模型实例转换为字典,所有字段(即类的属性)都会成为字典的键,属性值成为字典的值。如果你有嵌套的 Pydantic 模型,model_dump 会自动递归地将嵌套模型转换为字典。如果你的项目中使用了 Pydantic,这种方法将非常简便高效。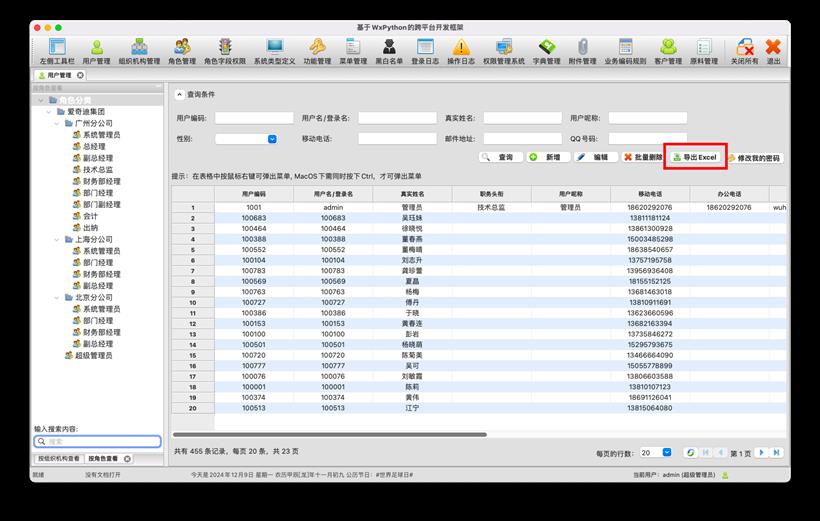
  btn_export = ControlUtil.create_button(
      pane, "导出Excel", "xls", handler=self.OnExport, is_async=True
  )
OnExport函数的实现如下所示。 async def OnExport(self, event: wx.Event) -> None:
"""导出数据"""
# 检查数据是否是一个 Pydantic 实体
export_list = []
for item in self.data:
if hasattr(item, "model_dump"):
export_item = item.model_dump()
export_list.append(export_item)
else:
export_list.append(item)
# print(export_list)
filename = FileDialogUtil.save_excel(self)
if not filename:
return
result = ExcelUtil.export_to_excel(
export_list, self.display_columns, self.column_mapping, filename
)
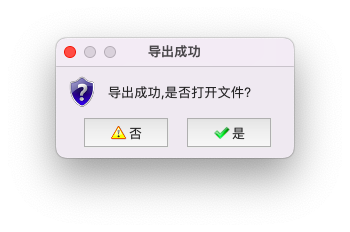
if result:
if (
MessageUtil.show_confirm(self, "导出成功,是否打开文件?", "导出成功")
== wx.ID_YES
):
ExcelUtil.open_file(filename)
else:
MessageUtil.show_error(self, "导出失败")
在MacOS上弹出导出提示,如下所示。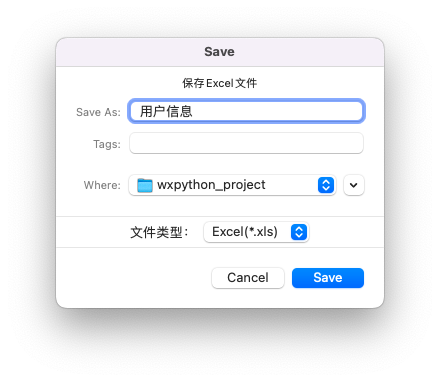

import subprocess

# 打开 .xls 文件
subprocess.run(["open", "your_file.xls"])
macOS 支持通过 os 模块调用系统命令来打开文件。可以通过 os.system() 或 subprocess.run() 来调用 open 命令,在 macOS 上打开文件。
import os

# 打开 .xls 文件
os.system("open your_file.xls")
通过 os.system("open your_file.xls") 或 subprocess.run(["open", "your_file.xls"]),你可以在 macOS 上使用默认的应用程序(如 Excel 或 Numbers)打开 .xls 文件。这些方法非常简单且不需要依赖外部库。import os
import subprocess
import platform
def open_file(file_path):
system = platform.system()
if system == "Darwin": # macOS
subprocess.run(["open", file_path])
elif system == "Windows":
os.startfile(file_path)
elif system == "Linux":
subprocess.run(["xdg-open", file_path])
else:
raise NotImplementedError(f"Unsupported operating system: {system}")
# 示例调用
open_file("your_file.xls")
说明: