- 联系我们
- duidaima.com 版权声明
- 闽ICP备2020021581号
-
 闽公网安备 35020302035485号
闽公网安备 35020302035485号

高阶组件HOC在React社区是非常常见的概念,但是在Vue社区中却是很少人使用。主要原因有两个:
1、Vue中一般都是使用SFC,实现HOC比较困难。
2、HOC能够实现的东西,在Vue2时代mixins能够实现,在Vue3时代Composition API能够实现。如果你不知道HOC,那么你平时绝对没有场景需要他。但是如果你知道HOC,那么在一些特殊的场景使用他就可以很优雅的解决一些问题。
HOC使用场景就是加强原组件。HOC实际就是一个函数,这个函数接收的参数就是一个组件,并且返回一个组件,返回的就是加强后组件。如下图:

export function useVip() {
  function getShowVipContent() {
    // 一些业务逻辑判断是否是VIP
    return false;
  }

  return {
    showVipContent: getShowVipContent(),
  };
}
然后再去每个具体的业务模块中去使用showVipContent变量判断,v-if="showVipContent"显示原模块,v-else显示引导开通会员UI。代码如下:<template>
<Block1
v-if="showVipContent"
:name="name1"
@changeName="(value) => (name1 = value)"
/>
<OpenVipTip v-else />
</template>
<script setup lang="ts">
import { ref } from "vue";
import Block1 from "./block1.vue";
import OpenVipTip from "./open-vip-tip.vue";
import { useVip } from "./useVip";
const { showVipContent } = useVip();
const name1 = ref("block1");
</script>
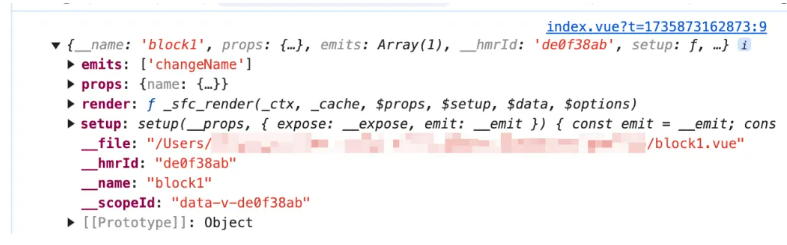
我们系统中有几十个这样的组件,那么我们就需要这样去改几十次。非常麻烦,如果有些模块是其他同事写的代码还很容易改错!!!而且现在流行搞SVIP,也就是光开通VIP还不够,需要再开通一个SVIP。当你后续接到SVIP需求时,你又需要去改这几十个模块。v-if="SVIP"显示某些内容,v-else-if="VIP"显示提示开通SVIP,v-else显示提示开通VIP。首先我们要明白Vue的组件经过编译后就是一个对象,对象中的props属性对应的就是我们写的defineProps。对象中的setup方法,对应的就是我们熟知的<script setup>语法糖。比如我使用console.log(Block1)将上面的import Block1 from "./block1.vue";给打印出来,如下图:
import { h } from"vue";
import OpenVipTip from"./open-vip-tip.vue";

exportdefaultfunction WithVip(BaseComponent: any) {
return {
    setup() {
      const showVipContent = getShowVipContent();
      function getShowVipContent() {
        // 一些业务逻辑判断是否是VIP
        returntrue;
      }

      return() => {
        return showVipContent ? h(BaseComponent) : h(OpenVipTip);
      };
    },
  };
}
在上面的代码中我们将会员相关的逻辑全部放在了WithVip函数中,这个函数接收一个参数BaseComponent,他是一个Vue组件对象。在setup方法中我们return了一个箭头函数,他会被当作render函数处理。如果showVipContent为true,就表明当前用户开通了VIP,就使用h函数渲染传入的组件。否则就渲染OpenVipTip组件,他是引导用户开通VIP的组件。<template> <EnhancedBlock1 /> </template> <script setup lang="ts"> import Block1 from "./block1.vue"; import WithVip from "./with-vip.tsx"; const EnhancedBlock1 = WithVip(Block1); </script>这个代码相比前面的hooks的实现就简单很多了,只需要使用高阶组件WithVip对原来的Block1组件包一层,然后将原本使用Block1的地方改为使用EnhancedBlock1。对原本的代码基本没有入侵。上面的例子只是一个简单的demo,他是不满足我们实际的业务场景。比如子组件有props、emit、插槽。还有我们在父组件中可能会直接调用子组件expose暴露的方法。
import { SetupContext, h } from"vue";
import OpenVipTip from"./open-vip-tip.vue";

exportdefaultfunction WithVip(BaseComponent: any) {
return {
    props: BaseComponent.props,  // 新增代码
    setup(props, { attrs, slots, expose }: SetupContext) {  // 新增代码
      const showVipContent = getShowVipContent();
      function getShowVipContent() {
        // 堆代码 duidaima.com
        // 一些业务逻辑判断是否是VIP
        returntrue;
      }

      return() => {
        return showVipContent
          ? h(BaseComponent, {
              ...props, // 新增代码
              ...attrs, // 新增代码
            })
          : h(OpenVipTip);
      };
    },
  };
}
在setup方法中接收的第一个参数就是props,没有在props中定义的属性就会出现在attrs对象中。所以我们调用h函数时分别将props和attrs透传给子组件。同时我们还需要一个地方去定义props,props的值就是直接读取子组件对象中的BaseComponent.props。所以我们给高阶组件声明一个props属性:props: BaseComponent.props,。<template>
<div class="divider">
<h1>{{ name }}</h1>
<button @click="handleClick">change name</button>
<slot />
这里是block1的一些业务代码
<slot name="footer" />
</div>
</template>
<script setup lang="ts">
const emit = defineEmits<{
changeName: [name: string];
}>();
const props = defineProps<{
name: string;
}>();
const handleClick = () => {
emit("changeName", `hello ${props.name}`);
};
defineExpose({
handleClick,
});
</script>
在上面的例子中,子组件有个默认插槽和name为footer的插槽。此时我们来看看高阶组件中如何处理插槽呢?import { SetupContext, h } from"vue";
import OpenVipTip from"./open-vip-tip.vue";
exportdefaultfunction WithVip(BaseComponent: any) {
return {
props: BaseComponent.props,
setup(props, { attrs, slots, expose }: SetupContext) {
const showVipContent = getShowVipContent();
function getShowVipContent() {
// 一些业务逻辑判断是否是VIP
returntrue;
}
return() => {
return showVipContent
? h(
BaseComponent,
{
...props,
...attrs,
},
slots // 新增代码
)
: h(OpenVipTip);
};
},
};
}
插槽的本质就是一个对象里面拥有多个方法,这些方法的名称就是每个具名插槽,每个方法的参数就是插槽传递的变量。这里我们只需要执行h函数时将slots对象传给h函数,就能实现插槽的透传(如果你看不懂这句话,那就等欧阳下篇插槽的文章写好后再来看这段话你就懂了)。我们在控制台中来看看传入的slots插槽对象,如下图:
export function h<P>(
  type: Component<P>,
  props?: (RawProps & P) | null,
  children?: RawChildren | RawSlots,
): VNode

export type RawSlots = {
  [name: string]: unknown
  // ...省略
}
所以我们可以直接把slots对象直接丢给h函数,就可以实现插槽的透传。import { SetupContext, h, ref } from"vue";
import OpenVipTip from"./open-vip-tip.vue";
exportdefaultfunction WithVip(BaseComponent: any) {
return {
props: BaseComponent.props,
setup(props, { attrs, slots, expose }: SetupContext) {
const showVipContent = getShowVipContent();
function getShowVipContent() {
// 一些业务逻辑判断是否是VIP
returntrue;
}
// 新增代码start
const innerRef = ref();
expose(
newProxy(
{},
{
get(_target, key) {
return innerRef.value?.[key];
},
has(_target, key) {
return innerRef.value?.[key];
},
}
)
);
// 新增代码end
return() => {
return showVipContent
? h(
BaseComponent,
{
...props,
...attrs,
ref: innerRef, // 新增代码
},
slots
)
: h(OpenVipTip);
};
},
};
}
在高阶组件中使用ref访问到子组件赋值给innerRef变量。然后expose一个Proxy的对象,在get拦截中让其直接去执行子组件中的对应的方法。比如在父组件中使用block1Ref.value.handleClick()去调用handleClick方法,由于使用了HOC,所以这里读取的handleClick方法其实是读取的是HOC中expose暴露的方法。所以就会走到Proxy的get拦截中,从而可以访问到真正子组件中expose暴露的handleClick方法。if (key in target) {
return target[key];
}
很明显我们这里的Proxy代理的原始对象里面什么都没有,执行key in target肯定就是false了。所以我们可以使用has去拦截key in target,意思是只要访问的方法或者属性是子组件中expose暴露的就返回true。至此,我们已经在HOC中覆盖了Vue中的所有场景。但是有的同学觉得h函数写着比较麻烦,不好维护,我们还可以将上面的高阶组件改为tsx的写法,with-vip.tsx文件代码如下:import { SetupContext, ref } from"vue";
import OpenVipTip from"./open-vip-tip.vue";
exportdefaultfunction WithVip(BaseComponent: any) {
return {
props: BaseComponent.props,
setup(props, { attrs, slots, expose }: SetupContext) {
const showVipContent = getShowVipContent();
function getShowVipContent() {
// 一些业务逻辑判断是否是VIP
returntrue;
}
const innerRef = ref();
expose(
newProxy(
{},
{
get(_target, key) {
return innerRef.value?.[key];
},
has(_target, key) {
return innerRef.value?.[key];
},
}
)
);
return() => {
return showVipContent ? (
<BaseComponent {...props} {...attrs} ref={innerRef}>
{slots}
</BaseComponent>
) : (
<OpenVipTip />
);
};
},
};
}
一般情况下h函数能够实现的,使用jsx或者tsx都能实现(除非你需要操作虚拟DOM)。import { SetupContext, onMounted, ref } from"vue";
exportdefaultfunction WithDiscount(BaseComponent: any, item: string) {
return {
props: BaseComponent.props,
setup(props, { attrs, slots, expose }: SetupContext) {
const discountInfo = ref("");
onMounted(async () => {
const res = await getDiscountInfo(item);
discountInfo.value = res;
});
function getDiscountInfo(item: any): Promise<string> {
// 根据传入的item获取折扣信息
returnnewPromise((resolve) => {
setTimeout(() => {
resolve("我是折扣信息1");
}, 1000);
});
}
const innerRef = ref();
expose(
newProxy(
{},
{
get(_target, key) {
return innerRef.value?.[key];
},
has(_target, key) {
return innerRef.value?.[key];
},
}
)
);
return() => {
return (
<div class="with-discount">
<BaseComponent {...props} {...attrs} ref={innerRef}>
{slots}
</BaseComponent>
{discountInfo.value ? (
<div class="discount-info">{discountInfo.value}</div>
) : null}
</div>
);
};
},
};
}
那么我们的父组件如果需要同时用VIP功能和折扣信息功能需要怎么办呢?代码如下:const EnhancedBlock1 = WithVip(WithDiscount(Block1, "item1"));如果不是VIP,那么这个模块的折扣信息也不需要显示了。因为高阶组件接收一个组件,然后返回一个加强的组件。利用这个特性,我们可以使用上面的这种代码将其组合起来。但是上面这种写法大家觉得是不是看着很难受,一层套一层。如果这里同时使用5个高阶组件,这里就会套5层了,那这个代码的维护难度就是地狱难度了。
const EnhancedBlock1 = compose(WithVip, WithDiscount("item1"))(Block1);
这样就舒服多了,所有的高阶组件都放在第一个括弧里面,并且由右向左去依次执行每个高阶组件HOC。如果某个高阶组件HOC需要除了组件之外的额外参数,像WithDiscount这样处理就可以了。很明显,我们的WithDiscount高阶组件的代码需要修改才能满足compose函数的需求,这个是修改后的代码:import { SetupContext, onMounted, ref } from"vue";
exportdefaultfunction WithDiscount(item: string) {
return(BaseComponent: any) => {
return {
props: BaseComponent.props,
setup(props, { attrs, slots, expose }: SetupContext) {
const discountInfo = ref("");
onMounted(async () => {
const res = await getDiscountInfo(item);
discountInfo.value = res;
});
function getDiscountInfo(item: any): Promise<string> {
// 根据传入的item获取折扣信息
returnnewPromise((resolve) => {
setTimeout(() => {
resolve("我是折扣信息1");
}, 1000);
});
}
const innerRef = ref();
expose(
newProxy(
{},
{
get(_target, key) {
return innerRef.value?.[key];
},
has(_target, key) {
return innerRef.value?.[key];
},
}
)
);
return() => {
return (
<div class="with-discount">
<BaseComponent {...props} {...attrs} ref={innerRef}>
{slots}
</BaseComponent>
{discountInfo.value ? (
<div class="discount-info">{discountInfo.value}</div>
) : null}
</div>
);
};
},
};
};
}
注意看,WithDiscount此时只接收一个参数item,不再接收BaseComponent组件对象了,然后直接return出去一个回调函数。准确的来说此时的WithDiscount函数已经不是高阶组件HOC了,他return出去的回调函数才是真正的高阶组件HOC。在回调函数中去接收BaseComponent组件对象,然后返回一个增强后的Vue组件对象。function compose(...funcs) {
return funcs.reduce((acc, cur) => (...args) => acc(cur(...args)));
}
这个函数虽然只有一行代码,但是乍一看,怎么看怎么懵逼,欧阳也是!!我们还是结合demo来看:const EnhancedBlock1 = compose(WithA, WithB, WithC, WithD)(View);假如我们这里有WithA、WithB、 WithC、 WithD四个高阶组件,都是用于增强组件View。compose中使用的是...funcs将调用compose函数接收到的四个高阶组件都存到了funcs数组中。然后使用reduce去遍历这些高阶组件,注意看执行reduce时没有传入第二个参数。