- 联系我们
- duidaima.com 版权声明
- 闽ICP备2020021581号
-
 闽公网安备 35020302035485号
闽公网安备 35020302035485号

CREATE TABLE `t_order` (
 `order_id` BIGINT ( 20 ) NOT NULL COMMENT "订单表分布式主健ID",
 `order_number` VARCHAR ( 255 ) NOT NULL COMMENT "订单号",
 `customer_id` BIGINT ( 20 ) NOT NULL COMMENT "用户ID",
 `order_date` date NOT NULL COMMENT "下单时间",
 `total_amount` DECIMAL ( 10, 2 ) NOT NULL COMMENT "订单金额",
    PRIMARY KEY ( `order_id` ) USING BTREE
);
有了这些基础信息,可以先来进行t_order表的分片配置了,不考虑其他因素,这里先Run起来!spring:
shardingsphere:
datasource:
# 数据源名称,多数据源以逗号分隔 ,放在第一个的数据源为未配置分片规则表的默认数据源
names: db0 , db1
# 名称与上边 names 保持一致
db0:
....
db1:
....
# 具体规则配置
rules:
sharding:
# 分片算法定义
sharding-algorithms:
# 自定义分片算法名称
t_order_database_algorithms:
# 分片算法类型
type: INLINE
# 自定义参数
props:
algorithm-expression: db$->{order_id % 2}
t_order_table_algorithms:
type: INLINE
props:
algorithm-expression: t_order_$->{order_id % 1000}
t_order_mod:
type: MOD
props:
# 指定分片数量
sharding-count: 1000
# 分布式序列算法配置
key-generators:
t_order_snowflake:
type: SNOWFLAKE
# 分布式序列算法属性配置
props:
worker-id: 1
tables:
# 逻辑表名称
t_order:
# 数据节点:数据库.分片表
actual-data-nodes: db$->{0..1}.t_order_$->{1..1000}
# 分库策略
database-strategy:
standard:
# 分片列名称
sharding-column: order_id
# 分片算法名称
sharding-algorithm-name: t_order_database_algorithms
# 分表策略
table-strategy:
standard:
# 分片列名称
sharding-column: order_id
# 分片算法名称
sharding-algorithm-name: t_order_table_algorithms
# 主键生成策略
keyGenerateStrategy:
column: order_id
keyGeneratorName: t_order_snowflake
# 属性配置
props:
# 展示修改以后的sql语句
sql-show: true
Java编码方式/**
* 堆代码 duidaima.com
*/
@Configuration
public class ShardingConfiguration {
/**
* 配置分片数据源
*/
@Bean
public DataSource getShardingDataSource() throws SQLException {
Map<String, DataSource> dataSourceMap = new HashMap<>();
dataSourceMap.put("db0", dataSource0());
dataSourceMap.put("db1", dataSource1());
// 分片rules规则配置
ShardingRuleConfiguration shardingRuleConfig = new ShardingRuleConfiguration();
// 分片算法
shardingRuleConfig.setShardingAlgorithms(getShardingAlgorithms());
// 配置 t_order 表分片规则
ShardingTableRuleConfiguration orderTableRuleConfig = new ShardingTableRuleConfiguration("t_order", "db${0..1}.t_order_${1..1000}");
orderTableRuleConfig.setTableShardingStrategy(new StandardShardingStrategyConfiguration("order_id", "t_order_table_algorithms"));
orderTableRuleConfig.setDatabaseShardingStrategy(new StandardShardingStrategyConfiguration("order_id", "t_order_database_algorithms"));
shardingRuleConfig.getTables().add(orderTableRuleConfig);
// 是否在控制台输出解析改造后真实执行的 SQL
Properties properties = new Properties();
properties.setProperty("sql-show", "true");
// 创建 ShardingSphere 数据源
return ShardingSphereDataSourceFactory.createDataSource(dataSourceMap, Collections.singleton(shardingRuleConfig), properties);
}
/**
* 配置数据源1
*/
public DataSource dataSource0() {
HikariDataSource dataSource = new HikariDataSource();
dataSource.setDriverClassName("com.mysql.cj.jdbc.Driver");
dataSource.setJdbcUrl("jdbc:mysql://127.0.0.1:3306/db0?useUnicode=true&characterEncoding=utf-8&useSSL=false&serverTimezone=Asia/Shanghai&allowPublicKeyRetrieval=true");
dataSource.setUsername("root");
dataSource.setPassword("123456");
return dataSource;
}
/**
* 配置数据源2
*/
public DataSource dataSource1() {
HikariDataSource dataSource = new HikariDataSource();
dataSource.setDriverClassName("com.mysql.cj.jdbc.Driver");
dataSource.setJdbcUrl("jdbc:mysql://127.0.0.1:3306/db1?useUnicode=true&characterEncoding=utf-8&useSSL=false&serverTimezone=Asia/Shanghai&allowPublicKeyRetrieval=true");
dataSource.setUsername("root");
dataSource.setPassword("123456");
return dataSource;
}
/**
* 配置分片算法
*/
private Map<String, AlgorithmConfiguration> getShardingAlgorithms() {
Map<String, AlgorithmConfiguration> shardingAlgorithms = new LinkedHashMap<>();
// 自定义分库算法
Properties databaseAlgorithms = new Properties();
databaseAlgorithms.setProperty("algorithm-expression", "db$->{order_id % 2}");
shardingAlgorithms.put("t_order_database_algorithms", new AlgorithmConfiguration("INLINE", databaseAlgorithms));
// 自定义分表算法
Properties tableAlgorithms = new Properties();
tableAlgorithms.setProperty("algorithm-expression", "db$->{order_id % 1000}");
shardingAlgorithms.put("t_order_table_algorithms", new AlgorithmConfiguration("INLINE", tableAlgorithms));
return shardingAlgorithms;
}
}
上面我们在应用中编写好了分片规则,现在就差在数据库实例中创建分片表了,手动创建和管理1000张分片表确实是一个又脏又累的活,反正我是不会干的!/**
* 自动创建分片表
*/
@SpringBootTest
class AutoCreateTablesTests {
@Resource
private JdbcTemplate jdbcTemplate;
/**
* 执行创建逻辑表的SQL,会根据AutoTables的配置自动在对应的数据源内创建分片表
* @author 公众号:程序员小富
*/
@Test
public void autoCreateOrderTableTest() {
jdbcTemplate.execute("CREATE TABLE `t_order` (\n" +
" `order_id` bigint(20) NOT NULL,\n" +
" `order_number` varchar(255) NOT NULL,\n" +
" `customer_id` bigint(20) NOT NULL,\n" +
" `order_date` date NOT NULL,\n" +
" `total_amount` decimal(10,2) NOT NULL,\n" +
" PRIMARY KEY (`order_id`) USING BTREE\n" +
");");
}
}
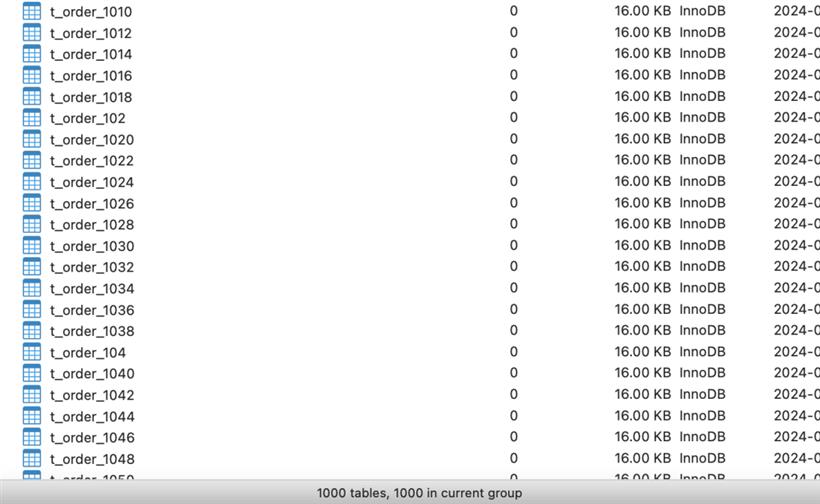
根据之前配置的分片规则,将会在两个数据库实例 db0 和 db1 中,分别生成1000张命名为t_order_1到t_order_1000的分片表,看到两个数据库均成功创建了1000张分片表。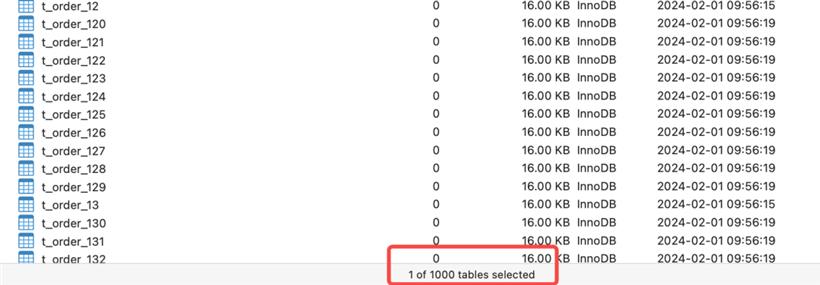
/**
 * 自动创建分片表
 * @date 2023/12/31 17:25
 */
@SpringBootTest
class AutoCreateTablesTests {
    @Resource
    private JdbcTemplate jdbcTemplate;

    @Test
    public void autoModifyOrderTableTest() {

        jdbcTemplate.execute("ALTER TABLE t_order MODIFY COLUMN order_number varchar(500);");
    }
}
通过查看两个分片库,我们成功地将所有分片表的order_number字段长度更改为了varchar(500),在控制台日志中,可以看到它是通过在每个分片库内依次执行了1000次命令实现的。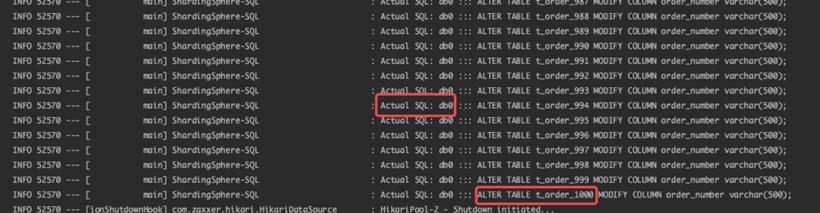
spring:
  shardingsphere:
    # 数据源配置
    datasource:
      ......
    # 具体规则配置
    rules:
      sharding:
        # 逻辑表分片规则
        tables:
          # 逻辑表名称
          t_order:
            .....
        # 自动分片表规则配置
        auto-tables:
          t_order: # 逻辑表名称
            actual-data-sources: db$->{0..1}
            sharding-strategy: # 切分策略
              standard: # 用于单分片键的标准分片场景
                sharding-column: order_id # 分片列名称
                sharding-algorithm-name: t_order_mod # 自动分片算法名称
ShardingSphere-Jdbc中配置使用auto-tables主要两个参数,actual-data-sources指定数据源分布,由于是管理分片表所以只需数据源信息即可;sharding-strategy指具体采用何种算法来进行分片。对逻辑表的DDL操作,系统会首先检查是否配置了AutoTable,如果已配置,则优先采用配置的规则;若未配置,则将使用默认的逻辑表分片规则。AUTO_INTERVAL:自动时间段分片算法
spring:
  shardingsphere:
    # 数据源配置
    datasource:
      .....
    # 具体规则配置
    rules:
      sharding:
        # 自动分片表规则配置
        auto-tables:
          t_order:
            actual-data-sources: db$->{0..1}
            sharding-strategy:
              standard:
                sharding-column: order_date
                sharding-algorithm-name: t_order_mod
        # 分片算法定义
        sharding-algorithms:
          t_order_mod:
            type: MOD
            props:
              # 指定分片数量
              sharding-count: 2000
还是执行刚才创建表的单元测试,会发现db0、db1两个实例中已经各自创建了1000张分片表,但你会发现1000张表已经不再是按照顺序创建的了。